Radial Magento2 Connector for ROM Installation Guide
The Radial Magento2 Connector for ROM Installation Guide explains how to install and configure Phase 2.0, Version 1.0 of the connector used to integrate ROM with Magento2.
Note: Click here for a PDF version of the Installation and Configuration Guide.
Module Installation Steps
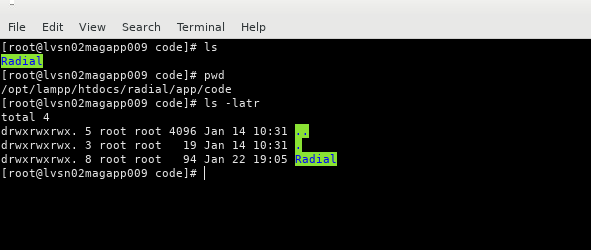
- Extract the downloaded archive into your app/code/ folder of the Magento root directory. On a command line, enter:
unzip folder.zip
tar -xvf folder.tgz
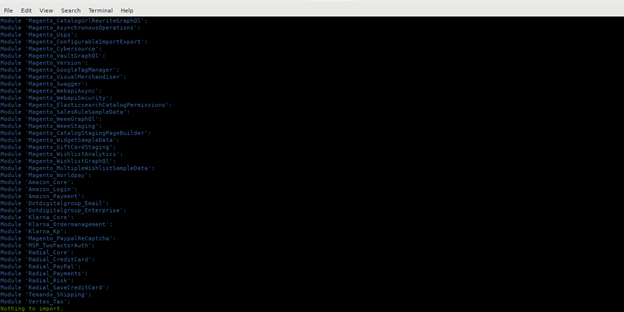
A folder is created in the app/code folder named “Radial” (app/code/Radial). This folder contains the following modules:
- Inventory
- OrderManagement
- Product
- Rma
- RomCore
- Storepickup
- CronSchedule

-
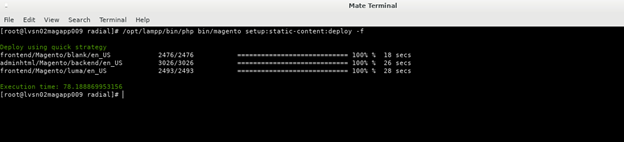
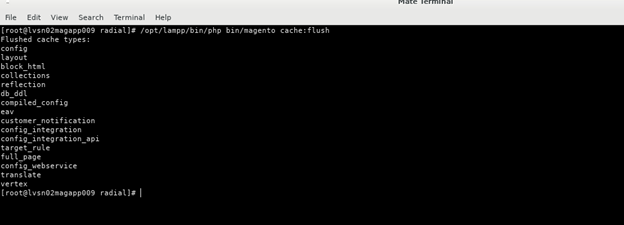
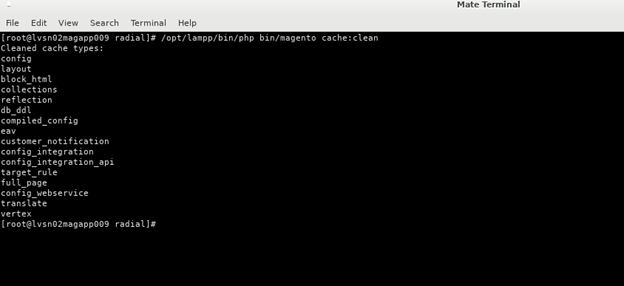
On the command line (cmd) in the project root folder, run the following Magento CLI commands:
-
php bin/magento setup:upgrade

-
php bin/magento setup:di:compile

-
php bin/magento setup:static-content:deploy -f

-
php bin/magento cache:flush

-
php bin/magento cache:clean
-
chmod -R 777 generated/ pub/static var/ var/log var/cache

-
-
After installing the modules, log in to the magento backend.


Radial ROM Core Admin Configuration
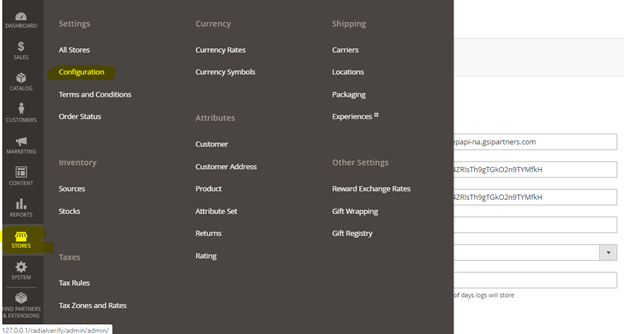
-
Navigate to the Radial ROM Tab on the Admin section:
Stores>Configuration
-
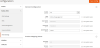
Navigate to Radial ROM>ROM Settings. The General Configuration screen appears.
- In the Enable field, select Yes.
- In the Store ID field, enter the ID provided by Radial.
- In the Environment field, select either Sandbox or Production.
- Enter the API URL in the Sandbox API URL field; for example, https://example.com/.
- Enter the API Key for Sandbox or Production in the applicable fields. Note: Radial provides these keys.
- Enter the Catalog Prefix provided by Radial.
- Enter the number of days for Save Log Days; for example, 30.
- Enter the Order Id Prefix provided by Radial.

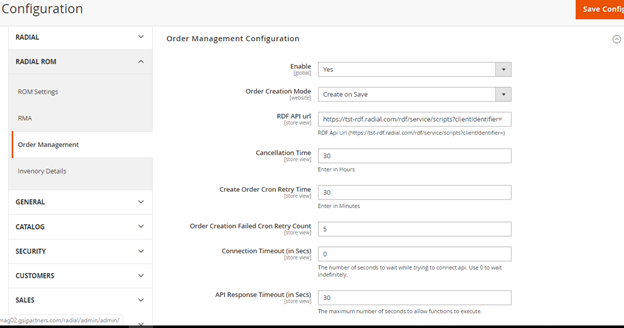
Order Management Admin Configuration
-
Navigate to Stores>Settings>Configuration.
-
In the side panel, select Radial ROM>Order Management. The Configuration screen appears.

-
Enter the settings as needed. The following table describes the available settings.
Setting Description Enable Select Yes to enable the Order Management module. Select No to disable the module. Order Creation Mode To place orders in ROM through a CRON running every minute, select Create on Schedule.
To place orders in ROM at the same time that orders are created in Magento, select Create on Save.
Cancellation Time Time limit in which an order can be cancelled, in minutes; for example, 30. Order Creation Failed Cron Retry Count If an order creation failed in ROM, a retry cron picks up the data tries to place the order, up to the specified number of times; for example, 5. Create Order Cron Retry Time Retry order cron picks the order to create in ROM only after the order is created in given minutes; for example, 30. Connection Timeout The number of seconds to wait while trying to connect. Use 0 to wait indefinitely. API Response Timeout The maximum number of seconds to allow API URLs to execute; for example, 30.
ROM Shipment Configuration
-
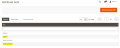
From the side menu, select ROM Settings>ROM Shipment.

Existing ROM shipping methods are listed.
-
To edit the name and code of an existing shipping method, click on the list.
-
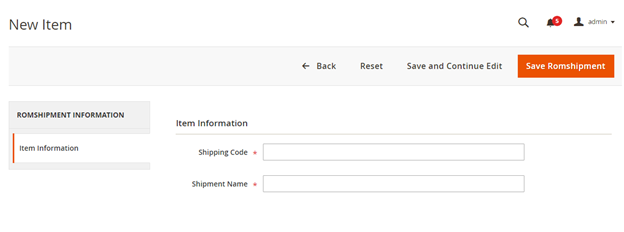
To add a new shipping method, click Add New. The New Item screen appears.

-
Enter the new shipping method code and name.
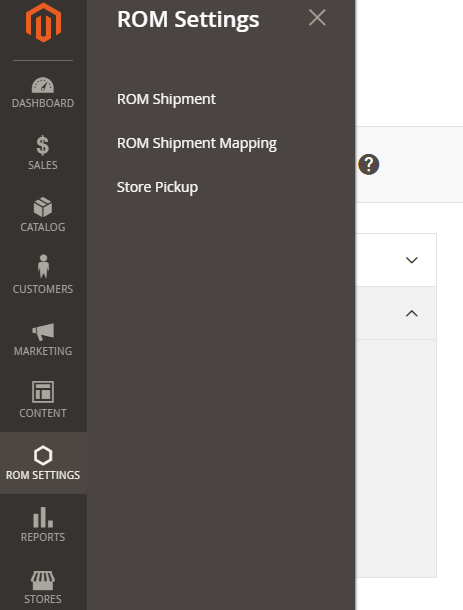

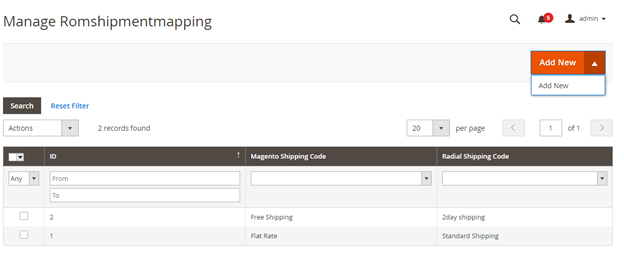
ROM Shipment Mapping
Use ROM Shipment Mapping to map active Magento shipping methods to Radial shipping methods. The Radial shipping method is sent in the Create Order API based on the Magento shipping code.
-
From the side menu, select ROM Settings>ROM Shipment Mapping. The Romshipmentmapping screen appears.

-
To edit existing mappings, click on the mapping.
-
To add a new mapping, click Add New. The New Item screen appears that displays the ROM Shipping Methods added through ROM Shipment.
-
Select the appropriate values from the Magento Shipping Code and Radial Shipping Code dropdowns. Based on the mapping, the corresponding Radial shipping method is assigned to the order in the Create Order API.

Inventory Admin Configuration
-
Navigate to Stores>Settings>Configuration.
-
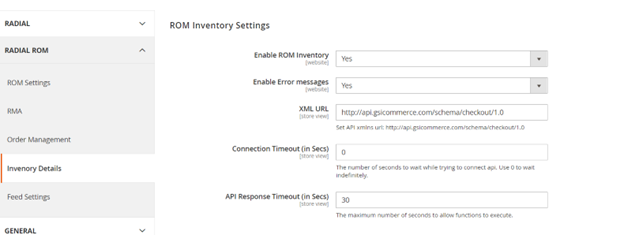
From the side panel, select Radial ROM>Inventory Details. The ROM Inventory Settings screen appears. Note: This screen shows the default configuration settings.
-
Enter the settings as needed. The following table describes the available settings.
Setting Description Enable ROM Inventory Enable the module to check inventory details. Enable Error Message To display error messages on the front end, select Yes. XML URL Radial API request attribute. The value is: http://api.gsicommerce.com/schema/checkout/1.0 API Response Timeout (in Secs) The number of seconds to wait for the API reponse; for example, 0. Connection Timeout (in Secs) The number of seconds to allow functions to execute; for example, 30. -
Save the configuration and flush the cache.
RMA Admin Configuration
-
Navigate to Stores>Settings>Configuration.
-
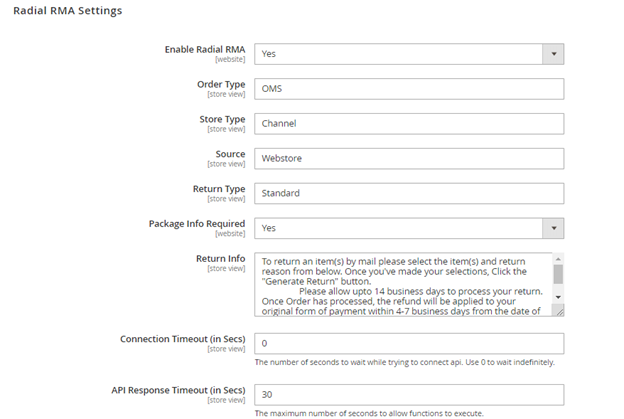
In the side panel, select Radial ROM>RMA. The Radial RMA Settings screen appears.

-
In the Enable Radial RMA field, select Yes. This selection enables the module and displays the return link on the Order View screen.
-
Add the following values as listed in the requirements.
Value Description Order Type The Order Type of the Radial RMA flow; for example, OMS. Store Type The Store Type of the Radial RMA flow; for example, Channel. Source The Source of the order; for example, Webstore. Return Type The type of the return; for example, Standard. Package Info Required Provides package information in the RMA Lookup. Radial recommends that you select Yes. Return Info Information for the shopper on how to return items. For example:
To return an item(s) by mail, select the item(s) and return reason. Once you've made your selections, click the "Generate Return" button.
Please allow up to 14 business days to process your return. Once your order has processed, the refund will be applied to your original form of payment within 4-7 business days from the date of confirmation, but could take up to 30 days depending on your financial institution.
API Response Timeout (in Secs) The number of seconds to wait for the API reponse; for example, 0. Connection Timeout (in Secs) The number of seconds to allow functions to execute; for example, 30. -
Save the configuration.
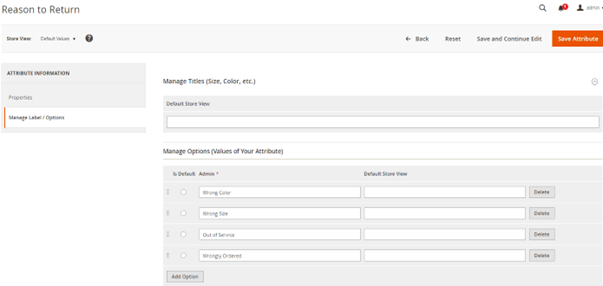
To create the Return Reason attribute:
-
Navigate to Stores>Attributes>Returns. The Reason to Return screen appears.

-
Select radial_reason>Manage Options.
-
To add a new reason, click Add Reason and enter the reason in the new field.
-
When you're finished adding return reasons, click Save Attribute and flush the cache.
Feeds Admin Configuration
-
Navigate to Stores>Settings>Configuration.
-
In the left panel, select Radial ROM>Feed Settings. The following screenshot shows the default values.
The following table describes the General Configuration settings and Product Mapping Values. Radial provides the values to be used.
Configuration Settings Description
Enable Enable the feeds. Host SFTP mailbox host address Username SFTP mailbox host username Password SFTP mailbox host password SyncFilepath SFTP mailbox Radial feeds location. The default value is \InBox. Radial may provide a different value; if so, update it. Product Mapping Value Description Standard GSI Version 5.2.1 VersionReleaseNumber 5.2.1 SourceID MAGT2NA Source Type CLIENT DestinationId GIS DestinationType PH Catalog Id 206 GSI Client Id MAGT2NA DeptNumber 403 SubDeptNumber
998
ClassNumber
1
SubClass
1
-
Save the configuration and flush the cache.
-
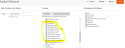
To add radial required attributes to an attribute set for pushing item master feed, select Stores>Attributes>Attribute Set. The Attribute Set screen appears, listing the available attribute sets.
-
Click the Radial attribute set name. The Radial Attribute screen appears.
-
Add required attributes from right side to left side under the product details tab by dragging from right to left. Add below required attributes to the attribute set and save the details. These are required MERCH product type.
-
Add required attributes for gift card product type as highlighted in the following screenshot.
Note: You can assign to existing attribute sets as well.
-
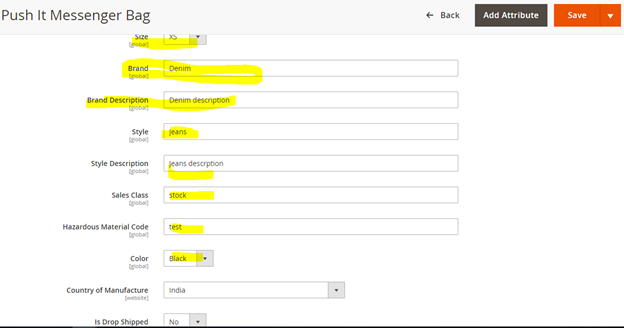
Update above attributes data in the product. The following example illustrates the attributes for a messenger bag.

-
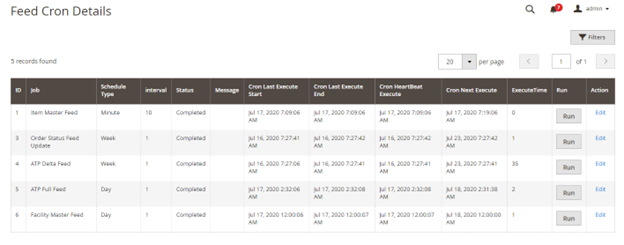
To set up the Feeds cron settings, select System>Data Transfer>Feed Cron settings. The Feeds Cron Details screen appears.
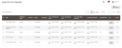
-
To edit a feed's cron details, click the Edit button in the applicable row. The following table lists the default configurations.
Feed Schedule Type Interval Start Time Example Item Master
Day
1
Start day of cron job (cron runs daily based on the hours value in Start Time)
2020-05-12 02:00:42
Order Status
Minutee
30
Start day of cron job
2020-05-12 02:00:42
ATP Delta
Minute
30
Start day of cron job
2020-05-12 02:00:42
ATP Full
Day
1
Start day of cron job (cron runs daily based on hours value in Start Time)
2020-05-12 02:00:42
Facility Master
Day
1
Start day of cron job (cron will run daily based on hours value in Start Time)
2020-05-12 02:00:42
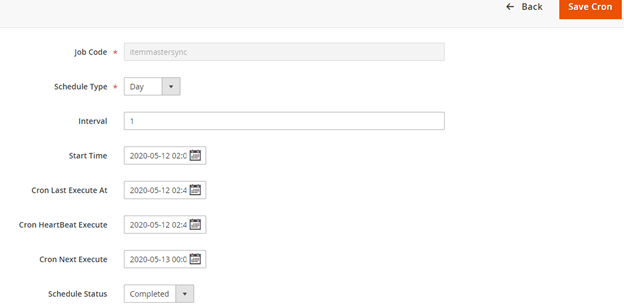
The following screenshot shows an example of editing a cron job.

-
To save your changes, click Save Cron.


Storepickup Admin Configuration
To enable store pickup, you must:
-
Configure the storepickup settings.
-
Enable storepickup for products.
-
Enable storepickup as a shipping method.
Configure Storepickup Settings
-
Navigate to Stores>Settings>Configuration.
-
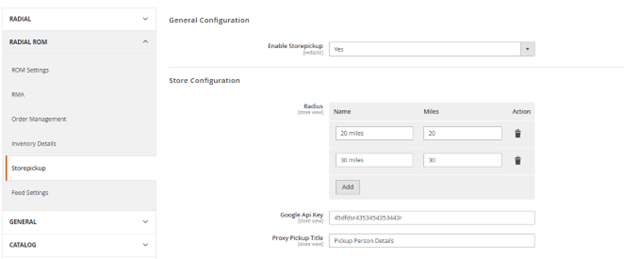
From the side panel, select Radial ROM>Storepickup. The Configuration screen appears.
-
In the Enable Storepickup field, select Yes.
-
In the Radius field, add mileage options to be displayed on Storepickup form. These values indicate the distance options that a shopper can choose from for picking up orders from a store.
-
In the Google Api Key field, enter the Google API key to find the nearest store.
-
In the Proxy Pickup Title field, enter the proxy pickup person details.
Enable Storepickup for Products
-
Navigate to Catalog>Products>Edit/Add Product.
-
In the Enable ISPU field, select Yes to show the storepickup option for that product.
-
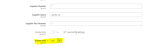
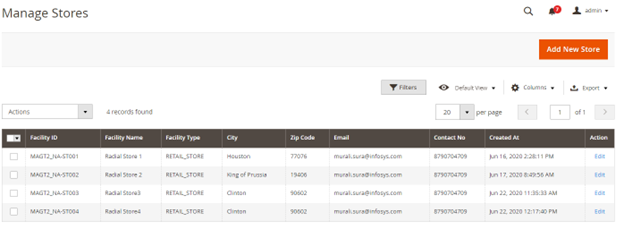
Navigate to ROM Settings>Store Pickup. The Manage Stores screen appears.
-
To add a new store, click Add New Store. The Add Store screen appears.

-
Complete the fields, then click Save.


Enable the Storepickup Shipping Method
-
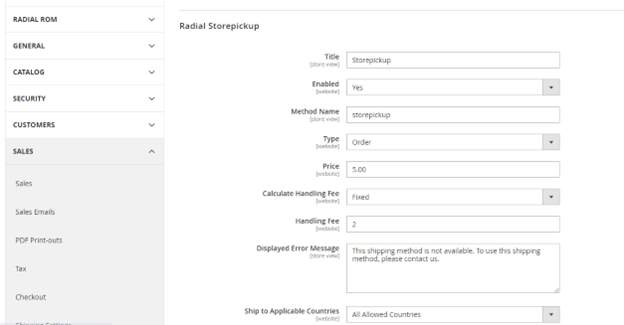
Navigate to Stores>Configuration>Sales>Shipping Methods. The Radial Storepickup screen appears.

-
Complete the following fields:
-
Title: Enter a name for the shipping method; for example, Storepickup.
-
Enabled: To enable the Storepickup shipping method, select Yes.
-
Type: Choose the type to calculate shipping fee; for example, Order.
-
Price: Enter the price for the storepickup shipping method; for example, 5.00.
-
Handling Fee: Enter the handling fee for Storepickup method; for example, 2.00.
-
Calculate Handling Fee: Choose the handling fee calculation for storepickup method; for example, Fixed.
-