Configure Service Flows
A service flow is a sequence of steps that define the processes that an order must pass through in a module. Service flows "live" within the modules in a pipeline.
A service flow has two parts:
- Service Flow Criteria, which define the conditions that an order must meet to proceed through that service flow.
- Service Flow Configuration, which defines the workflow for an order that meets the criteria defined for that service.
Review Service Flows
To manage the service flows that have been defined for your Radial Order Management implementation:
- Click or tap the
 icon in the upper-left corner. The Main Menu appears.
 - Click or tap Service Flows. The Service Flows screen appears.
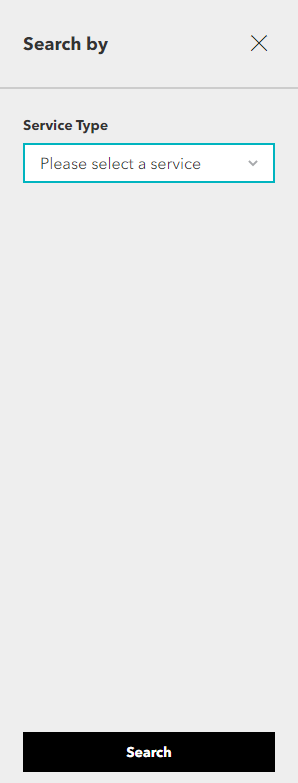
- Click or tap the
 icon. The Search panel appears.
- Select the Service from the dropdown. Note: At this time, only the Shipment Service is available.
- Click or tap the Search button. A list of service flows for the service that you selected appears.

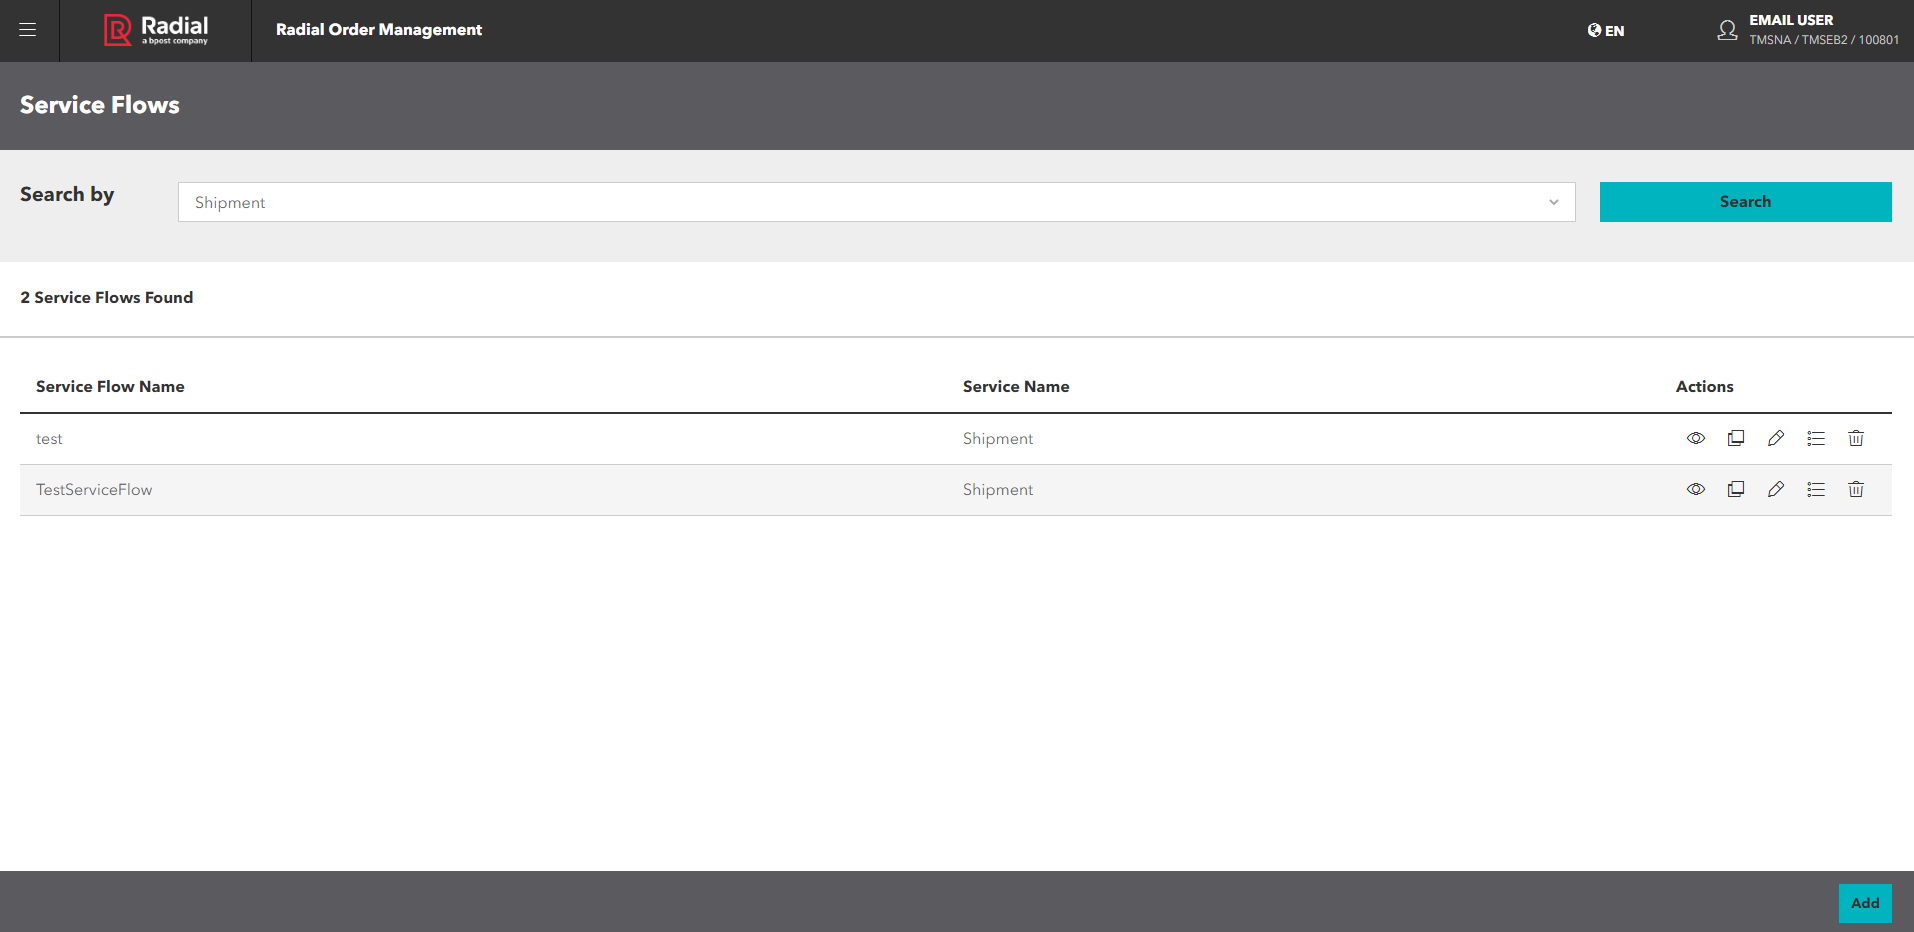
This screen displays a list of your current Service Flows. From this screen, you can:
- View the Service Flow.
- Copy the Service Flow.
- Edit the Service Flow criteria.
- Edit the Service Flow Process configuration.
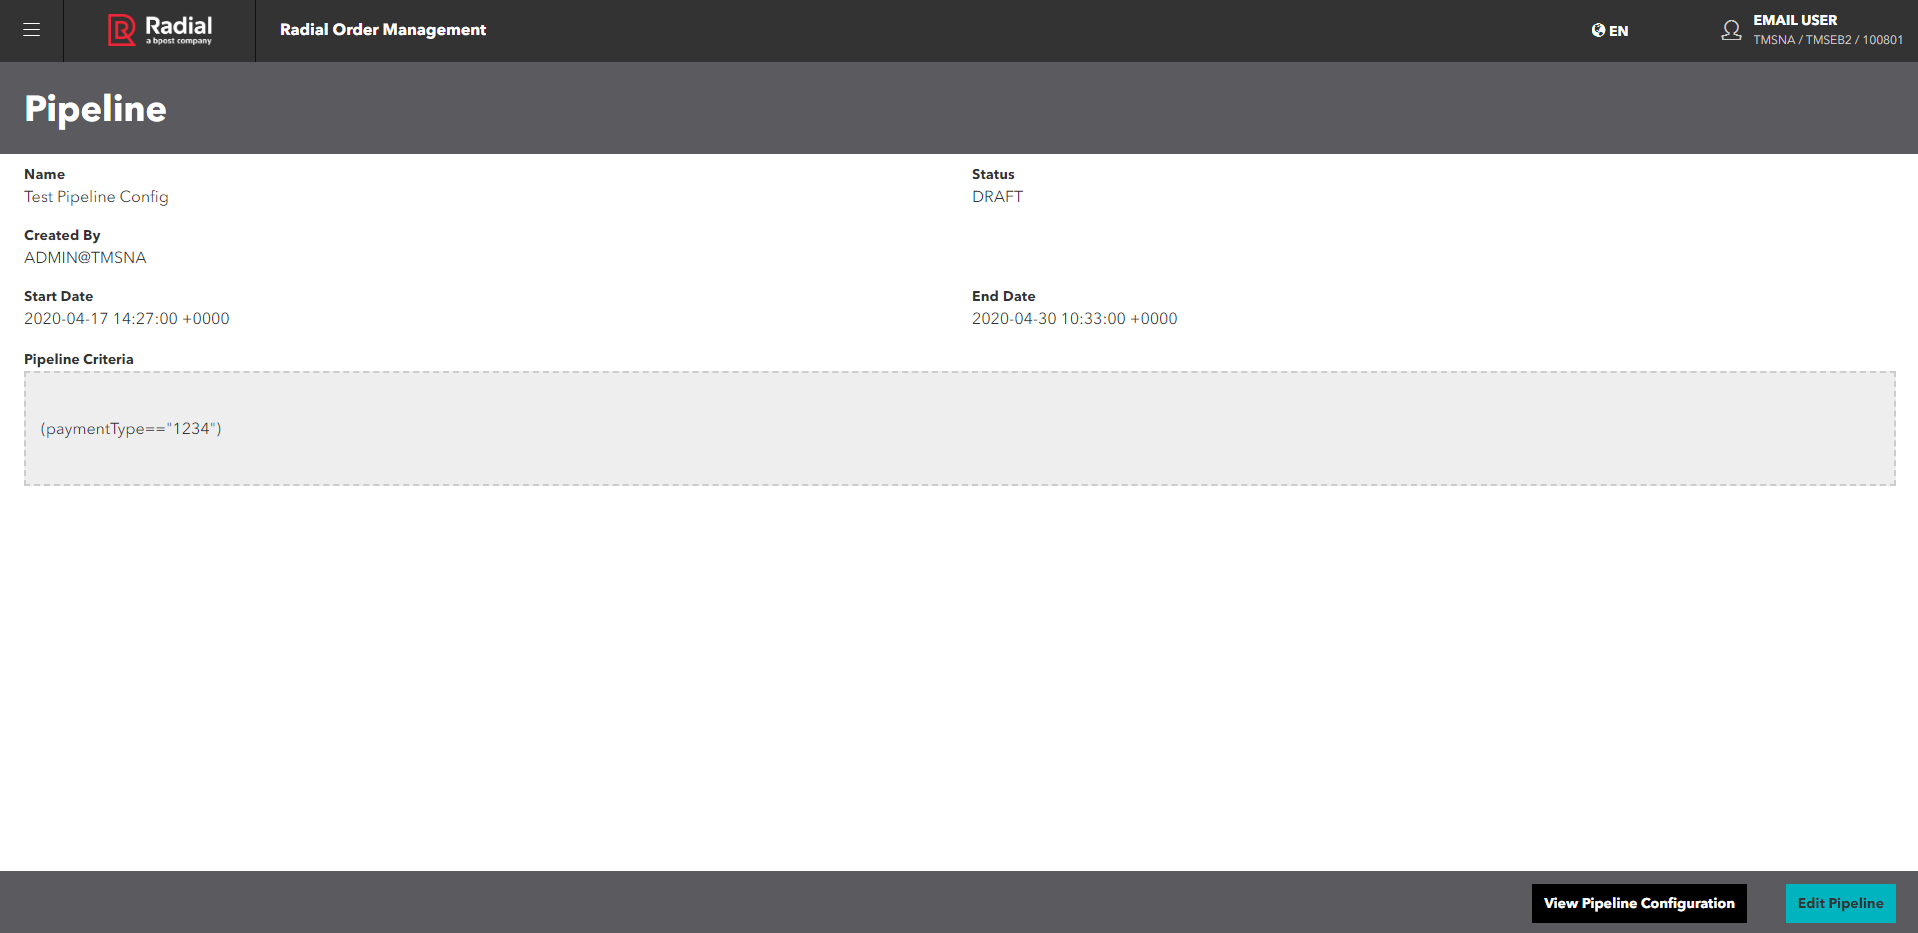
View a Service Flow
To view a Service Flow:
- Click or tap the
 icon. The Service Flow screen appears.
This screen shows:
- Name of the Service Flow
- Name of the service
- Service Flow Criteria: The expression that determines the order orchestration for this Service Flow.
- From this screen, you can edit the Service Flow criteria or view the Service Flow configuration.
- To return to the Service Flow list, click or tap the Back button on your browser.
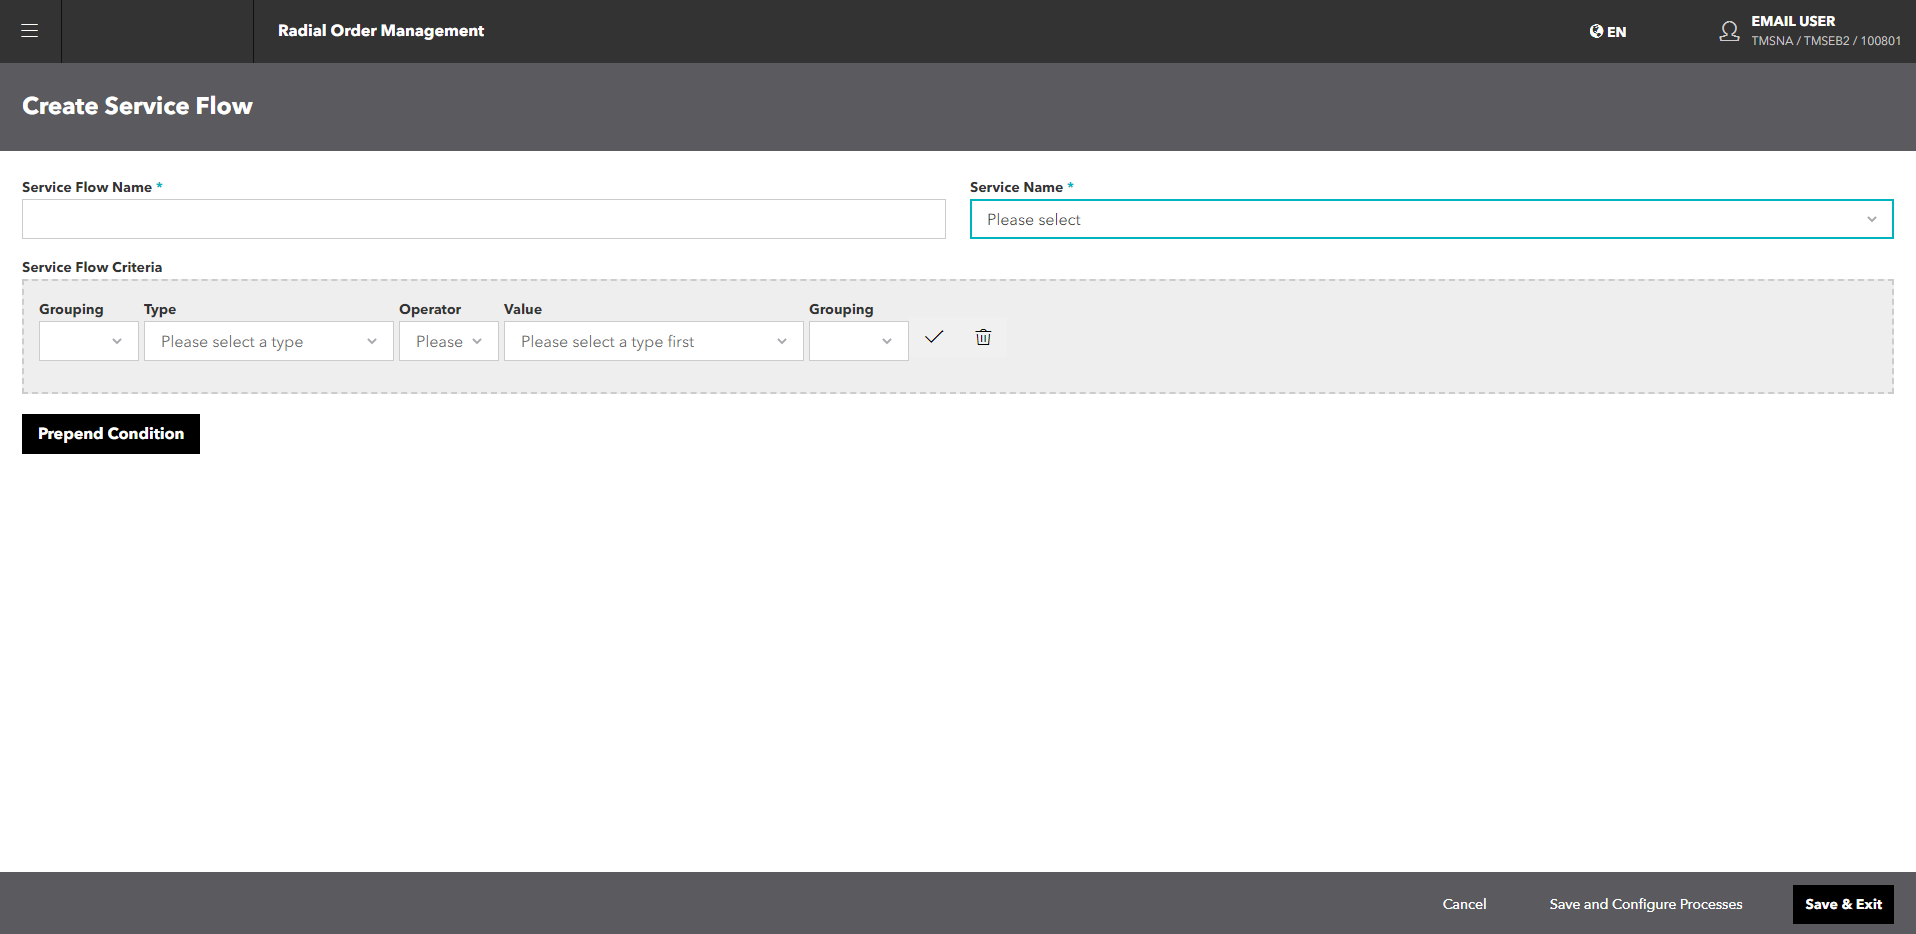
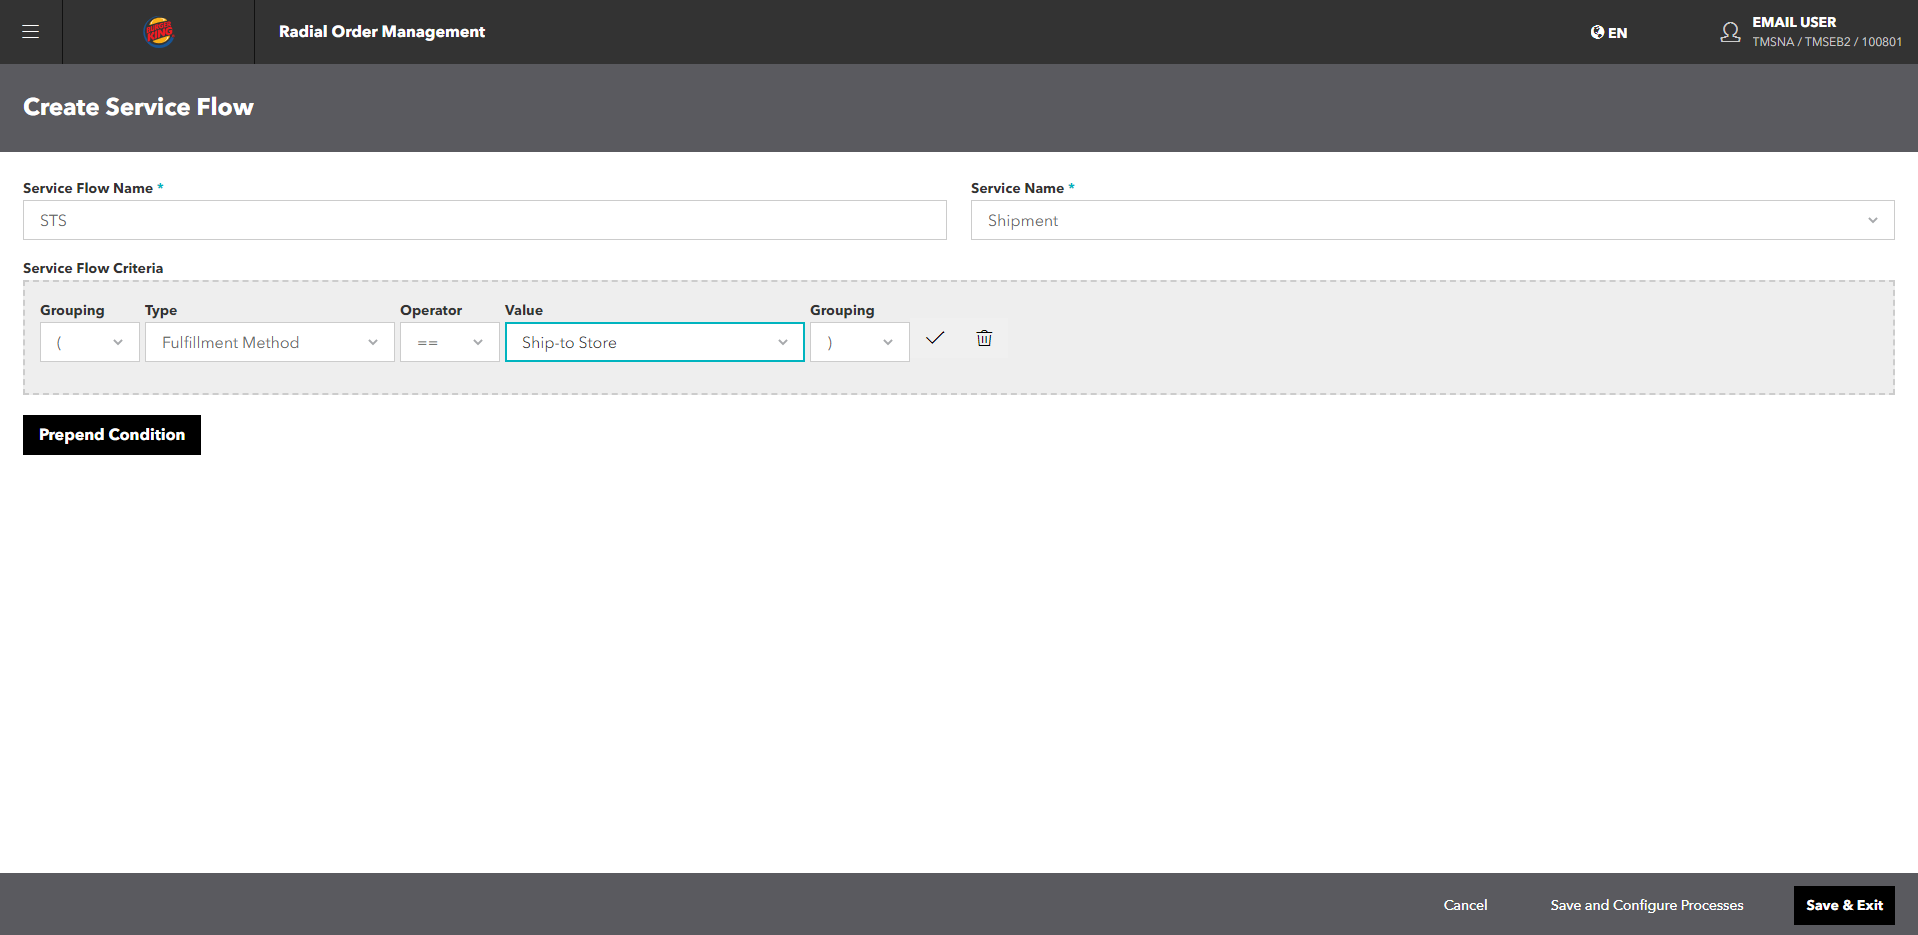
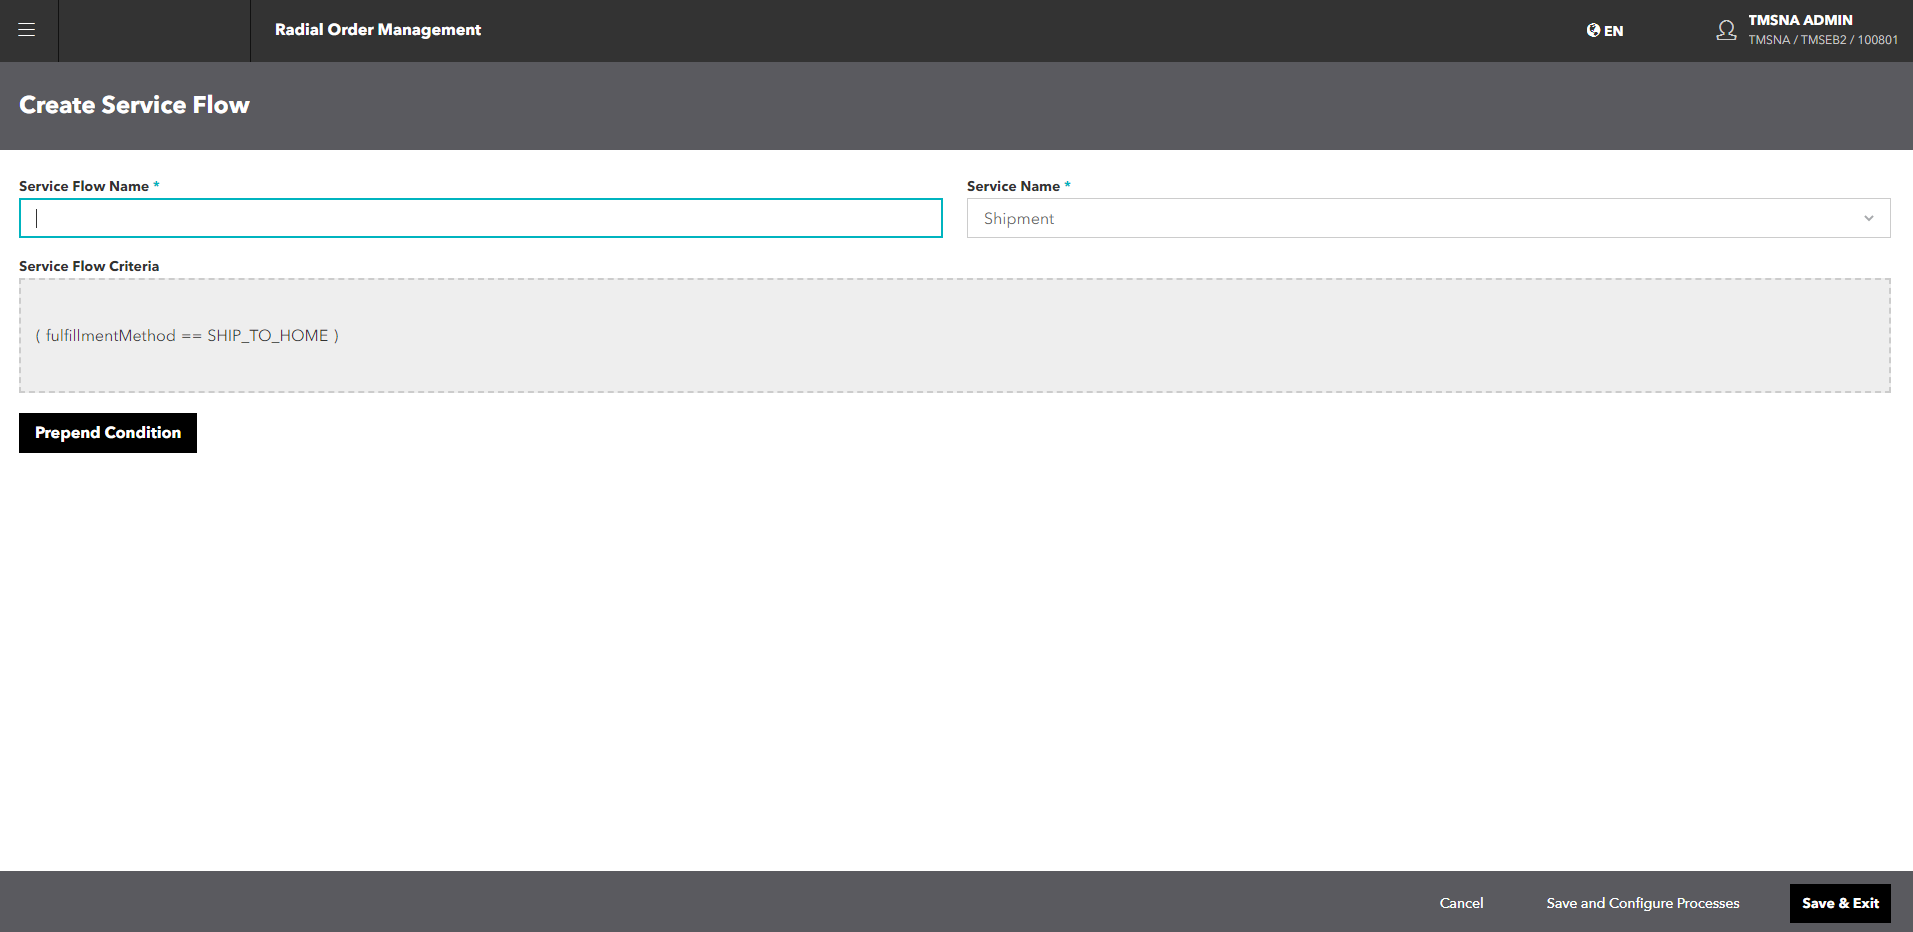
Add a Service Flow
To add a Service Flow:
- From the Service Flows screen, click or tap the Add button. The Create Service Flow screen appears.

- Enter a name for the Service Flow.
- Select the Service from the dropdown.
- Set up the first expression of the Service Flow Criteria. The Service Flow Criteria define the requirements that an order must meet to move through the flow. These requirements take the form of an expression or group of expressions that define the Type of the order and the Value associated with that type.

The expression fields are:
- Grouping: Specifies how the expressions are tied together.
- Type: Specifies the type of order.
- Operator: Specifies how the Type relates to the Value.
- Value: Specifies the value of the order Type.
- Grouping: Closes the expression and specifies its relationship to the following expression.
When you finish adding the expression, click or tap the
 icon.
icon. - To further refine the criteria, you can add more expressions, edit existing expressions, or delete an expression.
- Hover over the expression. A popup appears that enables you to add a new expression to the end of the existing expression, edit the existing expression, or delete the expression.

- To add a new expression, click or tap the + icon. A new set of expression fields appears, where you can enter the new expression.
- To edit an expression, hover over the expression that you want to edit, then click the
 icon. The expression appears in the expression fields, where you can edit it. You can only edit one expression at a time.
 - To delete an expression, hover over the expression that you want to delete, then click or tap the
 icon.
icon. - To add an expression to the left of the existing expression, click or tap the Prepend Condition button. The criteria fields appear.
- Hover over the expression. A popup appears that enables you to add a new expression to the end of the existing expression, edit the existing expression, or delete the expression.
- When you finish adding conditions, click or tap the icon.
- To save the criteria and then configure the Service Flow Processes, click or tap the Save and Configure Processes button. The Configure Service Flow Processes screen appears. See Add A Service Flow Process Configuration for details.
- To save the Service Flow without configuring Service Flow Processes, click or tap Save & Exit. The Service Flows screen appears, showing the new Service Flow.
- To exit without saving the Service Flow, click or tap Cancel.

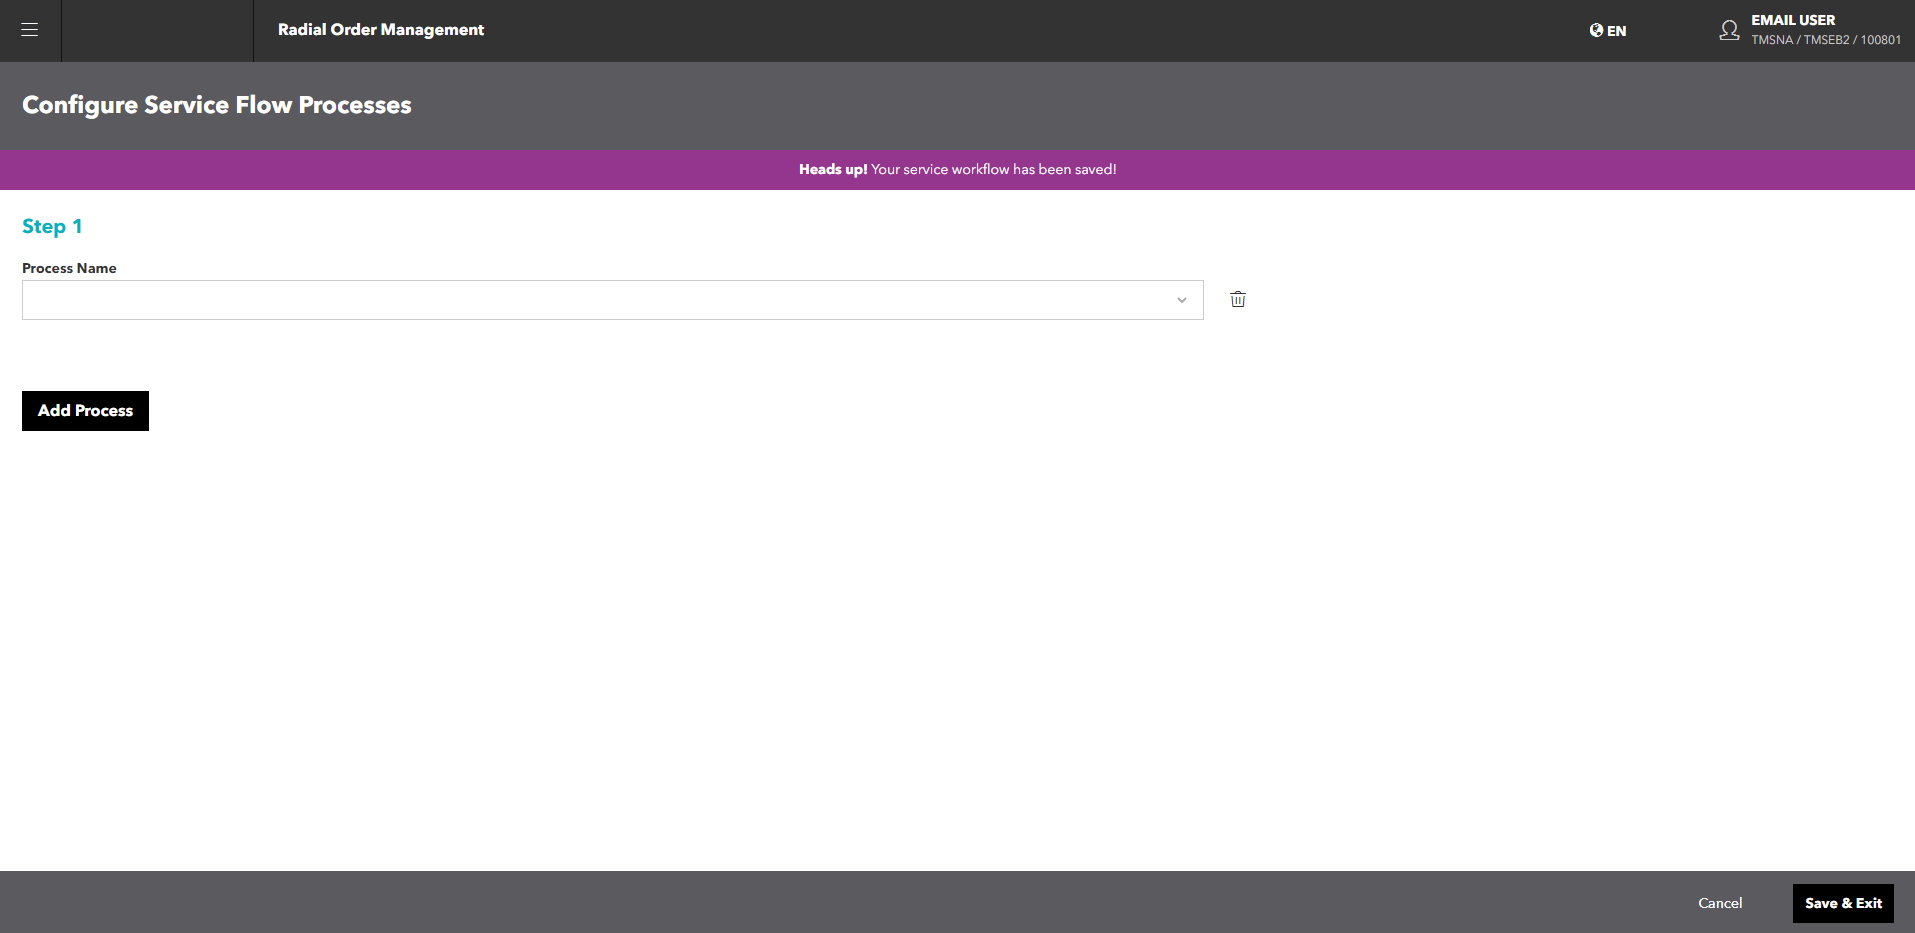
Add a Service Flow Process Configuration
Once you have created your Service Flow and set up the Service Flow Criteria, you can configure the processes for the service flow.
For a description of the applicable services, including entry and exit events, see Service Flow Configuration Services.
To configure Service Flow processes:
- From either the Create Service Flow or Edit Service Flow Criteria screen, click or tap the Save and Configure Processes button. The Configure Service Flow Processes screen appears.
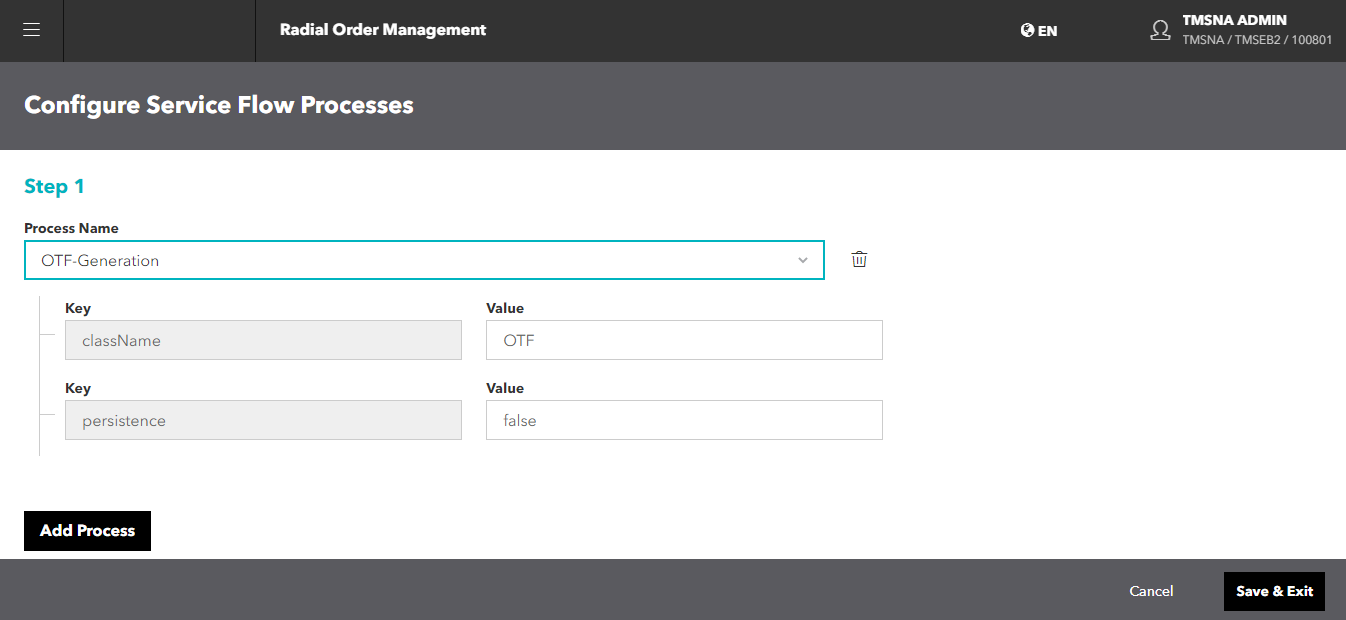
- Click or tap the Add Process button. Step 1 for the first process appears.

- Select the Process Name from the dropdown:
- OTF - Generation: Orders to Fulfill generation process
- HFR - Hassle-Free Returns process
- Pick
- Pack
- Shipment Boost - Ship Method Optimization process
- Flatrate - Flat rate shipping process
The keys associated with the process and their default values appear.
- If necessary, you can change the default key values.
- Click or tap the Add Process button to add the next step in the Service Flow configuration.
- When you're finished adding steps to the process, click to tap the Save & Exit button. To leave without saving the configuration, click or tap the Cancel button.
Copy a Service Flow
If you want to use the same Service Flow criteria in a new Service Flow, you can copy the original Service Flow. When you copy a Service Flow, you must rename it. You can also change the Service Flow criteria and the Service Flow configuration.
To copy a Service Flow:
- From the Service Flows screen, click or tap the
 icon for the Service Flow that you want to copy. The Create Service Flow screen appears, with the criteria and configuration from the original Service Flow.
- Enter a name for the Service Flow.
- To edit the Service Flow criteria:
- Hover over the expression. A popup appears that enables you to add a new expression to the end of the existing expression, edit the existing expression, or delete the expression.
- To add a new expression, click or tap the + icon. A new set of expression fields appears, where you can enter the new expression.
- To edit an expression, hover over the expression that you want to edit, then click the icon. The expression appears in the expression fields, where you can edit it. You can only edit one expression at a time.
- To delete an expression, hover over the expression that you want to delete, then click or tap the icon.
- To add an expression to the left of the existing expression, click or tap the Prepend button. The Pipeline Criteria fields appear.

Using these fields, you can:
- Add a new expression in addition to the existing expression.
- Add a new expression and delete the existing expression.
See Edit Service Flow Criteria for details.
- When you finish editing the Service Flow Criteria, click or tap the icon.
- To save the criteria and edit the existing Service Flow Processes, click or tap the Save and Configure Processes button. The Configure Service Flow Processes screen appears, where you can edit the existing Service Flow Processes. See Edit a Service Flow Configuration for details.
- To save the criteria without editing the existing Service Flow Processes, click or tap the Save & Exit button.
- To exit without saving the copy, click or tap the Cancel button.

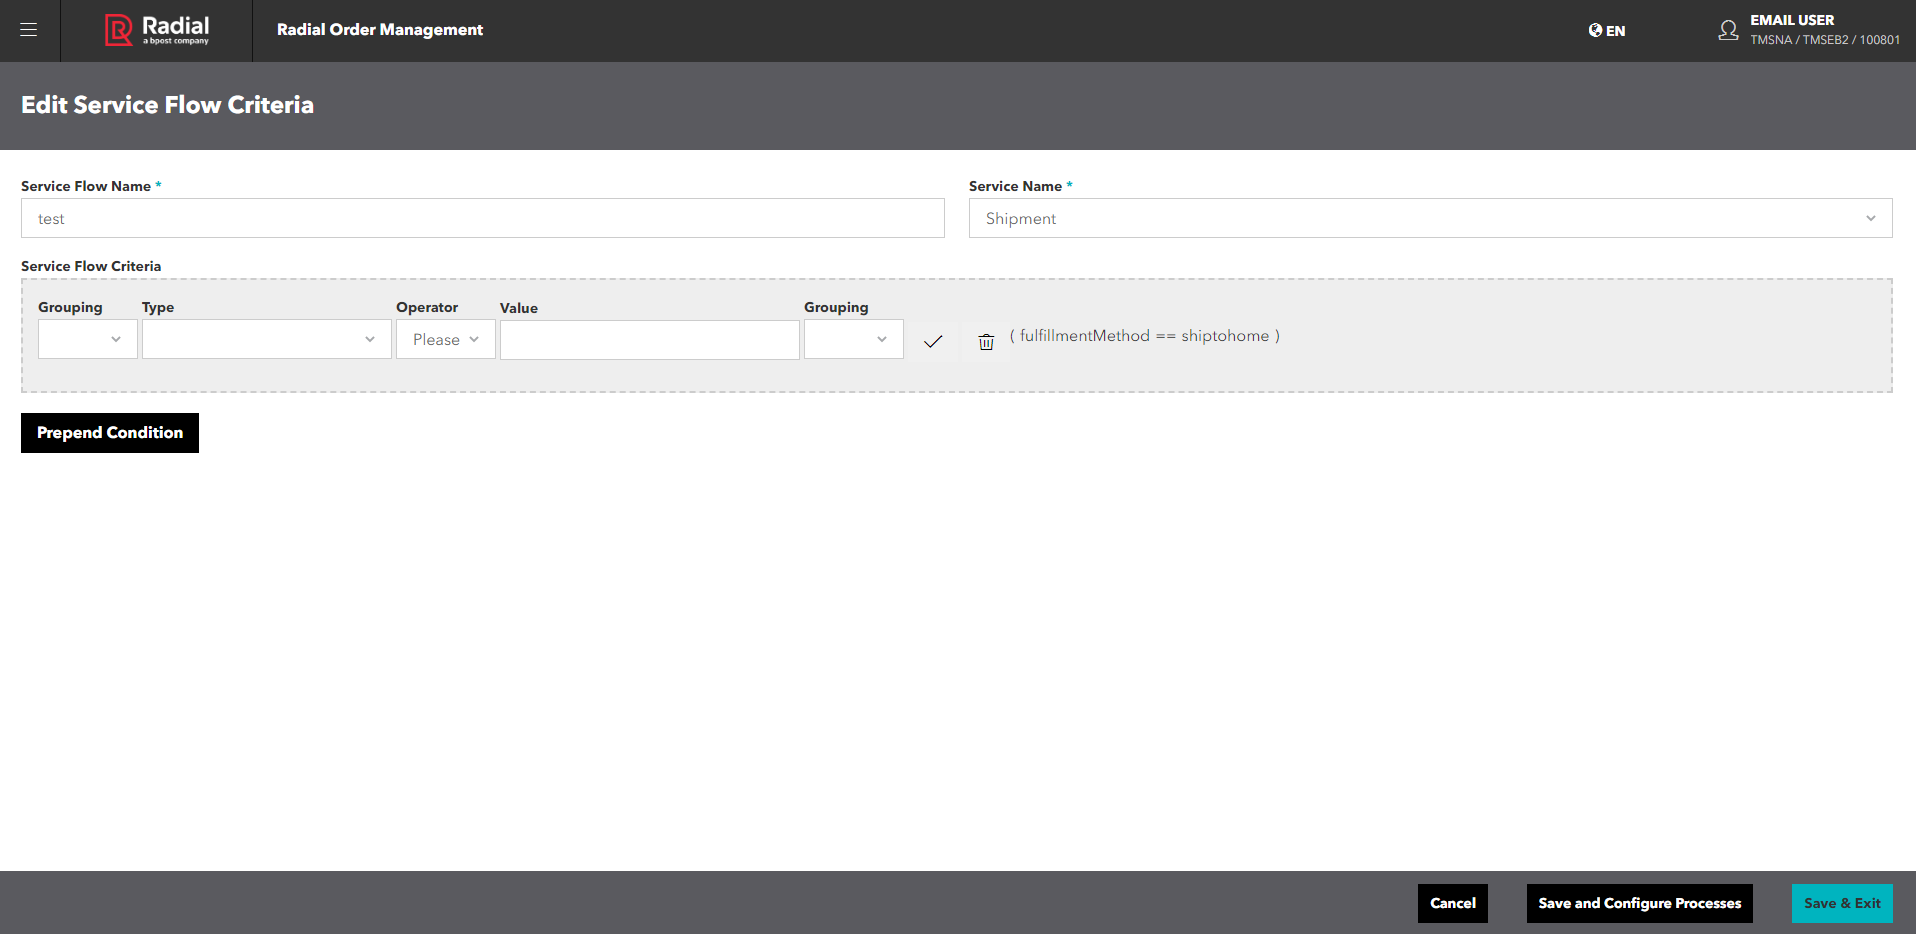
Edit Service Flow Criteria
After you set up a Service Flow, you can edit it. You can:
- Change the name of the Service Flow.
- Edit the Service Flow Criteria:
- Edit the existing expression.
- Add additional expressions to an existing expression.
- Delete an existing condition.
To edit a Service Flow:
- From the Service Flows screen, click or tap the icon for the Service Flow that you want to edit. The Edit Service Flow Criteria screen appears.

- Edit the name of the Service Flow.
- To edit the Service Flow criteria:
- To add a new expression, hover over the existing expression, then click or tap the + icon. A new set of expression fields appears.
Using these fields, you can:
- Add a new expression in addition to the existing expression.
- Add a new expression and delete the existing expression.
The expression fields are:
- Grouping: Specifies how the expressions are tied together.
- Type: Specifies the type of order.
- Operator: Specifies how the Type relates to the Value.
- Value: Specifies the value of the order Type.
- Grouping: Closes the expression and specifies its relationship to the following expression.
- To edit an expression, hover over the expression that you want to edit, then click the icon. The expression appears in the expression fields, where you can edit it. You can only edit one expression at a time.
- To delete an expression, hover over the expression that you want to delete, then click or tap the icon.
- To add an expression to the left of the first expression, click or tap the Prepend button. The expression fields appear.
- When you finish editing the Service Flow Criteria, click or tap the icon.
- To save the criteria and edit the existing Service Flow Processes, click or tap the Save and Configure Processes button. The Configure Service Flow Processes screen appears, where you can edit the existing Service Flow Process Configuration. See Edit a Service Flow Process Configuration for details.
- To save the criteria without editing the existing Pipeline Configuration, click or tap the Save & Exit button.
- To exit without saving the copy, click or tap the Cancel button.
Edit a Service Flow Process Configuration
You can edit a Service Flow Process configuration in two ways:
- From the Service Flows screen, click or tap the icon. Then, from the Edit Service Flow Criteria screen, click or tap the Save and Configure Processes button.
- From the Service Flows screen, click or tap the
 icon.
icon.
In either case, the Configure Service Flow Process appears.
From that screen, you can edit the steps of the process as follows:
- To delete a step, click or tap the icon next to the step that you want to delete. The step is deleted, and the following steps move up and are renumbered.
- To change the process in a step, select the new process from the Process Name dropdown. The Keys and Values change to those associated with the new process.
- To edit the value of a Key, enter the new value in the Value field for that Key.