PayPal SDK JavaScript Smart Button
This page will soon be removed. The integration described here is now the only supported option for PayPal integration. Current information on the PayPal SDK integration has been moved to the PayPal Processing page.
Overview
PayPal Checkout (formerly called Express Checkout) gives shoppers a simplified and secure checkout experience that keeps them in the store website or mobile app throughout the payment process. PayPal SDK JavaScript Checkout's Smart Payment Buttons present shoppers with the most relevant online payment methods. On almost any device, customers can be given the option to pay with PayPal, PayPal Pay Later, Venmo, and major credit cards and debit cards. When shoppers use PayPal Checkout, they can skip online forms and complete their checkout in just a few taps. Customers can start the checkout process on the product page or on the shopping cart page. PayPal passes customer contact and shipping details to the webstore, so shoppers can check out without needing to type this information into forms on the webstore.
Flow Diagram
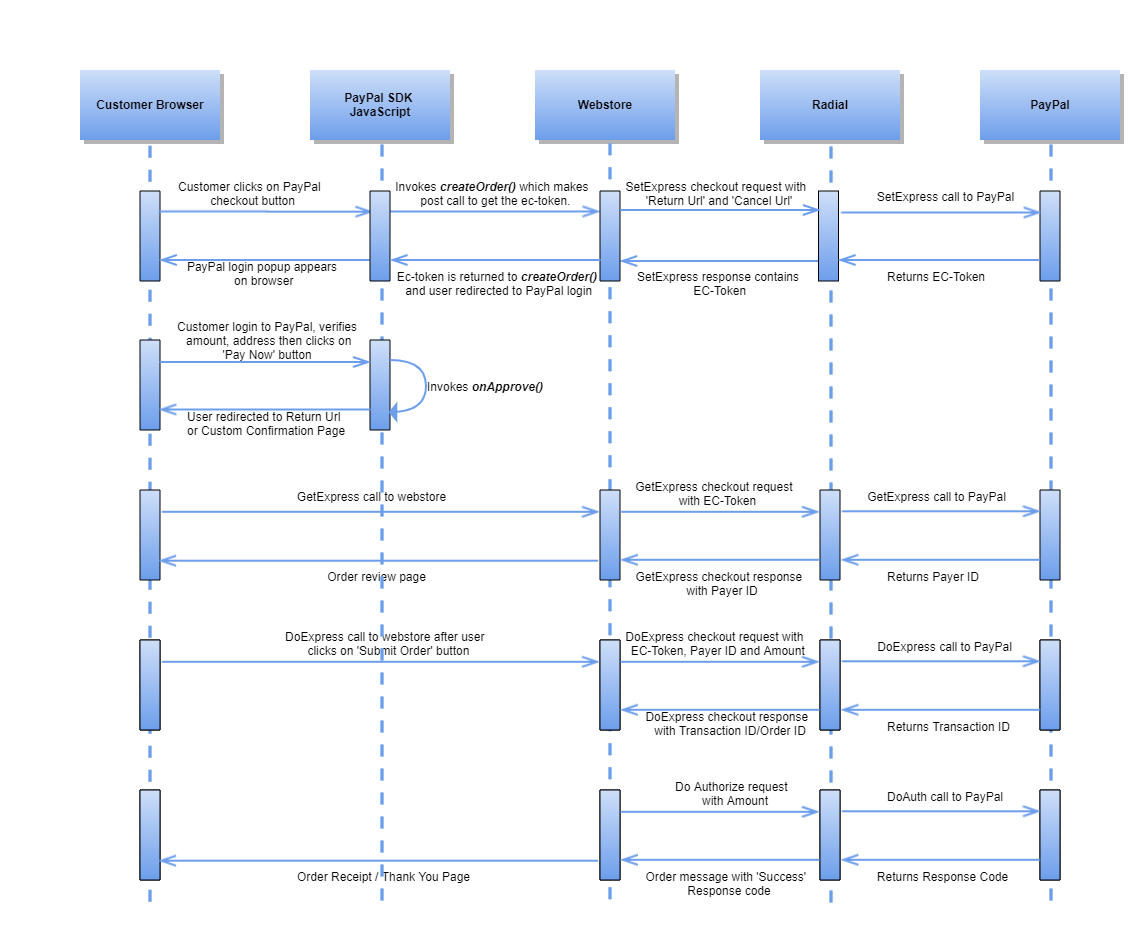
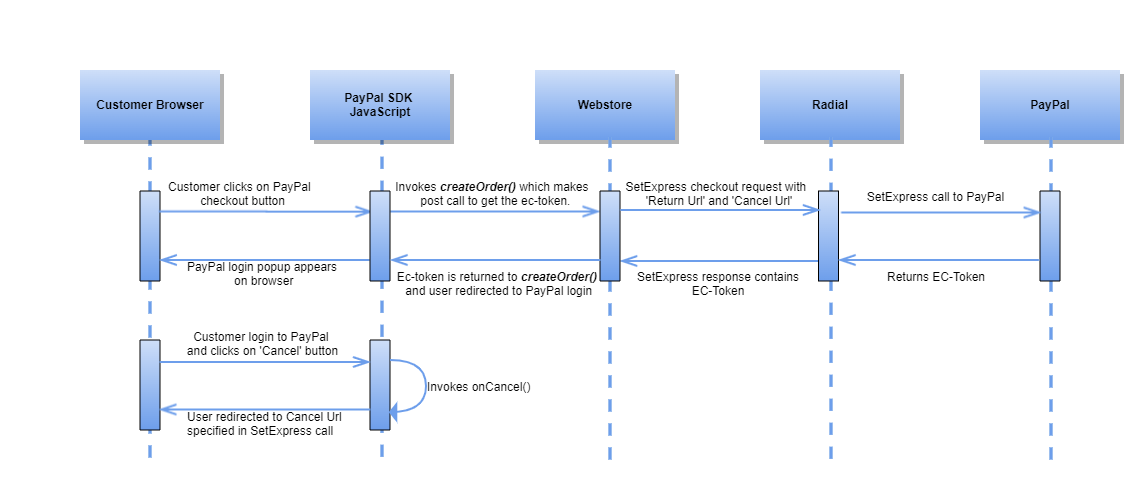
These flow diagrams cover the system interactions that occur between a Customer Browser, PayPal SDK JavaScript, Merchant Server, Radial and PayPal.
Happy Path Flow
Order Cancellation Flow
Client Integration
Before you begin, get the sandbox and production values for client-id from Radial.
Complete these steps to integrate with the PayPal JavaScript SDK.
Integrate PayPal SDK JavaScript Smart Payment Buttons to set up and execute payments directly from your browser, complete the following steps. Refer to the PayPal Developer Site for more information.
- Use SDK JavaScript Integration.
To integrate PayPal Checkout using JavaScript SDK, get the Sandbox/Production client-id from Radial. This code always keeps you current with the latest button styles and payment features from PayPal.
For a detailed list of the many SDK query parameters available, see PayPal's JavaScript SDK script configuration.
If you want to use PayPal's PayLater, there is a PayLater query parameter that displays messages to the consumer with the most relevant offer for every purchase. See the following links:
Add the following script to the store web page. (You can customize this script to add the link components that you choose to implement for your webstore.)
Copy<script src="https://www.paypal.com/sdk/js?client-id=YOUR_CLIENT_ID&intent=order&commit=false"></script>To enable the Venmo payment method, an additional attribute is needed, as shown below.
Copy<script src="https://www.paypal.com/sdk/js?client-id=YOUR_CLIENT_ID&enable-funding=venmo&intent=order&commit=false"></script> -
Add the PayPal Button component, which renders a PayPal button on your page. The button takes care of opening up PayPal and guiding the shopper through the payment process. The render component's functions include createOrder, onApprove, onCancel, and onError. Set up the payment by modifying the payment function, then execute the payment by modifying the onApprove function.
Copy// Render the PayPal button
paypal.Buttons({
createOrder: function () {
},
onApprove: function (data, actions) {
},
onCancel: function (data, actions) {
},
onError: function (err) {
}
}).render('#container-name'); - Set up payment.
The createOrder function is called when the shopper clicks the PayPal button. Modify this function to make either a client or webstore call to Radial's PayPal SetExpress API and retrieve the EC-Token value from the SetExpress Response. It is critical to return only this EC-Token value in the createOrder function.
CopycreateOrder: function () {
//Set Express Call
var SET_EXPRESS_URL = '/setexpress';
return fetch(SET_EXPRESS_URL, {
method: 'post',
headers: {
'content-type': 'application/json'
}
}).then(function(res) {
return res.json();
}).then(function(data) {
return data.token;
});
} - Execute the payment.
The onApprove function is called after a shopper logs in and clicks on the Pay Now button to approve the payment.
After the shopper approves the payment, redirect the shopper to a Return URL. This URL is specified in the Set Express API call by using the following code snippet.
CopyonApprove: function (data, actions) {
// Redirect to return url specified in set_express call
return actions.redirect("http://www.webstore.com/return?token=");
} - Cancel the payment.
A shopper who cancels the payment is redirected to the Cancel URL that has been passed in Radial's SetExpress Request API. To handle cancellation and errors, use:
CopyonCancel: function (data, actions) {
return actions.redirect("http://www.webstore.com/cancel");
},
onError: function (err) {
// log the error
}
More Information
-
PayPal developer documentation: https://developer.paypal.com/docs/checkout/standard/integrate/
-
PayPal SDK reference: https://developer.paypal.com/sdk/js/
-
Radial’s PayPal API documentation