PayPal Processing
You can accept PayPal payments at your webstore through an integration with Radial Payments. The Radial PayPal integration is accomplished through a series of API calls to Radial Payments. This page provides an overview of Radial's PayPal processing and the integration steps required.
Radial Payments supports using PayPal's Vault feature to store a payment method in a wallet on a webstore and to set up billing agreements for subscription payments. Please see specific Vault documentation for more details.
PayPal is a digital wallet payment option you can add to your checkout payment options. Generally, a wallet is a service that stores payment cards, just as a physical wallet stores physical payment cards. The customer can use payment cards in a digital wallet to pay for goods and services. PayPal is also considered a staged wallet, which means that the wallet itself can contain funds (comparable to cash) that can be used for purchases.
The primary reason to add PayPal as a payment option is that PayPal and their Venmo service have a large base of users who enjoy using PayPal and find that it speeds up their checkout process. Another reason to add PayPal is to make PayPal's PayLater option available to customers. The PayLater payment option is a good alternative for customers who want to finance their purchases over time.
Overview of the Radial PayPal Lifecycle
PayPal offers more than one way for a consumer to pay for purchases and provides a number of integration possibilities to satisfy different use cases. With one integration you can offer several PayPal payment options for your customers. We have broken down the integration process into four main parts as shows in the image below:
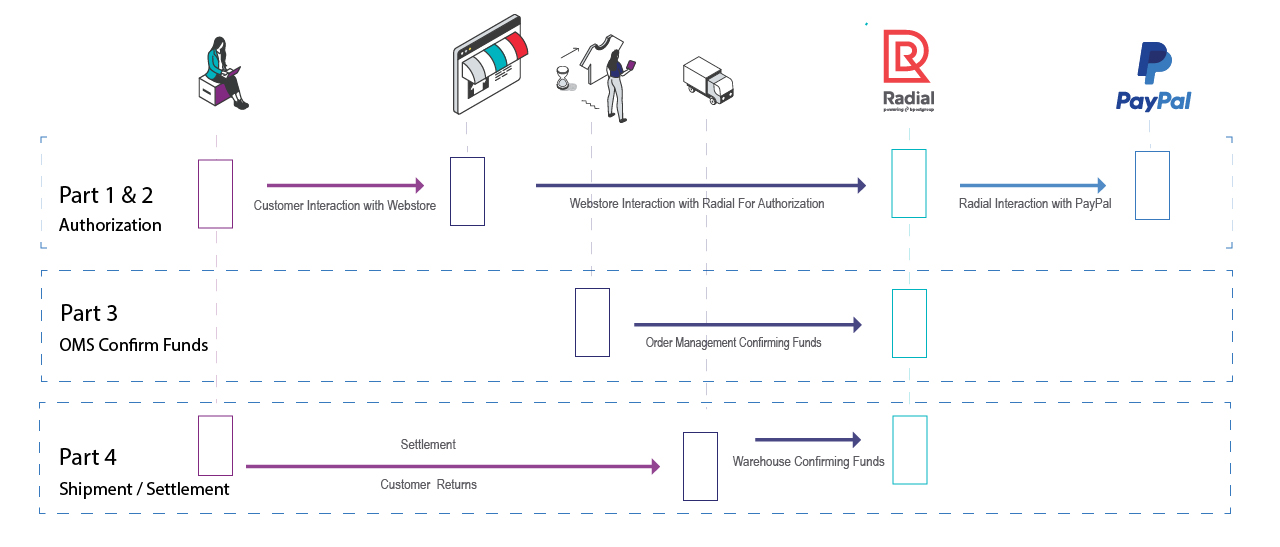
This guide covers Parts 1-4 of the lifecycle of Radial PayPal Payments, as captioned in the diagram above. Part 1 and 2 are concerned with obtaining an authorization; Part 3 is concerned with making sure the authorization is still valid on delayed shipments; and Part 4 is concerned with settlement of your funds and processing returns.
Part 1, as detailed below, is accomplished with the PayPal SDK configuration. This is the preferred integration option to be used with Radial PayPal Payments. Previously, PayPal integration could be accomplished using a redirect method called the PayPal Express Checkout flow (Redirect). This redirect method is now considered a legacy implementation, and it is no longer supported.
The Role of the Order Management System
The order management system (OMS) plays a significant role in the payment lifecycle. The OMS manages many of the complexities inherent in e-commerce, that is, in shipping goods to customers. One of the responsibilities of an OMS is to initiate a notification of shipment so the payment can be settled or "captured." A payment authorization (at purchase time) puts funds on hold, while a payment settlement (at shipping time), makes sure those funds are actually paid out to you.
Because of the possibility of delay in shipping, there is a chance that the original authorization is no longer valid at shipping time. Radial Payments must be notified when a package is ready to be shipped. A confirm funds check is made before you ship an item to make certain that the original authorization is still valid. If an item is shipped without a confirm funds check, you might not get paid for the order.
For more information, see Confirm Funds.
Radial will send a response to a Confirm Funds check. If the response to ConfirmFunds API returns a FundsAvailable value of Fail, this means that there is an issue with the authorization, and the item should not be shipped. When this occurs, ask the customer to provide payment with a different payment method.
If you are using Radial Order Management (ROM), you do not have to manage these additional calls at shipping time to ensure your payment is authorized.ROM handles these calls automatically. But if you are using another order management system, you will need to have your order management system check with Radial Payments before you ship.
Refunds are also managed by the OMS. If you are not using ROM, then your OMS will need to call the Radial Payments API to process the refund. The API calls to process refunds are discussed below.
Getting Started
In order to begin your integration you will need to have a Radial Payments account setup and needed PayPal configuration details. If you are already processing Radial Payments you should have the required Radial Payment credentials to get started. If you need credentials, please contact your Radial representative.
If you are upgrading your PayPal integration or adding a new integration, please contact Radial so we can configure your PayPal-specific credentials and provide the access you need for your integration.
PayPal Vault explains how to use PayPal's Vault feature to securely store a payment method in a wallet on a webstore and to set up billing agreements for subscription payments.
PayPal Merchant Account Ownership
It is important to point out that Radial will be the owner of the PayPal merchant account - you do not need to contact PayPal to create an account - we do that for you. Having Radial as the owner of the PayPal account has the advantage of payment consolidation, reconciliation and reporting. We can also manage your chargeback services for PayPal transactions.
Front-end versus Back-end
Radial is here to help you with integrating PayPal; however, because we do not host your e-commerce shopping cart (the front-end or client), we do not provide coding assistance in getting the front-end up and running. We can help troubleshoot your integration front-end efforts and can have PayPal assist directly if needed. For most integrations we can walk you through what you need and what to expect; however, you are responsible for the specific front-end options and features selected with your integration to PayPal.
Front-end interactions start with PayPal's SDK integration. This integration is primarily between the webstore and PayPal; however, there are specific details you need to be aware of when setting up your API calls to Radial. These details are described below.
Part 1: Authorization: PayPal's JavaScript SDK and Buttons
Front-end integration starts with using the recommended JavaScript SDK from PayPal. There are many options you can choose from for your front-end integration; these are detailed on PayPal's documentation at https://developer.paypal.com/sdk/js/reference/.
The JavaScript SDK
The PayPal JavaScript SDK allows you to specify "components" that in turn dynamically expose objects and methods you can use to customize your checkout.
The script looks like this:
<script src="https://www.paypal.com/sdk/js?client-id=YOUR_CLIENT_ID&components=YOUR_COMPONENTS"></script>You can customize the many options PayPal makes available to you by editing the components=YOUR_COMPONENTS string.
For a detailed list of the many SDK query parameters available, see PayPal's JavaScript SDK script configuration.
If you want to use PayPal's PayLater, there is a PayLater query parameter that displays messages to the consumer with the most relevant offer for every purchase. See the following links:
Mandatory SDK Script Tag Settings
PayPal's SDK script tag has components that provide customized options for your front-end checkout. While you have a lot of flexibility in terms of which optional component settings you choose, there are mandatory settings that you must include for successful Radial Payments processing. These mandatory setting are
-
the
intent=ordercomponent -
the
commit=falsecomponent
Use of intent
-
intent=order: Creates an order only. Authorization and capture occur later. -
intent=capture: Captures the payment immediately after customer approval.
The following example shows a script tag that includes both of these settings.
<script src="https://www.paypal.com/sdk/js?client-id=YOUR_CLIENT_ID&intent=order&commit=false"></script>This script tag will produce the following buttons on your checkout page.
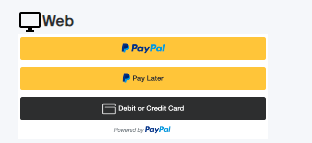
Depending on your location internationally, you may have different results. For merchants in US and Canada, your buttons will look similar to the image above. By default, all eligible payment buttons display in a single location on your page.
Optional Component Settings
The script tag can be customized to have optional components. PayPal provides extensive documentation on how to customize buttons and display certain information.
For more information, see the detailed PayPal documentation.
Disable and Adding Specific Buttons
The example pictured above shows a default set of buttons with a default shape and style. In the SDK you can pass instructions to enable or remove the default funding options and customize the button display.
For more information on button options, see PayPal's documentation.
Venmo example
As an example, to add Venmo as a payment button, you can use the following SDK script options.
<script src="https://www.paypal.com/sdk/js?client-id=YOUR_CLIENT_ID&enable-funding=venmo&intent=order&commit=false"></script>These settings produce the following button display:

If you don't pass any components, the default payment buttons component automatically renders all eligible buttons in a single location on your page.
For more information on the Venmo payment method, see Radial's Venmo documentation.
Optimizations
PayPal provides tips to optimize the loading of the JavaScript SDK. To learn about the use cases and find out if optimization is applicable to your environment, see PayPal's documentation: https://developer.paypal.com/sdk/js/performance/.
ClientId From Radial Payments
Radial will provide you with the proper credentials to get started on your front-end integration. One of the credentials you will need is the ClientId. You will use one ClientId for testing and a different ClientId for production. To request your ClientIds, contact your Radial representative.
PayPal Button Component
To render a PayPal button on your page, add the PayPal Button component to your checkout web page. The button takes care of opening up PayPal and guiding the shopper through the payment process. The render component's functions include createOrder, onApprove, onCancel, and onError.
You set up the payment by modifying the payment function; then you execute the payment by modifying the onApprove function. Here is an outline of the PayPal Button component.
// Render the PayPal button
                    paypal.Buttons({
                    createOrder: function () {
                    },
                    onApprove: function (data, actions) {
                    },
                    onCancel: function (data, actions) {
                    },
                    onError: function (err) {
                    }
                }).render('#container-name');
These modifications are described in detail in the sections below.
Part 2: Calling the Radial PayPal Methods
As mentioned above adding the PayPal Button component contains functions used to complete a PayPal transaction through Radial Payments. These functions are the SetExpress, GetExpress, DoExpress and DoAuthorize. They are discussed in detail below:
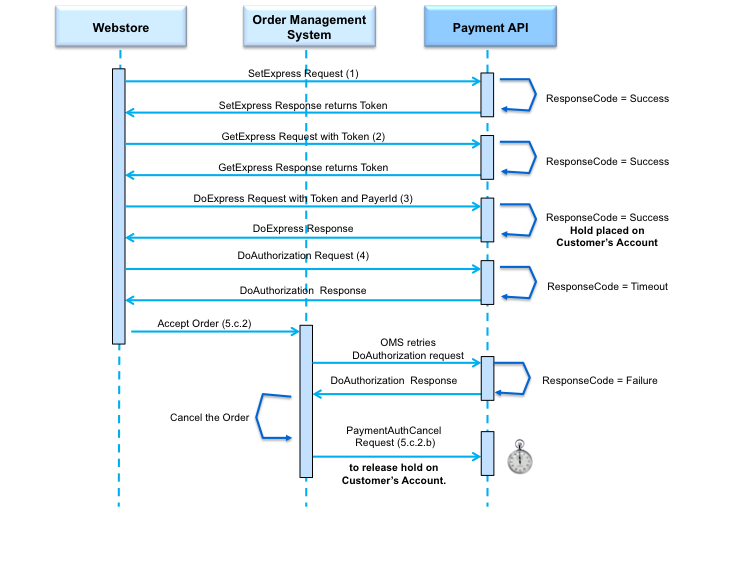
Lifecycle Diagram
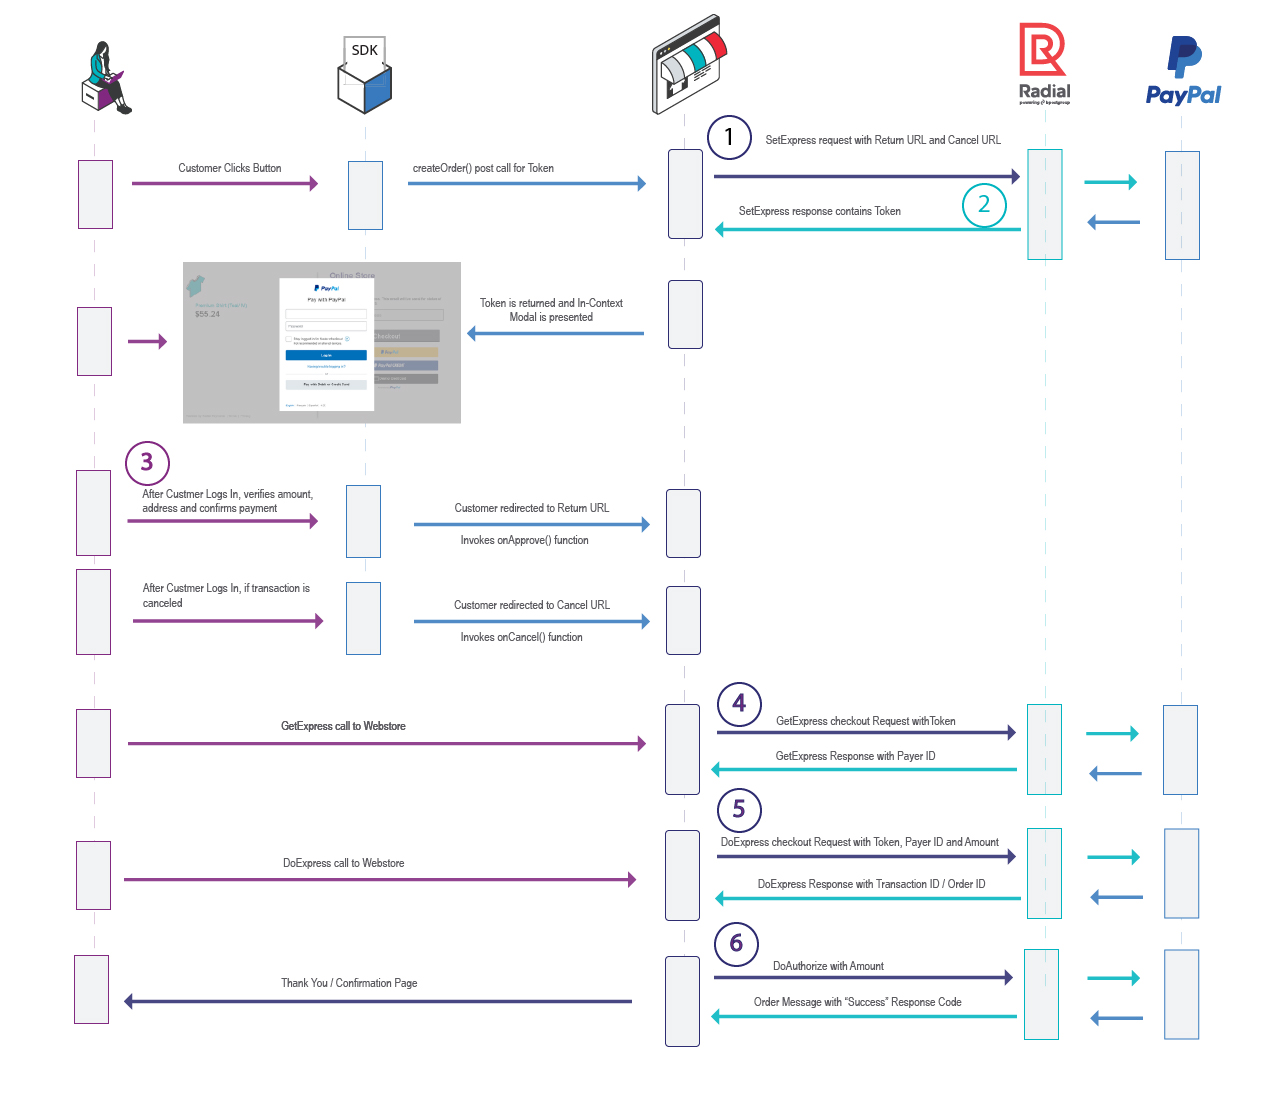
To accomplish the first parts of the payment flow, you will modify the PayPal createOrder and onApprove functions.
1. SetExpress Call
At location 1 in the diagram, the createOrder function calls the SetExpress endpoint URL to retrieve from the SDK the transactional data that was passed in the payload. The createOrder function is called when the shopper clicks the PayPal button. You will modify this function to make either a client or webstore call to Radial's PayPal SetExpress API.
2. SetExpress Response
At location 2 in the diagram, you retrieve the EC-Token value from the SetExpress Response. It is critical to return only this EC-Token value in the createOrder function. The EC-Token value is used in all subsequent calls to the Radial Payment APIs.
For details of the SetExpress XML request and response, see PayPal SetExpress.
createOrder Modifications
The createOrder modifications are show in the snippet below.
createOrder: function () {
                    //Set Express Call
                    var SET_EXPRESS_URL = '/setexpress';
                    return fetch(SET_EXPRESS_URL, {
                    method: 'post',
                    headers: {
                    'content-type': 'application/json'
                    }
                    }).then(function(res) {
                    return res.json();
                    }).then(function(data) {
                    return data.token;
                    });
                }
In this example, the createOrder function is calling the SetExpress endpoint URL to retrieve the transactional data from the SDK passed in the payload. The important value to retrieve from this call is the EC-token (data.token). This value is used in all subsequent calls to the Radial Payment API's.
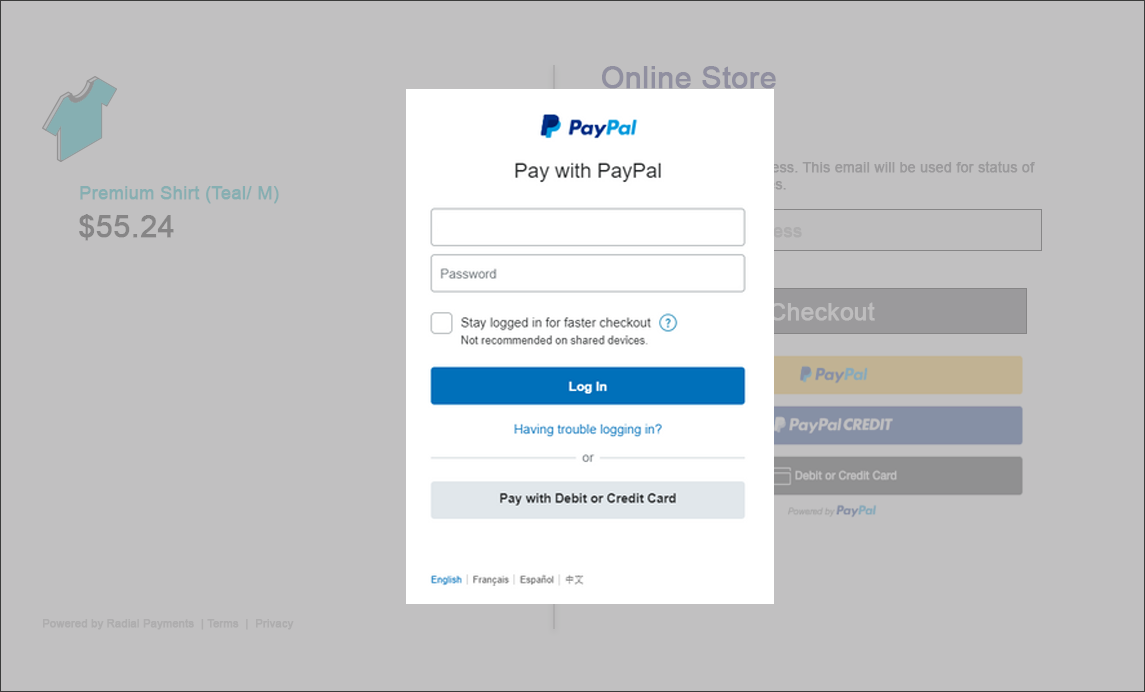
3. Customer Confirms PayPal Transaction
At location 3 in the diagram, after the customer chooses their payment options inside the PayPal modal and confirms the transaction details with PayPal they are sent back to the Webstore via the specified returnUrl in the onApprove function.
onApprove Modifications
The onApprove modifications are shown in the snippet below.
onApprove: function (data, actions) {
                    // Redirect to return url specified in set_express call
                    return actions.redirect("http://www.webstore.com/return?token=");
                }
4. GetExpress Call
At location 4 in the diagram, the GetExpress call used the token value and the GetExpress url to retrieve the payerId for the transaction. On the backend Radial will retrieve the transaction details from PayPal. It is important to note that the information returned from PayPal at this point may have changed - shipping address or delivery options (if configured) can change the tax or shipping cost for an item. The information returned in this call will be updated if necessary in the DoExpress call.
For details of the GetExpress request and response, see PayPal GetExpress.
5. DoExpress Call
At location 5 in the diagram, the DoExpress call uses the payerId, the DoExpress url and the token to update and save the details of the transaction for the next step, which is the DoAuthorize call.
For details of the PayPal DoExpress request and response here, see PayPal DoExpress.
6. DoAuthorize Call
At location 6 in the diagram, the DoAuthorize call is where the transaction is authorized. This happens through PayPal passing the DoAuthorize URL to Radial Payments PayPal API and receiving a response. As shown in the diagram, if the response is Success, then the customer is redirected back to the webstore to submit the transaction.
For details of the PayPal DoAuthorization request and response, see PayPal DoAuthorization.
Success Processing
A successful payment returns a Success ResponseCode after the DoAuthorization call. An example of a returned response is shown below.
<?xml version="1.0" encoding="UTF-8"?>
                    <PayPalDoAuthorizationReply xmlns="http://api.gsicommerce.com/schema/checkout/1.0">
                    <OrderId>12345</OrderId>
                    <ResponseCode>Success</ResponseCode>
                    <AuthorizationInfo>
                    <PaymentStatus>Pending</PaymentStatus>
                    <PendingReason>authorization</PendingReason>
                    <ReasonCode>1234</ReasonCode>
                    </AuthorizationInfo>
                </PayPalDoAuthorizationReply>
For details of the PayPal DoAuthorization request and response, see PayPal DoAuthorization.
Return After Success
The URL return for a successful transactions is set in the onApprove function, as shown in the following example.
onApprove: function (data, actions) {
                    // Redirect to return url specified in set_express call
                    return actions.redirect("http://www.webstore.com/return?token=");
                }
Any desired redirect must be done intentionally by the merchant from onApprove functions. The URL can be a fully qualified URL, or alternatively you can set the value of window.location.href, which will accept relative paths.
Return After Cancel (onCancel Function Call) and onError
The purpose of the onCancel function is to listen for the customer's action when inside the PayPal modal. If the customer cancels the transaction then the customer will be redirected back to the webstore.
The URL designated for the onCancel function should be a fully qualified URL, or alternatively you can set the value of window.location.href, which will accept relative paths.
You can use the onError function (shown below) to catch any errors that occur.
onCancel: function (data, actions) {
                    return actions.redirect("http://www.webstore.com/cancel");
                    },
                    onError: function (err) {
                    // log the error
                }
Failure Processing
A Failure in the DoAuthorization call will return Failure in the ResponseCode, as shown in the following example.
<?xml version="1.0" encoding="UTF-8"?>
                    <PayPalDoAuthorizationReply xmlns="http://api.gsicommerce.com/schema/checkout/1.0">
                    <OrderId>12345</OrderId>
                    <ResponseCode>Failure</ResponseCode>
                    <AuthorizationInfo>
                    <PaymentStatus>None</PaymentStatus>
                    <PendingReason>None</PendingReason>
                    <ReasonCode>None</ReasonCode>
                    </AuthorizationInfo>
                    <ErrorMessage>Cannot find Order.</ErrorMessage>
                    <ShortErrorMessage>Cannot find Order.</ShortErrorMessage>
                    <ErrorCode>1234</ErrorCode>
                </PayPalDoAuthorizationReply>
If the ResponseCode value is Failure, the following steps should be performed to conclude the Express Checkout flow:
-
The webstore refuses the order and show the customer alternate payment options.
-
The webstore submits a PaymentAuthCancel request to release the hold on the order created by the successful DoExpress call. For the instructions to cancel a payment authorization, see Payment Authorization Cancel.
When submitting the Payment Authorization Cancel request, please use the tender code PY.
For details of the PayPal DoAuthorization request and response, see PayPal DoAuthorization.
Timeout Processing and Canceling Payment Authentication
If the ResponseCode value is Timeout, the webstore can retry the DoAuthorization call. The following example shows a timeout response.
<?xml version="1.0" encoding="UTF-8" standalone="yes"?>
                    <XmlFaultReply xmlns="http://schema.gsicommerce.com/payments/services/1.0/"
                    xmlns:payment="http://schema.gsicommerce.com/payments/types/1.0/">
                    <payment:CreateTimestamp>2012-01-26T17:09:07.046Z</payment:CreateTimestamp>
                    <payment:Code>SystemProcessingError</payment:Code>
                    <payment:Description>A system error has occurred.</payment:Description>
                </XmlFaultReply>
Radial recommends a maximum of three retry attempts, but the Payment service does not enforce a specific limit in the number of retries.
Retry Authorization
To retry after a Timeout response, the webstore submits another DoAuthorization call. (As an alternative, the webstore can accept the order and prompt the Order Management System, "OMS", to try another DoAuthorization call before the order is shipped.)
The DoAuthorization response includes a ResponseCode value with the results of PayPal's DoAuthorization processing. The next step depends on the ResponseCode value.
- Success/SuccessWithWarning: see Success Processing, above.
- Failure: The webstore or OMS submits a PaymentAuthCancel request (see below) to release the hold on the account created by the successful DoExpress call in Step 5.
- Timeout: The webstore or OMS retries the DoAuthorization call, or, if the maximum number of retries is reached, submits a PaymentAuthCancel request to void the order.
Payment Authorization Cancel
If the maximum number of DoAuthorization retries has been reached, and the response is still Timeout, the webstore or OMS submits a PaymentAuthCancel request to void the Order.
For the instructions to cancel a Payment Authorization, see Payment Authorization Cancel. Please use the tender code PY when submitting the Payment Authorization Cancel request.
Customer Account Hold Must Be Released
A successful DoExpress call places a hold on the customer account which can be released only if the OMS or webstore submits a PaymentAuthCancel request with TenderType=PY.
The PaymentAuthCancel can happens in two different ways, depending on the subsequent DoAuthorization call.
- If the DoAuthorization call returns a Failure, then the OMS or webstore must submit a PaymentAuthCancel request with TenderType=PY to release the hold.
- If the DoAuthorization call returns a Success or SuccessWithWarning, the OMS or webstore submits a PaymentSettlement request to capture the funds. After the final line item shipment (which means that no further capture/setttlement is necessary), the OMS or webstore sends one final PaymentSettlement request with the FinalDebit flag set to true, which finalizes the funds capture. (No more capture settlement requests are possible afterwards.)
- This final PaymentSettlement request automatically triggers a PaymentAuthCancel request with TenderType=PY, which releases the hold on the account.
Payment Capture Flows
In PayPal's authorization and capture process, "capture" refers to the action of collecting the funds from a previously authorized payment.
During capture the funds are moved to customer's account to seller's account and now the transaction is considered as completed.
Post-Authorization Capture Flow
In the Post-Capture Flow, payment is first authorized and captured separately at a later stage, typically when the order is ready for fulfillment. This method provides flexibility for merchants, allowing them to verify inventory, prevent fraud, or handle order modifications before capturing funds.
In this flow, Pass the 'AutoCapture' as false in SetExpress API, However, specifying capture in the request is optional; it defaults to Post-Capture.
For details of the PayPal SetExpress request and response, see PayPal SetExpress.
Auto-Capture Flow
In Auto-Capture (Pre-Capture) Flow, payment is automatically captured immediately upon authorization, eliminating the need for a separate capture call.
The Auto-Capture flow requires modifications in Set Express API.
In the Set Express request, set: AutoCapture as true
In addition, Merchants must ensure that intent is set as capture in SDK URL.
Example for SDK URL
<script src="https://www.paypal.com/sdk/js?client-id=YOUR_CLIENT_ID&intent=capture&commit=false"></script>For details of the PayPal SetExpress request and response, see PayPal SetExpress.
Part 3: Confirm Funds Call
If you are not using Radial Order Management as your order management system, then you must make a Confirm Funds API before shipment to be assured of a successful payment of your funds for the transaction. The authorization obtained by PayPal can be on a number of different card networks and payment methods. These different networks have different time periods for which the authorization you created is valid. For example, some authorizations are valid for 7 days, some for 10 days, and some for other durations.
Confirming funds before you are ready to ship is the most reliable way to make sure that the original authorization is still valid. If you find that it is not valid, you can take the opportunity to request another form of payment from the customer.
For more information, see Confirm Funds.
Part 4: Payment Settlement & Returns
A PaymentSettlement Request call is used both for PayPal payment settlement requests and for payment return requests.
A Payment Settlement is used for capturing funds for items that you sold. In the request message, the SettlementType is debit.
A Payment Return is used for returning funds to the customer. In the request message, the SettlementType is credit.
Payment Settlement
A PaymentSettlementRequest message must be submitted to capture funds from the customer's form of payment. The PaymentSettlementStatus message is returned to inform the caller of the final state of the settlement. In some cases, more than one PaymentSettlementStatus message is sent for a given settlement (for example, a credit card charge back could be made after a successful settlement).
An alternate request format, PaymentSettlementRequestList, groups several events together in a single message, and is intended for clients using the Webhooks Implementation for Asynchronous Messages. If you are using the Webhooks implemention, see Payment Settlement Status List Event, below.
After you submit a PaymentSettlementRequest message:
- Never resubmit a settlement again after you receive an ACK message that indicates the request has been received. If you submit the same settlement again, there is a high risk of multiple debit or credit entries being issued to the customer. This should never be done.
- Depending on the tender type, settlements have different time frames for processing. Certain settlement requests are processed immediately (for example, PayPal), while others are processed the next day (for example, credit cards)
- If there is an issue with the processor or a Radial server error, Radial takes care of any retries that are needed and has a process to submit them at a later date when necessary.
For Payment Settlement, Debit, Confirm Funds Before Settlement
Any system that calls Radial's Settlement (Debit) API must integrate Radial's Confirm Funds API into the business flow. You must invoke the ConfirmFunds API first, with PerformReauthorization set to true, before you invoke debit settlement. Use the original authorization amount in the amount field of the ConfirmFunds request, even if the amount does not match the current shipment cost (debit amount).
If the response to ConfirmFunds API returns FundsAvailable as Fail, this means that there is an issue with the authorization, and the shipment must be withheld from fulfillment. When this occurs, ask the customer to provide payment with a different payment method.
For the detailed Payment Settlement documentation, see Payment Settlement.
Payment Returns
When you need to process a return on behalf of the customer, you do so using the Payment Settlement API. In this case, in the API call the SettlementType value is credit because you are crediting back an amount to the customer. You cannot credit back more than the original authorization amount.
Error/Failure Processing
Failure Processing
If the ResponseCode value is Failure, the following steps conclude the payment flow:
- The webstore refuses the order and offers the customer alternate payment options.
- The webstore submits a PaymentAuthCancel request to release the hold on the order created by the successful DoExpress call.
Timeout Processing
If the ResponseCode value is Timeout, the webstore can retry the DoAuthorization call. Radial recommends a maximum of three retry attempts, but the Payment service does not enforce a specific limit in the number of retries.
To retry after a Timeout response, the webstore submits another DoAuthorization call. (As an alternative, the webstore can accept the order and prompt the OMS to try another DoAuthorization call before the order is shipped.)
The DoAuthorization response includes a ResponseCode value with the results of PayPal's DoAuthorization processing. The next step depends on the ResponseCode value.
- Success/SuccessWithWarning: see Success Processing, above.
- Failure: The webstore or OMS submits a PaymentAuthCancel request to release the hold on the account created by the successful DoExpress call in Step 5.
- Timeout: The webstore or OMS retries the DoAuthorization call, or, if the maximum number of retries is reached, submits a PaymentAuthCancel request to void the order.
If the maximum number of DoAuthorization retries has been reached, and the response is still Timeout, the webstore or OMS submits a PaymentAuthCancel request to void the Order.
Webhooks and Notifications
Radial Payments provides access to the payment information for your transactions, including PayPal payments. For detail on how to configure your integration to process transaction information, see Sales Transactions (POS) Feed.
PayPal Processing Notes
- A PayPal DoExpress is valid for 60 Days. After that it expires and another DoExpress request must be sent. The value can be adjusted to 365 days.
- A PayPal DoAuth is valid for 3 days. After that it expires and another DoAuth request must be sent. The value can be adjusted to 29 days.
- Both DoExpress and DoAuth must be valid when a Capture Settlement call is made.