Venmo
Radial Venmo Integration
Venmo is a mobile payments application available for supported iOS and Android devices. The Venmo app allows for secure and convenient mobile purchasing. Venmo is owned by PayPal, and Venmo payment transactions are processed through PayPal’s SDK integration.
Radial processes Venmo payments from your customers by using the APIs that are already in place to handle PayPal transactions.
Not all transactions are eligible for Venmo payments; see “Eligibility and Limitations of Venmo Payments,” below. In all cases, Venmo payments are available only for customers who have a Venmo account and have installed the Venmo app on a supported iOS or Android device.
Venmo payments can be accepted for the following scenarios:
-
An online purchase made on a supported iOS or Android device
-
An online purchase made in a desktop web browser, for customers who have at hand a supported iOS or Android device with the Venmo app
Both of these integration scenarios are detailed in the sections below.
Eligibility and Limitations of Venmo Payments
Not all transactions are eligible for Venmo payments. This section lists the limitations of Venmo payments.
Venmo can be used for online transactions only. Buy online, pay in store (BOPIS) transactions are not supported. In-person purchases are not supported.
Venmo supports United States transactions only. Both the merchant and the customer must be US-based. The transaction must be made in USD.
There are technology requirements for Venmo transactions. The seller’s app or website must be integrated with PayPal’s JavaScript SDK. The customer must have a Venmo account and must have the Venmo app installed on an iOS or Android device. On a mobile device, only the Safari browser is supported for iOS, and only the Chrome browser is supported on Android. A customer using a desktop computer can use any major web browser.
One-time payments, including authorization and capture use cases, are supported. Billing agreements, multiple seller payments, and shipping callback are not supported.
Integrate with PayPal’s JavaScript SDK
Adding Venmo as a payment option is done by adding the Venmo option to the checkout PayPal button. This is a client-side integration; that is, it requires integration with PayPal’s JavaScript SDK, which performs parts of the transaction processing in the customer’s app or web browser.
If you are not currently using PayPal’s JavaScript SDK, adopting the SDK integration also requires making changes to the server-side calls to Radial’s Payments API. The necessary changes and integration steps are detailed here: PayPal SDK JavaScript Smart Button.
Display a Venmo Button
After a site is integrated with PayPal’s JavaScript SDK, you can display a Venmo button to offer customers the option of paying with Venmo.
PayPal offers the following example code for displaying a Venmo payment button.
<!-- Set up a container element for the button -->
<div id="paypal-button-container"></div>

<!-- Include the PayPal JavaScript SDK. Replace `YOUR_CLIENT_ID` with your client ID.-->
<!-- Note that `enable-funding=venmo` is added as a query parameter -->
<script src="https://www.paypal.com/sdk/js?client-id=YOUR_CLIENT_ID&intent=authorize&commit=false&enable-funding=venmo"></script>

<script>
  // Render the Venmo button into #paypal-button-container
  paypal.Buttons().render('#paypal-button-container')
</script>
The above script results in the button display shown below.

In different countries, you may see different results. For merchants in the United States and Canada, your buttons will look similar to the image above. By default, all eligible payment buttons display in a single location on your page.
More Information
PayPal’s documentation for the Venmo button: https://developer.paypal.com/docs/checkout/pay-with-venmo/integrate/
Intent and Commit Settings
In addition to enabling the Venmo pay option there are two other settings that must be provided in the SDK script. These settings are called intent and commit.
The intent setting should be set to authorize. This is because most ecommerce orders experience a shipping delay. The authorize intent makes sure that the funds are held or allocated for the transaction before shipping. Although the funds are not available for use by the customer, they are not immediately paid to the merchant. When the order and its items have been shipped, then the funds are paid or captured.
The commit setting must be set to false. The commit setting tells PayPal whether the transaction amount is final or not final. If the commit setting is omitted, the default setting (true) is used and the transaction amount is final. If it is final, it cannot be updated.
Setting the commit value explicitly to false tells PayPal that the transaction amount may be updated. The amount does not have to be updated, but a false value retains the option of updating the amount. A common use case for updating the transaction amount is the use of shipping options, or speed of shipping within PayPal.
Although the shipping options feature does not currently work with a Venmo payment option, because the SDK for PayPal is used for both PayPal transaction and Venmo the commit value should be set to false.
The following example shows the intent and commit settings:
<script src="https://www.paypal.com/sdk/js?client-id=YOUR_CLIENT_ID&enable-funding=venmo&intent=authorize&commit=false"></script>
Accept Venmo Payments on a Mobile Device
You can accept Venmo payments in your own mobile app, or in the Safari web browser (on iOS devices) or the Chrome web browser (on Android devices).
To accept Venmo payments:
-
Add PayPal’s JavaScript SDK. See “Integrate with PayPal’s JavaScript SDK,” above.
-
Display a Venmo payment button. See “Display a Venmo Button,” above.
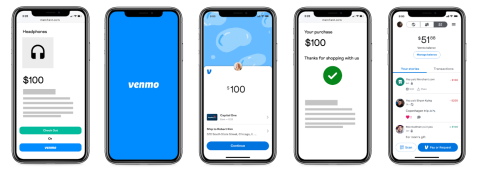
In a real-life Venmo payment flow, the following steps occur.
-
The customer taps the Venmo button.
-
Their mobile device switches to the Venmo app to complete the transaction.
-
In the Venmo app, the customer taps Continue.
-
The mobile device switches back to your website.
Note that a PayPal button will display along with the Venmo button. (The PayPal button is not shown in the simplified illustrations above.)
Venmo Display on Mobile Devices
If you are not able to view the Venmo option in a mobile browser, such as Safari on an iPad or iPhone, and you can see the option in the web/desktop browser view, then you may have to check your “mobile friendly” settings. The head tag of your webpage should include the following:
<head>
<meta name="viewport" content="width=device-width, initial-scale=1">
</head>
As mentioned in the Venmo documentation, your webstore's international location may prevent you from displaying the Venmo button. Also, make sure you are accessing the site from an approved location.
Accept Venmo Payments in a Desktop Web Browser
You can accept Venmo payments on a desktop web browser, if the customer has a mobile device in hand with the Venmo app installed.
To accept Venmo payments:
-
Add PayPal’s JavaScript SDK. See “Integrate with PayPal’s JavaScript SDK,” above.
-
Display a Venmo payment button. See “Display a Venmo Button,” above.
In a real-life Venmo payment flow, the following steps occur.

-
In the desktop web browser, the customer clicks the Venmo button.
-
The SDK automatically generates and displays a QR code in the desktop browser window.
-
The customer opens the Venmo app on their mobile device and scans the QR code.
-
The customer completes the payment review in their Venmo app.
-
The Venmo app directs the customer back to your website to complete the payment.
Note that a PayPal button will display along with the Venmo button. (The PayPal button is not shown in the simplified illustrations above.)
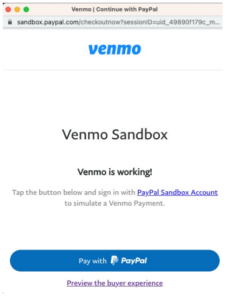
Important testing note: This desktop integration can only be tested in a live production environment. In a test environment, when you click the Venmo button, the text VENMO is working will display, but no QR code will appear. See “Testing Tips and Troubleshooting,” below.
Capture the Venmo Payment Type
For Venmo payments, the response sent back to Radial from PayPal will list the payment type as paypal. If you need to track the breakdown of Venmo payments versus PayPal payments for reporting purposes, you can capture the funding source using an onClick method supplied by PayPal.
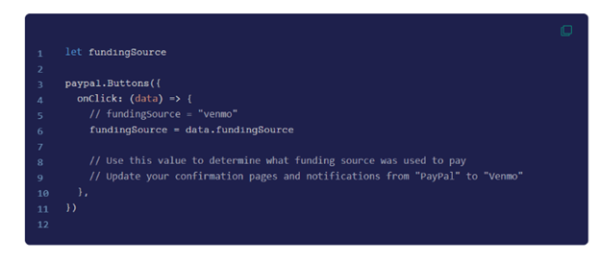
See PayPal documentation for details on the fundingSource code: https://developer.paypal.com/docs/checkout/standard/customize/display-funding-source/.
Send the Venmo Payment Type to Radial
For Venmo payments, the response sent back to Radial from PayPal will list the payment type as paypal.
If you want to send the Venmo payment method to Radial and if you use Radial’s ROM Create Order API call, then please provide the data as detailed there for WalletType as you would for ApplePay or GooglePay.
If you are not using Radial's order management system (ROM), you can send the Venmo payment type as a Custom Property in Radial’s Risk Assessment API XML message as illustrated in the code snippet below:
<CustomProperties>
  <CustomPropertyGroup Name="GSI_CUSTOM">
    <CustomProperty Name="RDFUID">
      <StringValue>d116bad5-fcd8-444a-8ae8-421015a04cef_1680684702321</StringValue>
    </CustomProperty>
    <CustomProperty Name="WalletType">
      <StringValue>VENMO</StringValue>
    </CustomProperty>
  </CustomPropertyGroup>
</CustomProperties>
Testing Tips and Troubleshooting Your Integration
PayPal advises the following tips and best practices when setting up Venmo payments for the first time.
Pay with Venmo is a mobile experience, so be sure to have the Venmo iOS or Android app installed. Do your mobile testing on an iOS Safari or Android Chrome browser.
Use your personal production login information during the checkout flow to complete a Venmo transaction and then log into the production site, paypal.com, to see the money move out of your account.
When making a live test purchase, consider:
-
The business account receiving money can’t also make the purchase.
-
If you create a personal account with the same information as the business account, those accounts might experience restrictions.
-
Open your test page with iOS Safari or Android Chrome.
-
Tap the Venmo button and switch to the Venmo app.
-
On the Venmo app, tap Continue or Pay Now to return to your test page.
-
If you have an additional confirmation page on your merchant website, continue to confirm the payment.
-
Contact Radial Payments support to confirm the funds have been received.
This desktop integration can only be tested in a live production environment. In a test environment, when you click the Venmo button, the text Venmo is working will display, but no QR code will appear.
When you are ready, contact Radial to switch your environment to “LIVE” and retrieve your production ClientId. The Testing ClientID and Production ClientID are different.
Troubleshooting Tips
Validate that there are no browser console warnings or errors. The JavaScript SDK configuration attributes have distinct validation checks for input formatting and values to ensure validity.
If the validation fails, the web browser's developer console displays warning messages that inform you which property is invalid and what you need to do to address the issue. In general, the library attempts to revert to the safe default values if there are missing or invalid inputs.
Best Practices
Always request Venmo. The Venmo button will not be visible if it can't support a given transaction. PayPal expands Venmo eligibility criteria regularly and recommend that you add enable-funding=venmo as a query parameter to your JS SDK.
Allow for Venmo placement. If you have an existing vertical button stack, an additional Venmo button renders in that stack. Ensure you are allowing enough room on your page for the additional Venmo button.
Display funding source used. You might have a confirmation page or a notification to the user that indicates the funding source used. Use an onClick handler to dynamically display Venmo in the confirmation notification.