Configure Core Rules
- Click or tap the
 icon in the upper-left corner. The Main Menu appears.
 - Click or tap Omni Administration. The Omni Administration submenu appears.
- Click or tap Order line Sourcing Rules. The Order Line Sourcing Rules submenu opens.
- Click or tap the Core Rules option. The Manage Core Rules screen appears.

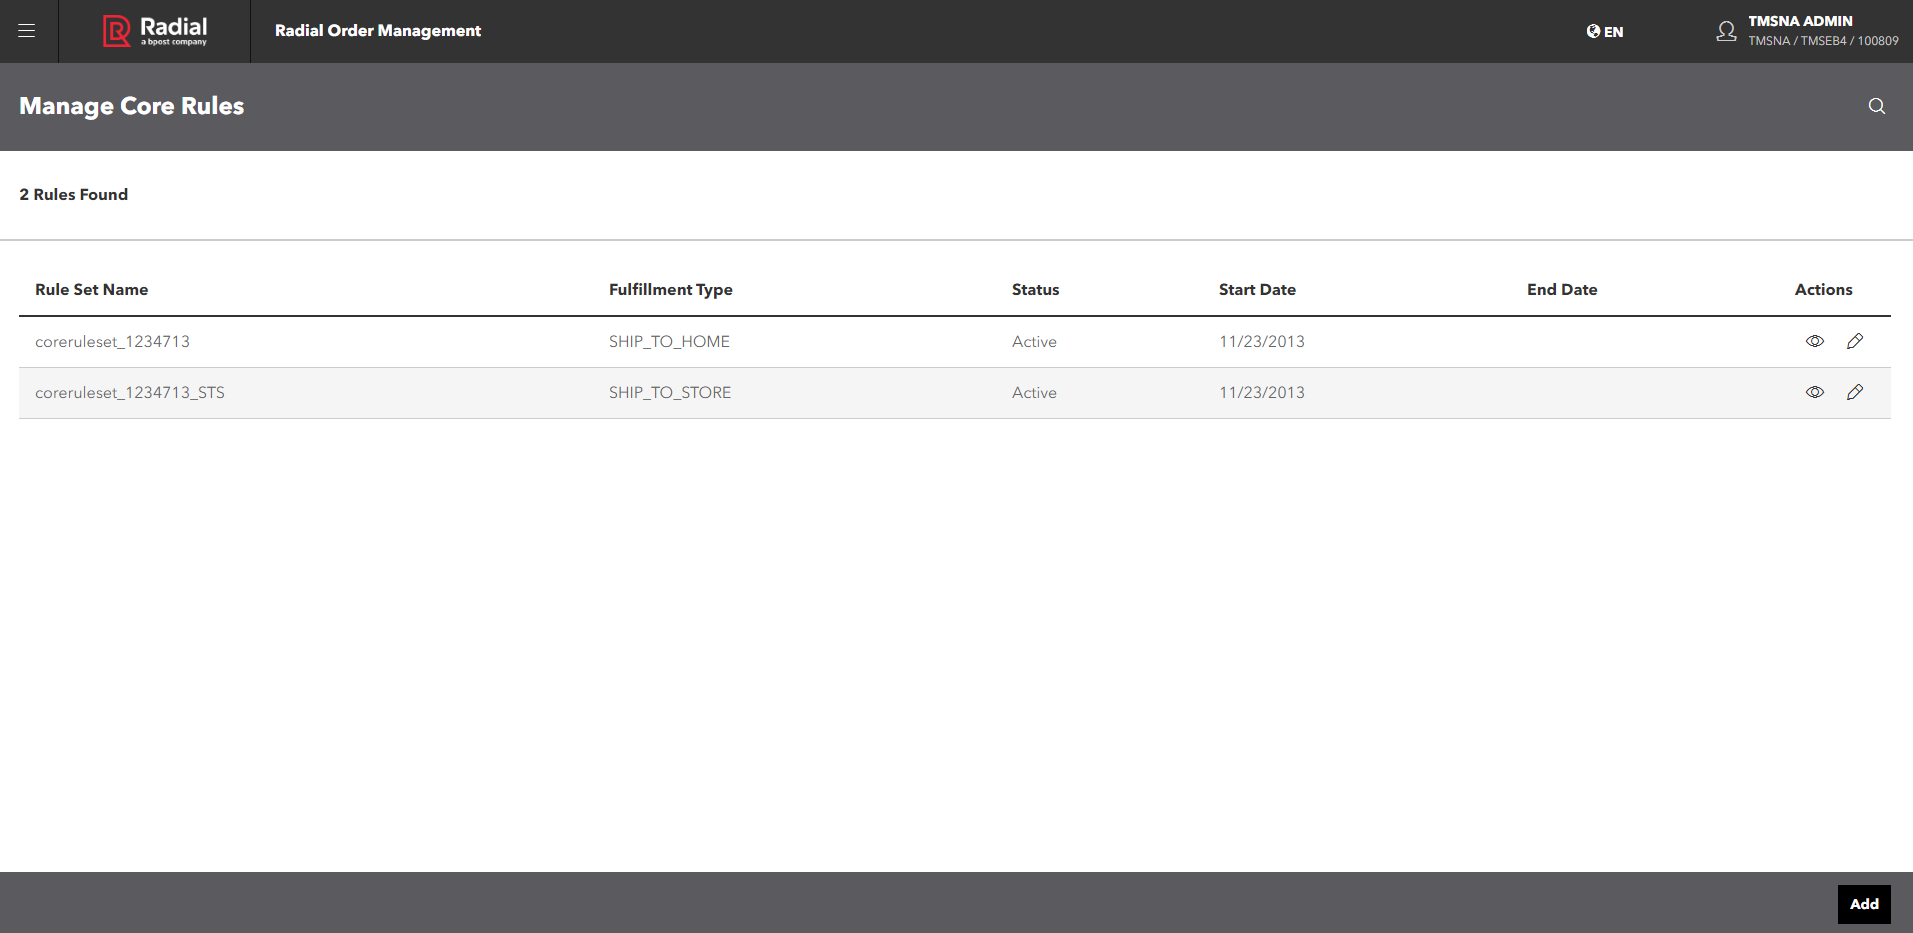
The Manage Core Rules screen shows a summary of all rule sets configured for a Seller. From this screen, you can:
- View a rule set.
- Edit a rule set.
- Add a rule set.
- Search for rule sets.
The Manage Core Rules screen displays the following information:
- Search by: Search fields that you can use to find rule sets. The screen provides basic and advanced search options.
- Rule Set Name: Provided by a user when a rule set is created.
- Fulfillment Type: Indicates the fulfillment type: SHIP_TO_HOME, SHIP_TO_STORE, or STORE_PICKUP.
- Status: Indicates a rule set status of Active or Inactive.
- Start Date: The date on which the rule set becomes active.
- End Date: The date on which the rule set is no longer be active.
- Actions:
 View Rule Set,
 Edit Rule Set
Add Rule Set
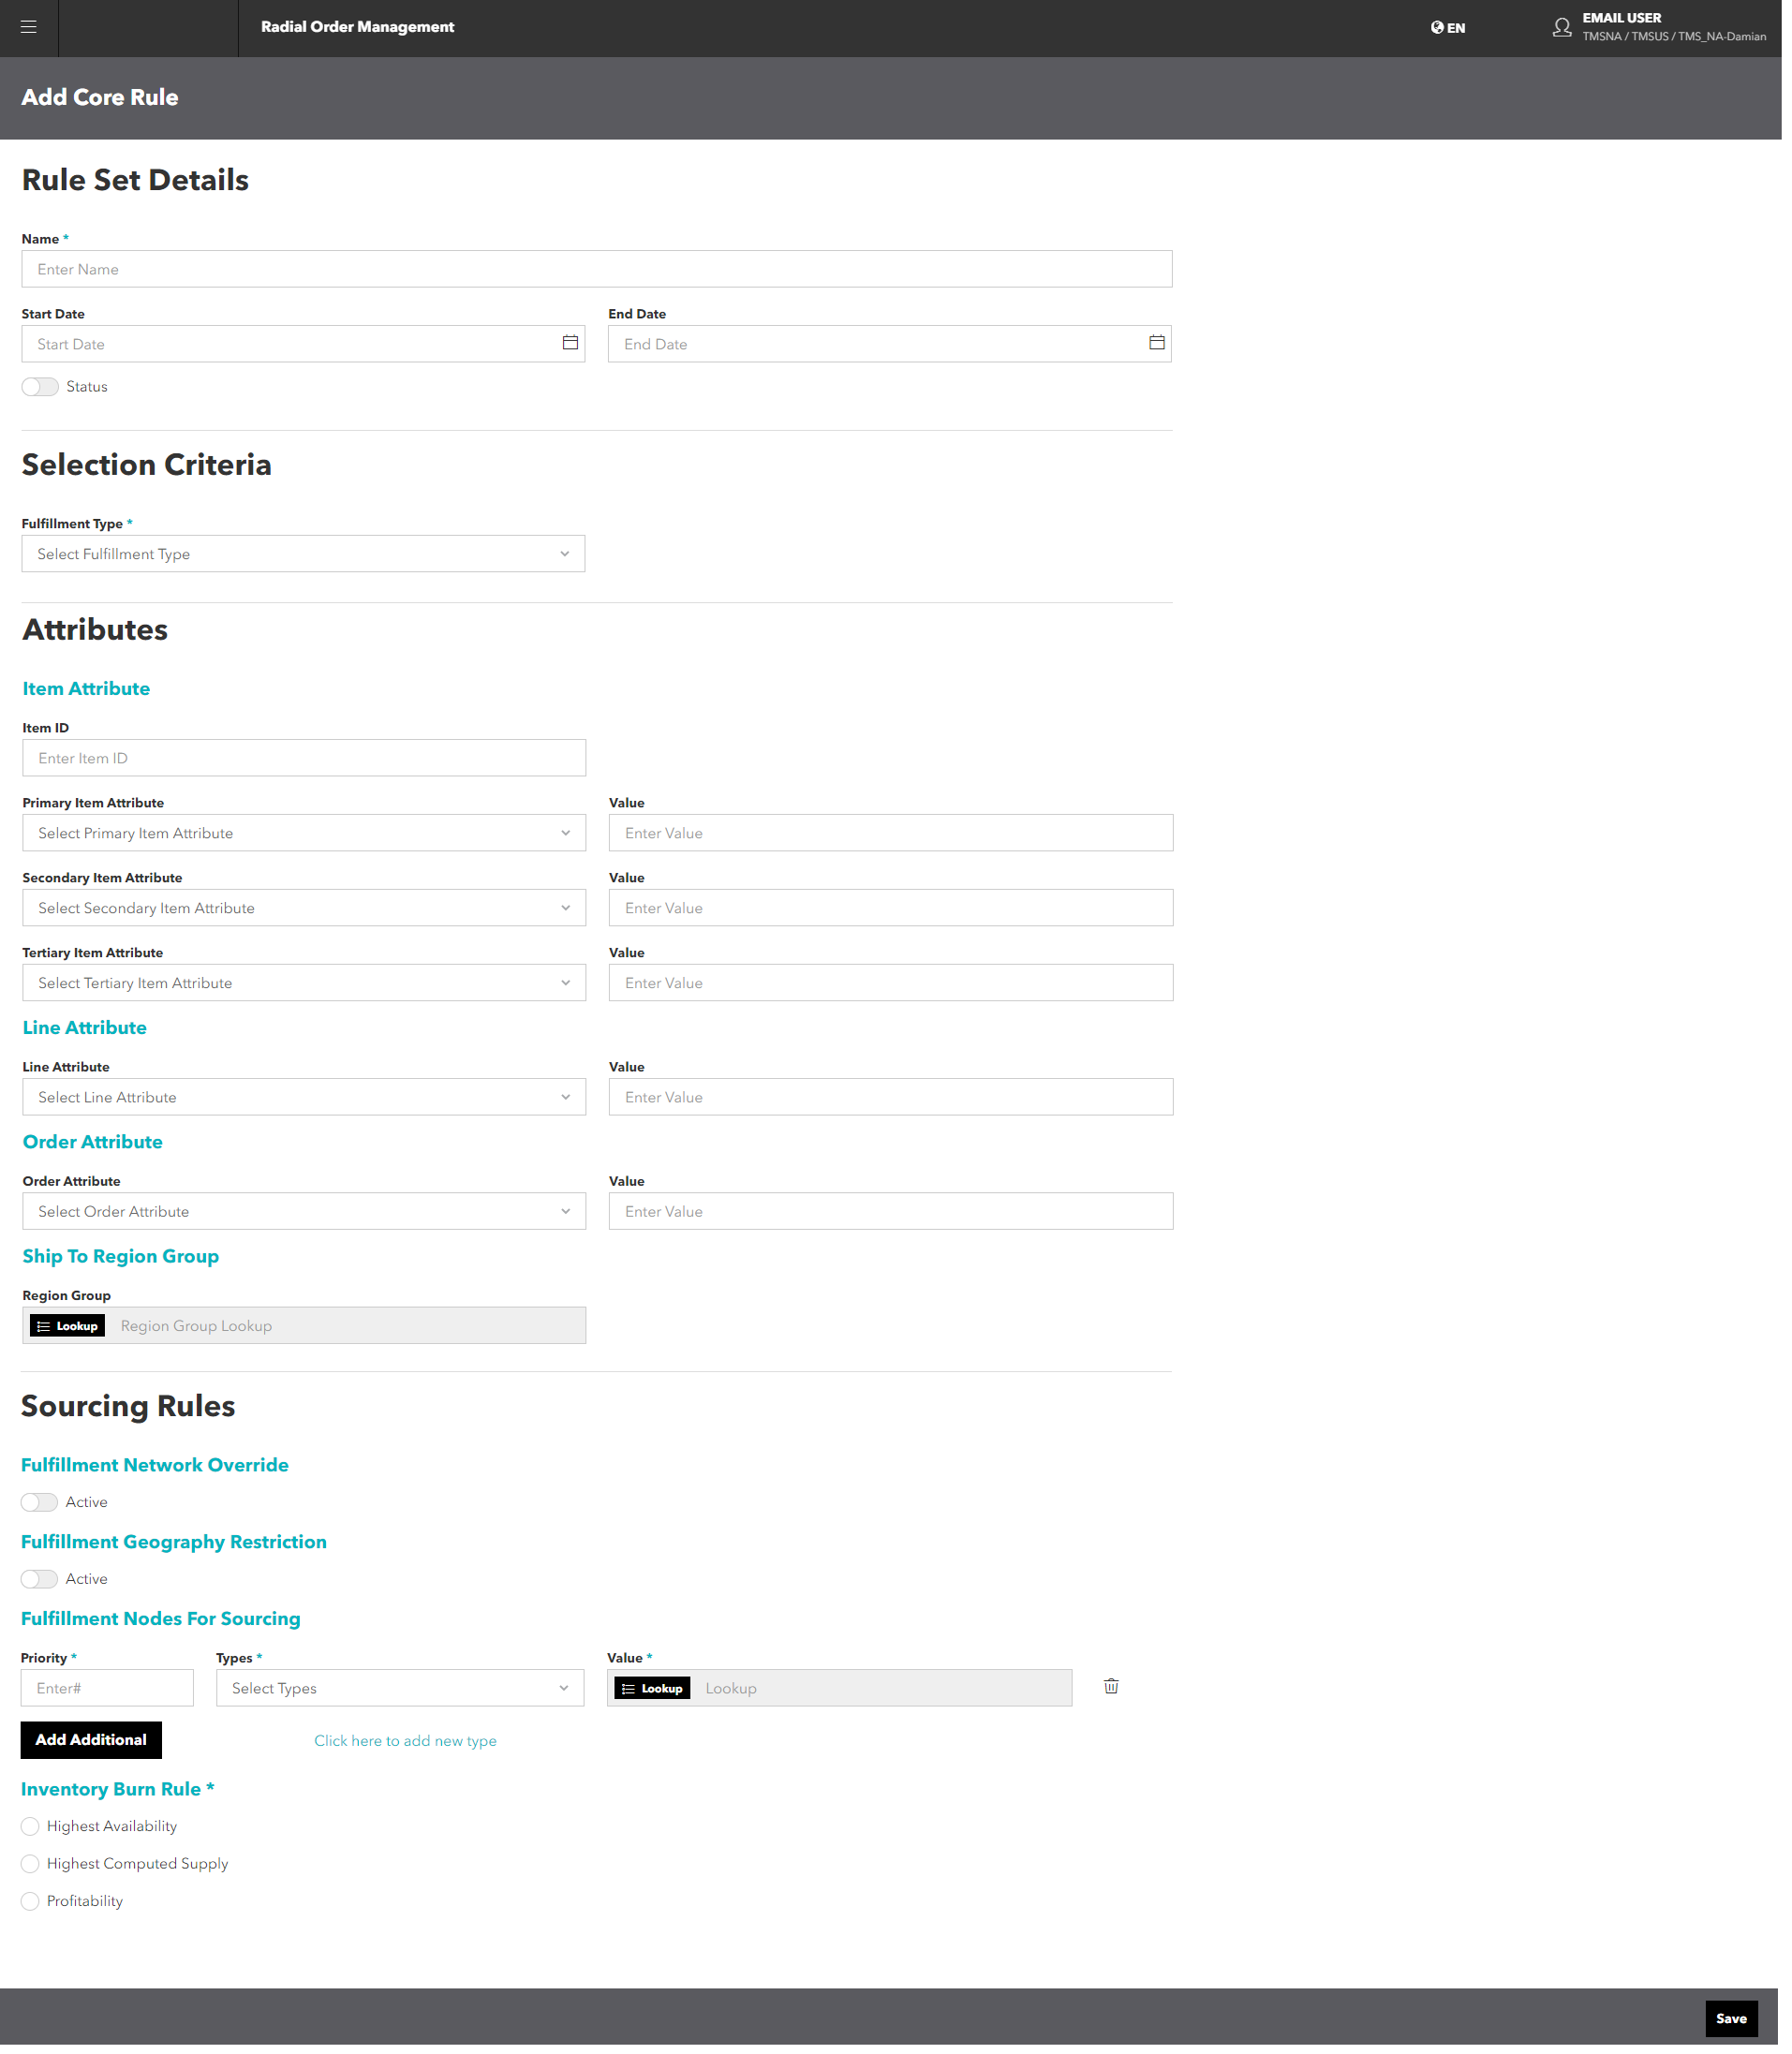
- From the Manage Core Rules screen, click or tap the Add button. The Add Core Rule screen appears.

This screen has four sections: Rule Set Details, Selection Criteria, Attributes, and Sourcing Rules.
- In the Rule Set Details section, enter the Rule Set Name. You can also specify a start date and end date. If the start date is not specified, it defaults to the current date.
- Click or tap the status toggle to activate the rule set.
- In the Selection Criteria section, select the Fulfillment Type: Ship-to Store, Ship-to Home, or Store Pickup.
- In the Attributes section, complete the following fields.
- To use the rule set for sourcing a specific item, enter the Item ID.
- To define a rule set that can only be used for sourcing items with the certain item attributes and/or items that belong to orders, specify the certain Line Attribute and/or Order Attribute:
- Select the desired Primary Item Attribute and enter the attribute value. Define secondary and tertiary item attributes if needed.
- Select the Line Attribute, if applicable, and enter the attribute value.
- Select the Order Attribute, if applicable, and enter the attribute value. Note: If you are configuring core sourcing rules for Radial Retail Connection stores, select Source.
- If you want the rule set to be used to source line items with the ship-to addresses that fall within the specific regions, specify the Ship to Group:
- Click or tap the Lookup button. The Manage Shipping Region Groups Summary screen opens.
- Find the desired Shipping Region Group and click or tap the Select action.
- Define the sourcing rules. For details, see Define Sourcing Rules.
- When you finish specifying all relevant Rule Set information, click or tap the Save button.
Define Sourcing Rules
- (Optional) Click or tap the toggle to activate the Fulfillment Network Override rule.
- (Optional) Enable the Fulfillment Geography Restriction rule. If the rule is enabled, you must define Ship from Region Group and Ship to Region Group Combinations.
- To activate the Fulfillment Geography Restriction rule, click or tap the toggle. Ship from Region Group and Ship to Region Group dropdowns appear. Select the Ship from Region Group and the Ship to Region Group.
- To add an additional restriction, click or tap the Add Additional button, the new Ship from Region Group and Ship to Region Group dropdowns appear. Select the Ship from Region Group and Ship to Region Group combination. Repeat this process until all the required restrictions are added.
- To remove a restriction, click or tap the
 icon for the restriction. The restriction is deleted.
- Specify the Source from Locations; that is, Nodes, Node Groups, Zone Groups or Distance Groups, and/or the Dropship Vendor to be used for sourcing order items.
- Enter the Priority number. The highest priority is determined in descending order; that is, the Source from Locations with the higher priority number is considered first.
- Select the FulfillmentTypes for Sourcing: Node, Pickup Node, Node Group, Zone Group, Distance Group, or Drop ShipVendor.
For Ship-to Store, if you select Pickup Node as the Fulfillment Type for Sourcing and assign it the highest priority, you enable STS Smart Routing. STS Smart Routing sources Ship-to Store orders from the collection/pickup store first. If items are not available at the pickup store, the normal sourcing logic applies.
- Specify the Value. If you selected the Drop Ship Vendor type, the Value is automatically set to “Primary Vendor”. If any other Type is selected, you must look up the value.
- Click or tap the Lookup button. Depending on the selected type, the appropriate lookup screen opens: Inventory Nodes, Node Groups, Search for Zone Group or Search for Distance Group. If the Node, Node Group, Zone Group or Distance Group that you want to include in the rule does not exist, you can add it. See Add Node, Node Group, Zone Group or Distance Group .
- Find the desired Source from Location and click or tap the Select action. The lookup screen closes and the Sourcing Rules Configuration screen re-appears. The Value field is now populated with the selected location.
- To add additional Source from Locations, click or tap the Add Additional button. The new Priority, Types and Value entry fields appear. Repeat Steps 1 - 3.
- Select the Inventory Burn Rule: Highest Availability, or Highest Computed Supply, or Profitability.
Add Node, Node Group, Zone Group or Distance Group
- Click or tap Click Here to Add New Type action. The dropdown list opens. Select one of the following options: Create Node, Create Node Group, Create Zone Group, or Create Distance Group. Depending on the selected option, the appropriate Add screen opens. Refer to Manage Fulfillment Node Group and Manage Fulfillment Node for details on how to create nodes and node groups.
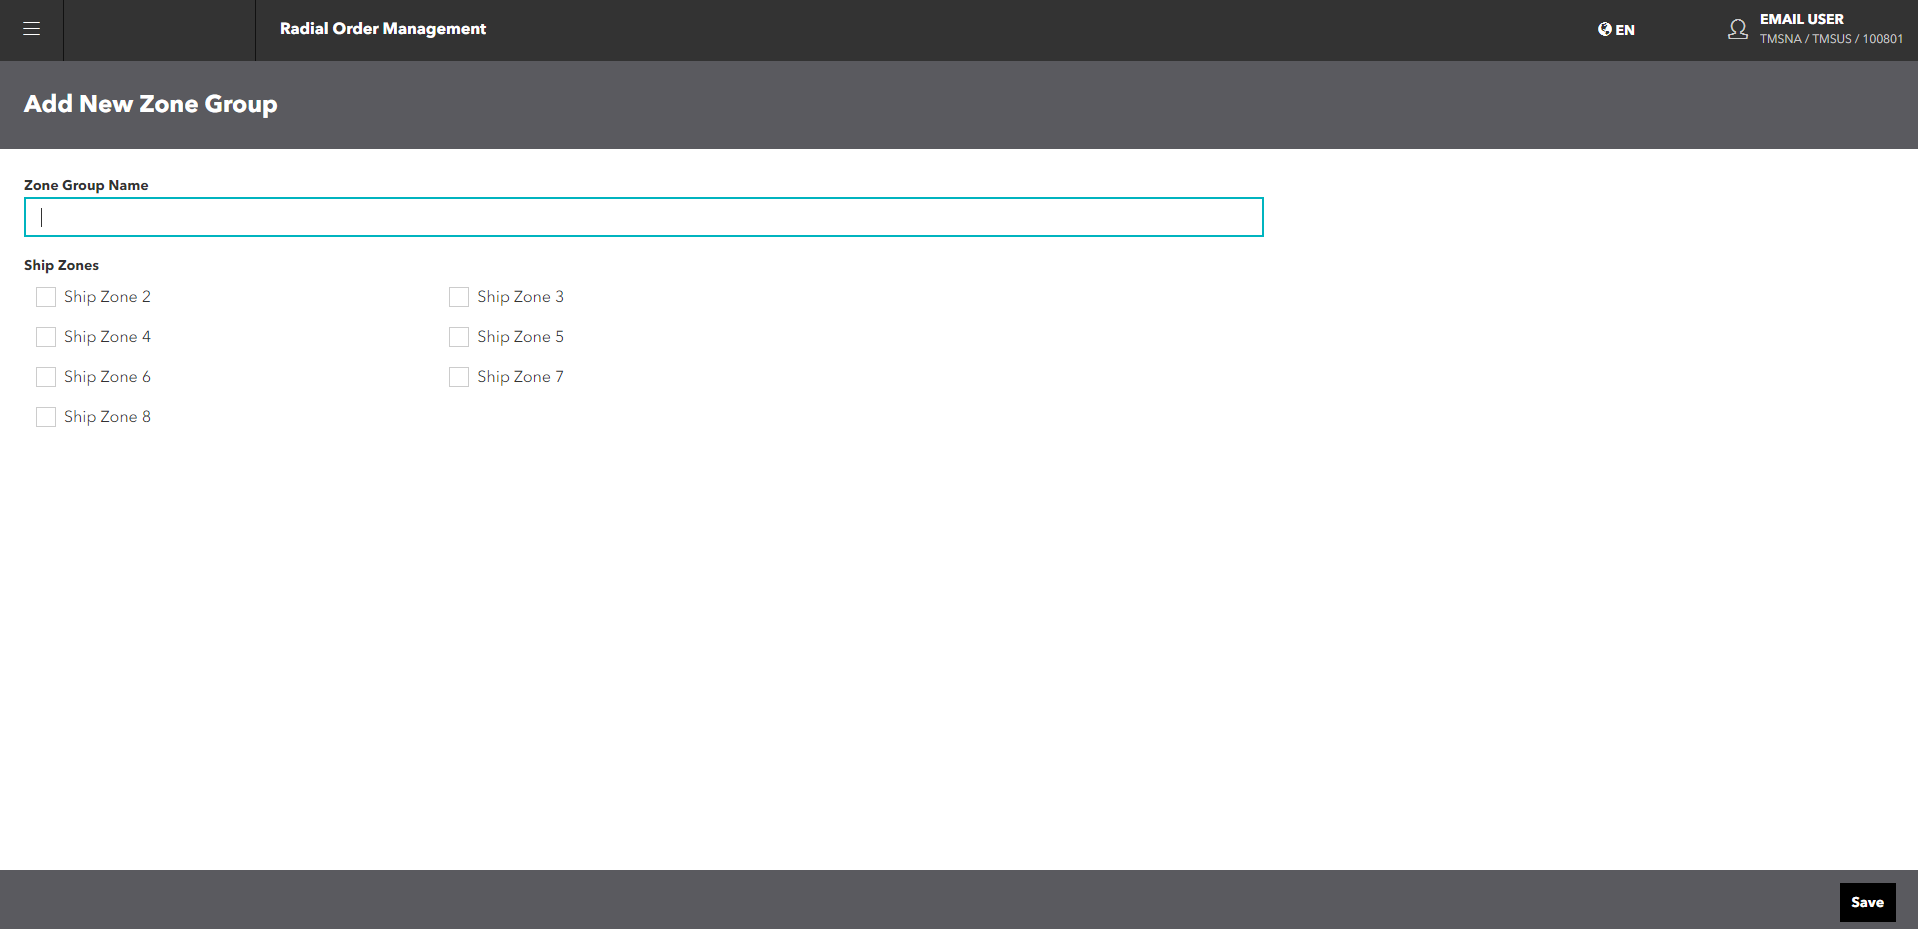
- If you select the Create Zone Group option, the Add New Zone Group screen appears.

- Enter the Zone Group Name.
- Select the Ship Zones to include in the group. Note that if you are creating a high-priority zone group that you want to be considered first during the “Fulfillment Nodes for Sourcing” rule execution, you should include the closest ship zones; that is, the ship zones with priorities 2 and 3.
- Click or tap the Save Zone Group button. Now you can include this Zone Group in the rule as described in Steps 1 – 4.
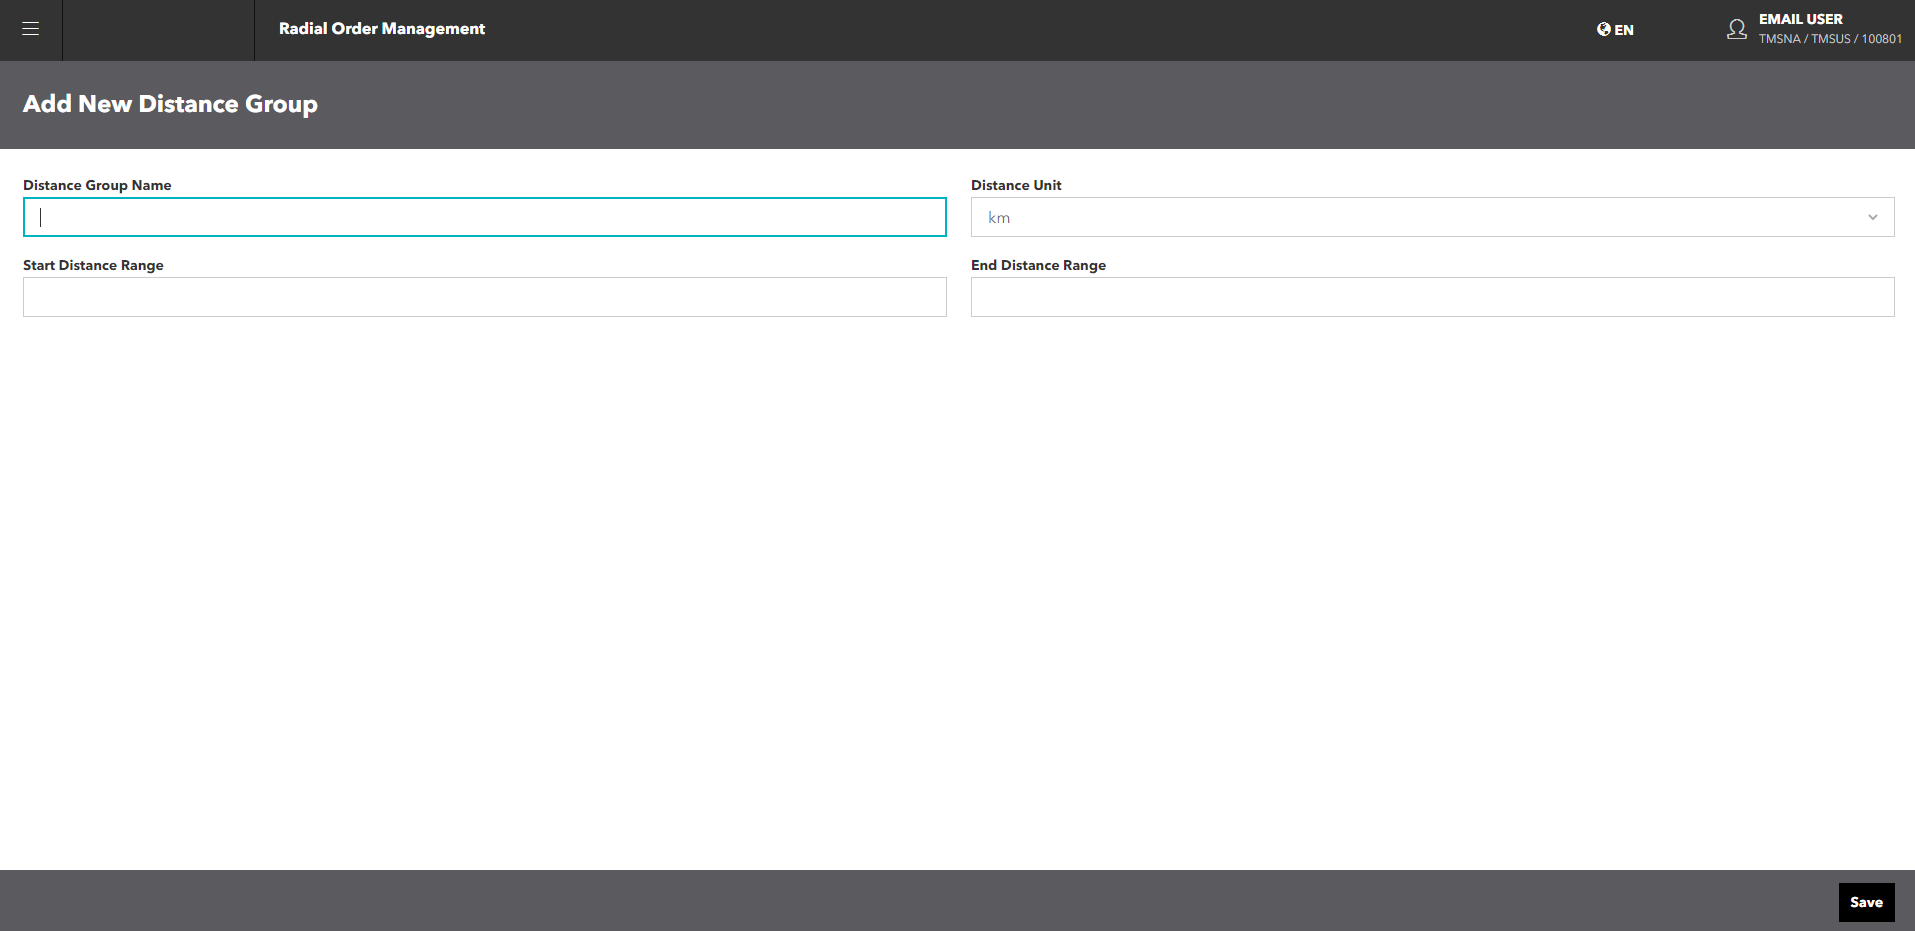
- If you select the Create Distance Group option, the Add New Distance Group screen appears.

- Enter the Distance Group Name.
- Select Distance Unit: km (kilometers) or mi (miles).
- Enter the Start Distance Range and the End Distance Range.
- Click or tap the Save Distance Group button. The Distance Group is created. Now you can include this Distance Group in the rule as described in Steps 1 – 4.
View Rule Set
To view the settings for a core rule:
- Click or tap the icon in the Actions column of the rule you to view. The View Core Rule screen appears.
- Review the settings for the rule. These settings include:
- Rule Set Details
- Selection Criteria
- Attributes
- Sourcing Rules
- If you need to update any of the settings, click or tap the Edit Core Rule button. See Edit Rule Set for details.
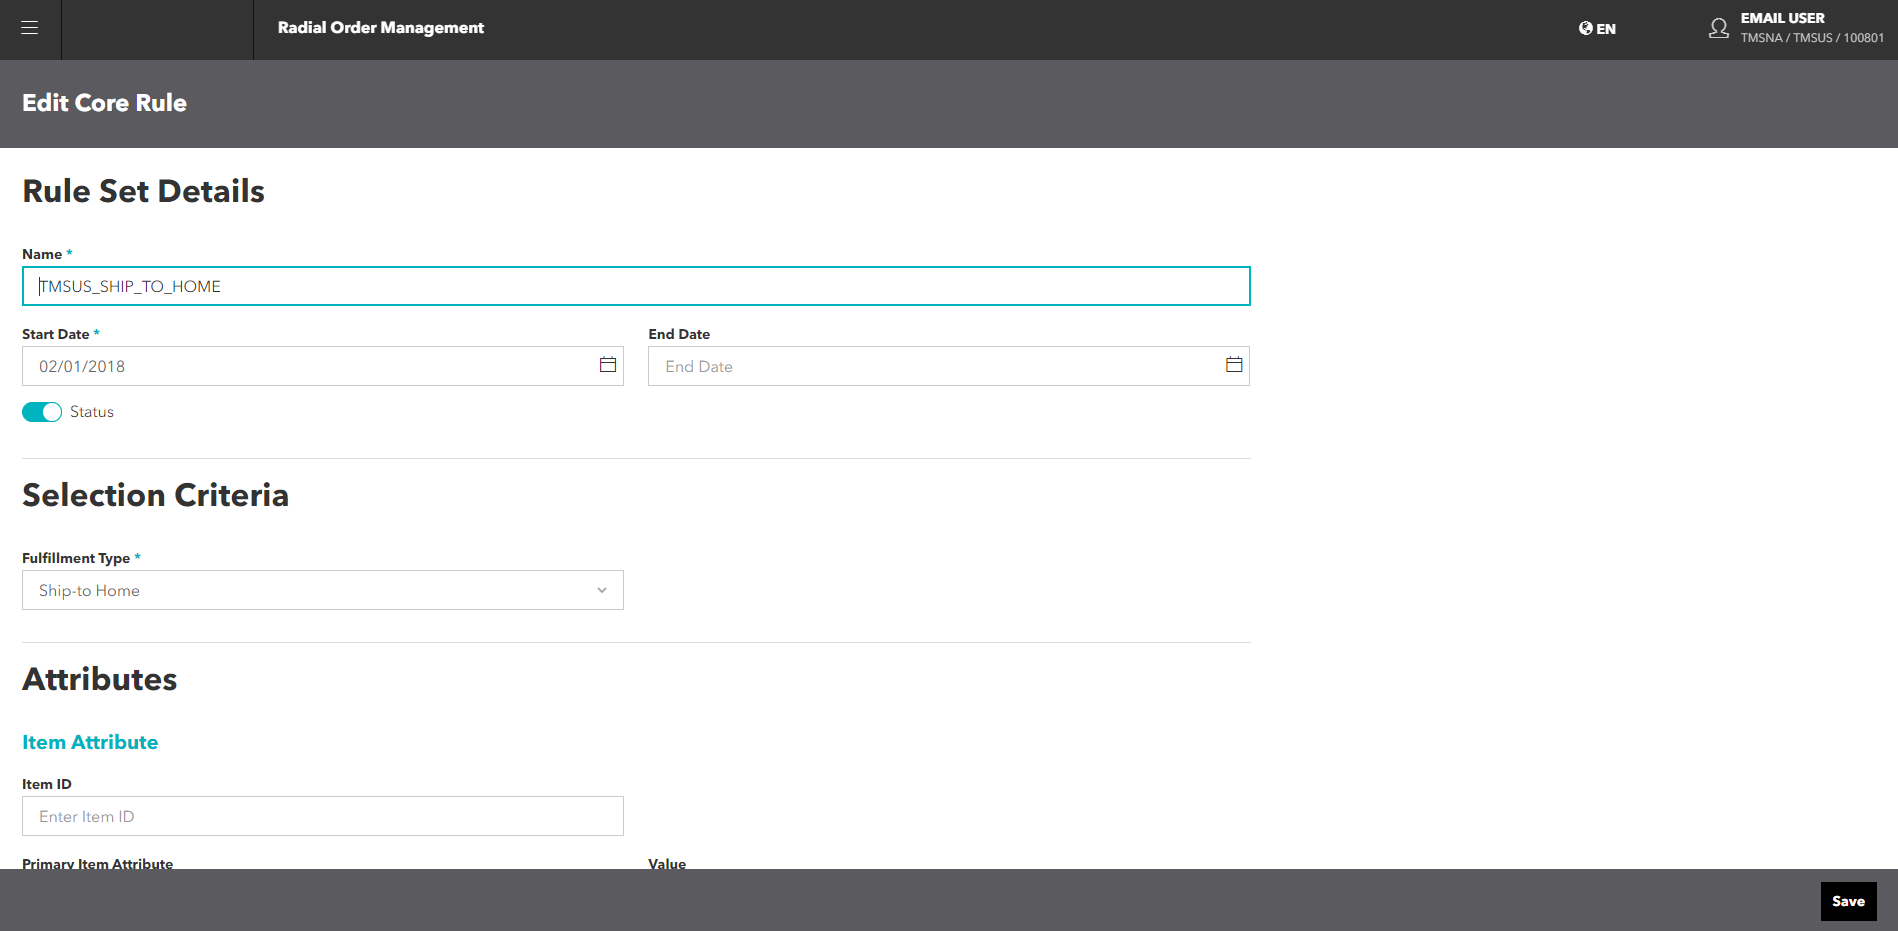
Edit Rule Set
- From the Sourcing Rule screen, click or tap the icon in the Actions column of the rule you want to edit. The Edit Core Rule screen appears.

- You can make the following changes to the rule set:
- Modify Start and End Dates.
- Change Status (Active to Inactive and vice versa).
- Modify Selection Criteria.
- Enable / Disable optional rules.
- Add / Remove Geography Restrictions
- Add / Remove Fulfillment Nodes for Sourcing
- Select a different Inventory Burn option
- When you complete your changes, click or tap the Save button.