Pack and Ship Orders (Ship-from Store and Ship-to Store)
Once you've completed picking your orders for Ship-from Store![]() A fulfillment process in which orders are shipped from a retail store rather than a warehouse or distribution center. Also called SFS. or Ship-to Store
A fulfillment process in which orders are shipped from a retail store rather than a warehouse or distribution center. Also called SFS. or Ship-to Store![]() A fulfillment process in which orders are shipped to a retail store where shoppers can pick them up. Also called STS. See also ISPU. fulfillment types, it's time to pack and ship them.
A fulfillment process in which orders are shipped to a retail store where shoppers can pick them up. Also called STS. See also ISPU. fulfillment types, it's time to pack and ship them.
- From the Dashboard, click or tap the Pack tile in the Ship From Store workflow.
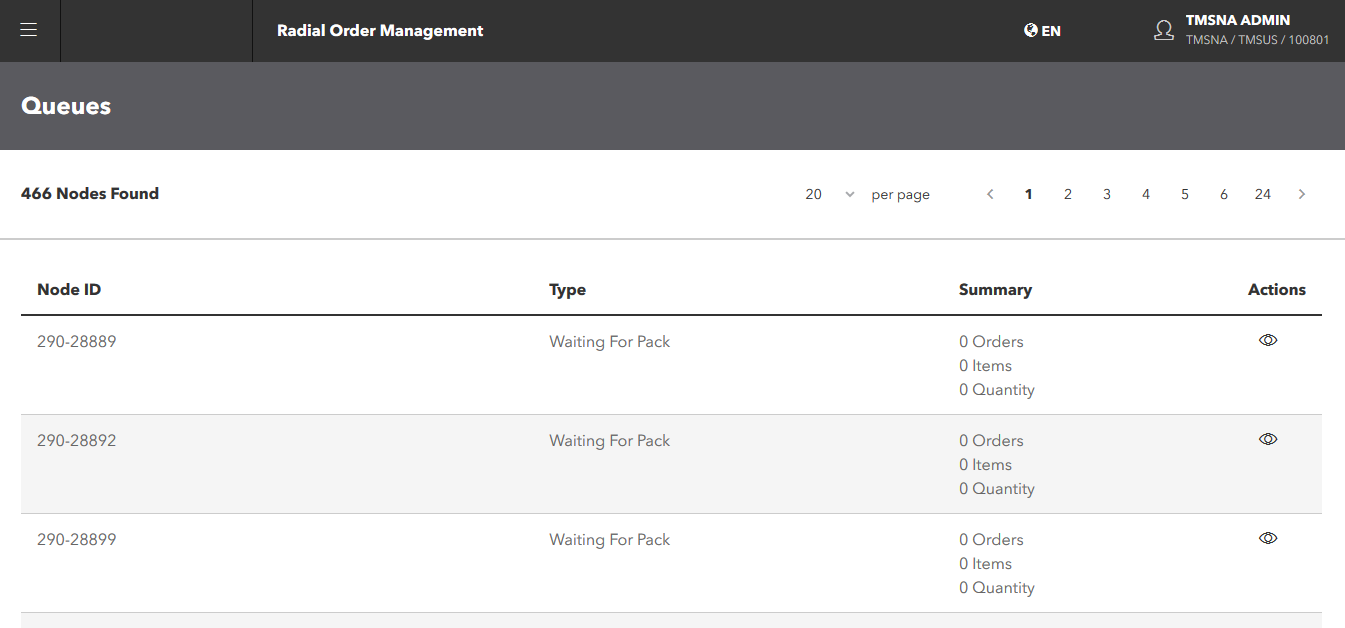
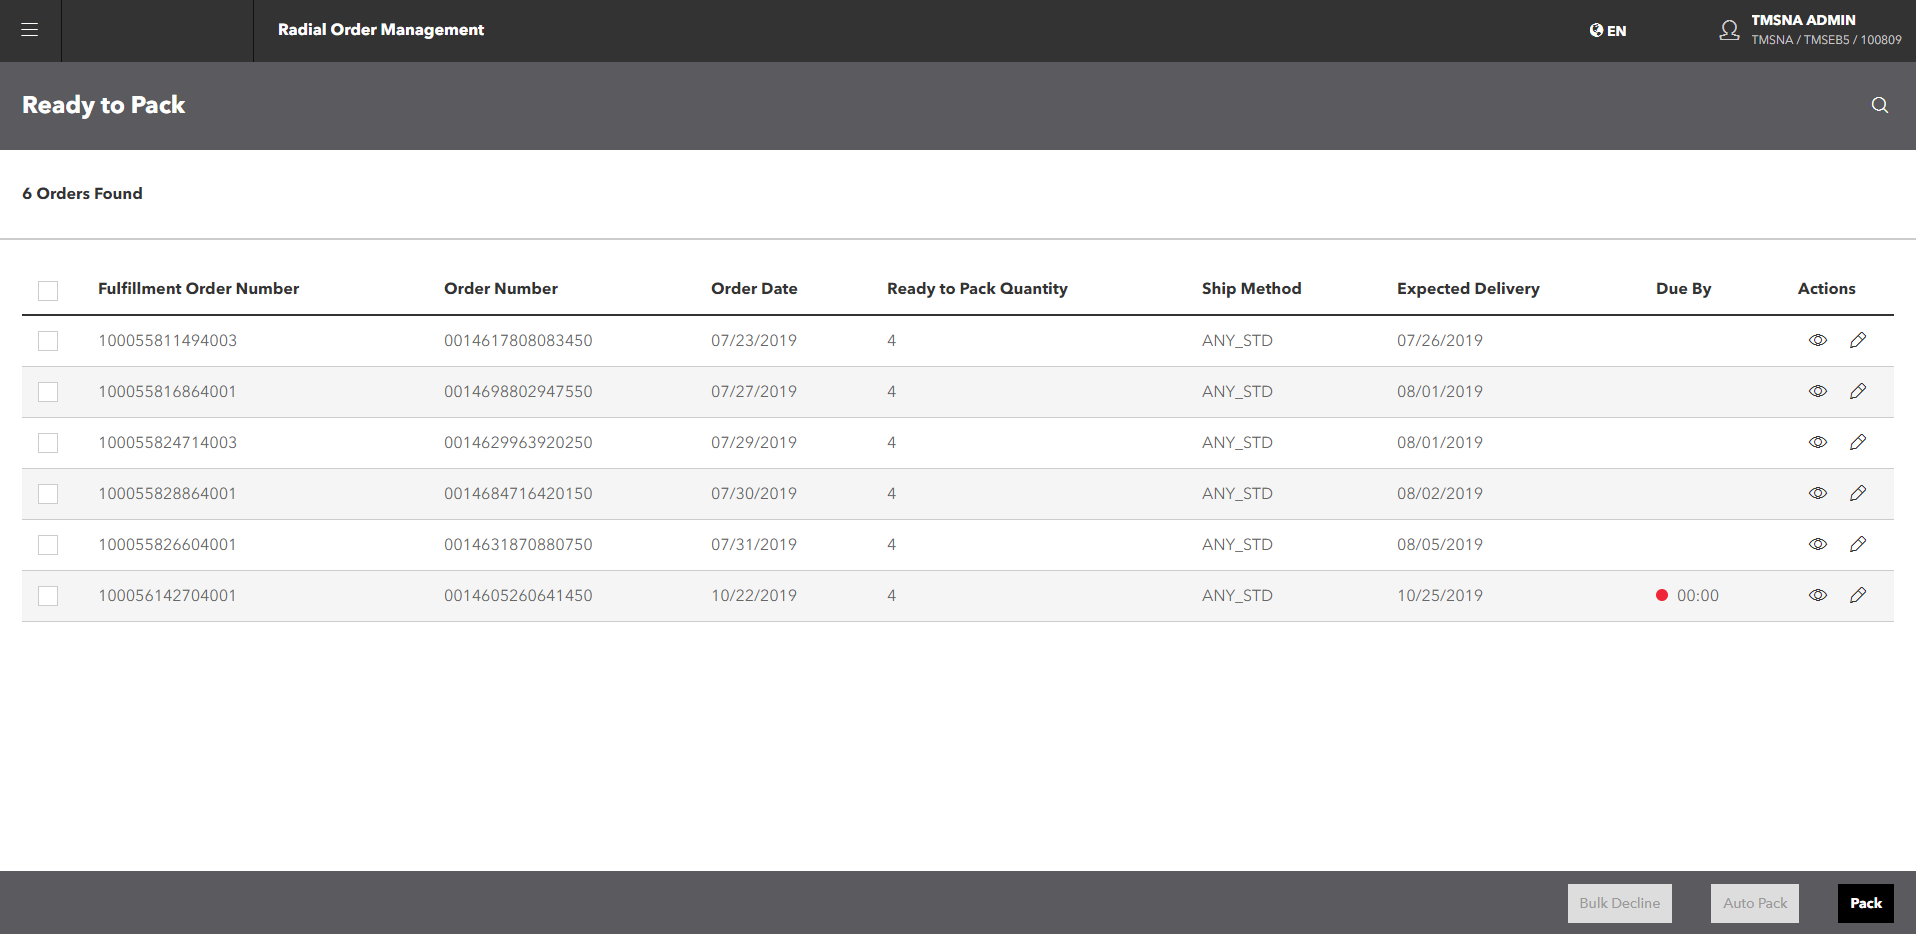
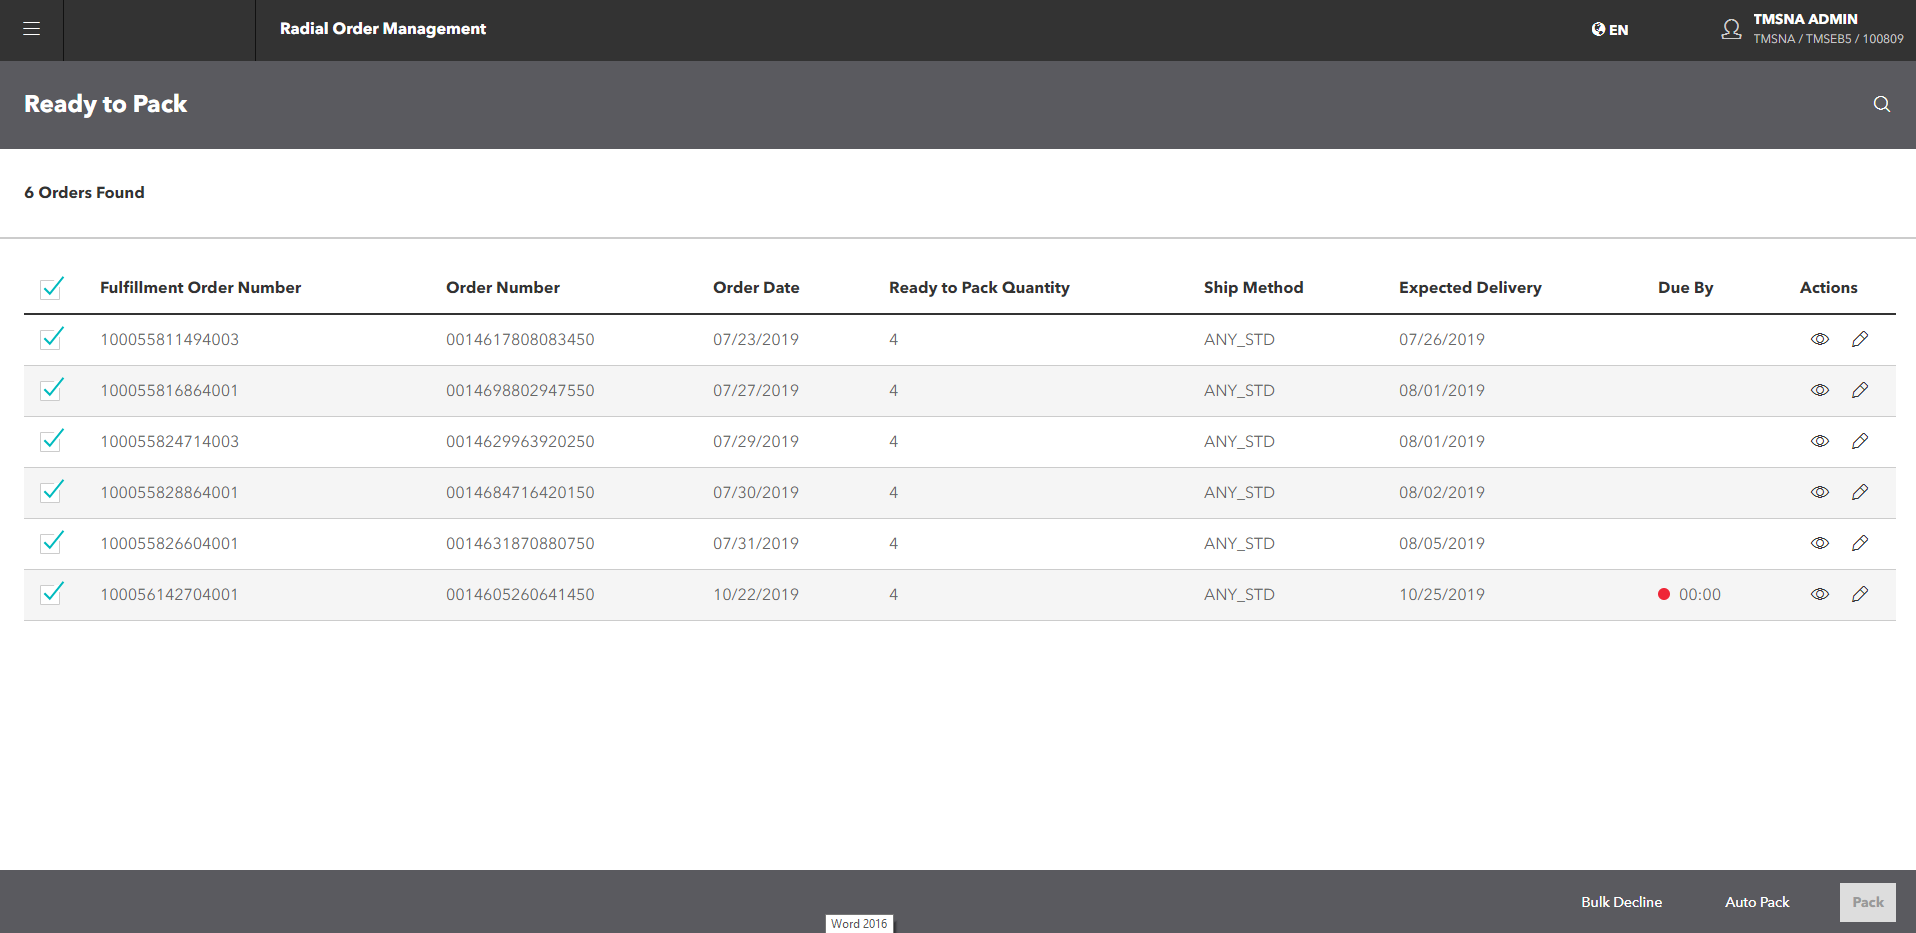
Depending on your role, either the Queues screen or the Ready to Pack screen appears.
If you have permission to access multiple fulfillment nodes, you see the Queues screen. It displays the orders, items, and quantities for all the nodes that you have access to. From this screen, you can view the orders to be packed at each node.
To see the orders that are ready to be packed, click the
 icon for the queue that want to see. The Ready to Pack screen appears.
If you have access to only one node, the Ready to Pack screen appears.

To narrow the results, you can search for a specific order or group of orders.
 Read more about this.
This screen has the following columns:
- Fulfillment Order An order that is ready to be picked, packed, shipped, and/or picked up. Number: The number assigned during the scheduling process.
- Order Number: The number assigned by the OMS when the order is placed.
- Order Date: When the order was placed.
- Pick Ticket A document that specifies the items in an order. The Store Associate uses the pick ticket to assemble the order. Number: The unique ID assigned to the pick ticket.
- Ready to Pack Quantity: The total number of units to be packed. For example, there may be three items, but two of each item; therefore, the quantity is six.
- Ship Method: How to ship the package.
- Due By: Shows the time remaining for the order to be packed. This time corresponds to the Service Level Agreement A commitment between the retailer and customer that defines the level of service. For ROM, the service level agreement defines the elapsed time between order placement and fulfillment. Also known as SLA. for the store. Teal indicates that there is plenty of time left, yellow indicates that there is only a short time left, and red indicates that time has run out.
- Actions: These icons that represent the actions you can perform.
 Pack a specific order.
- View the fulfillment order details -- you can't edit it or pack it.
- Fulfillment Order
- Now you're ready to pack the order. There are three ways that you can do this:
- Pack the next order in the queue.
- Pack a specific order in the queue.
- Automatically pack a selection of orders in the queue.
The following sections explain these procedures in detail.
 icon. The Search menu appears.
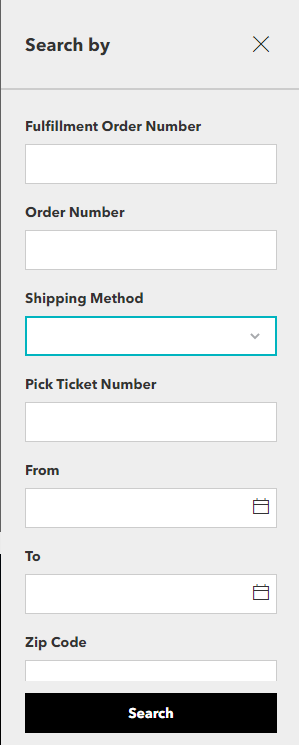
Pack the Next Order in the Queue
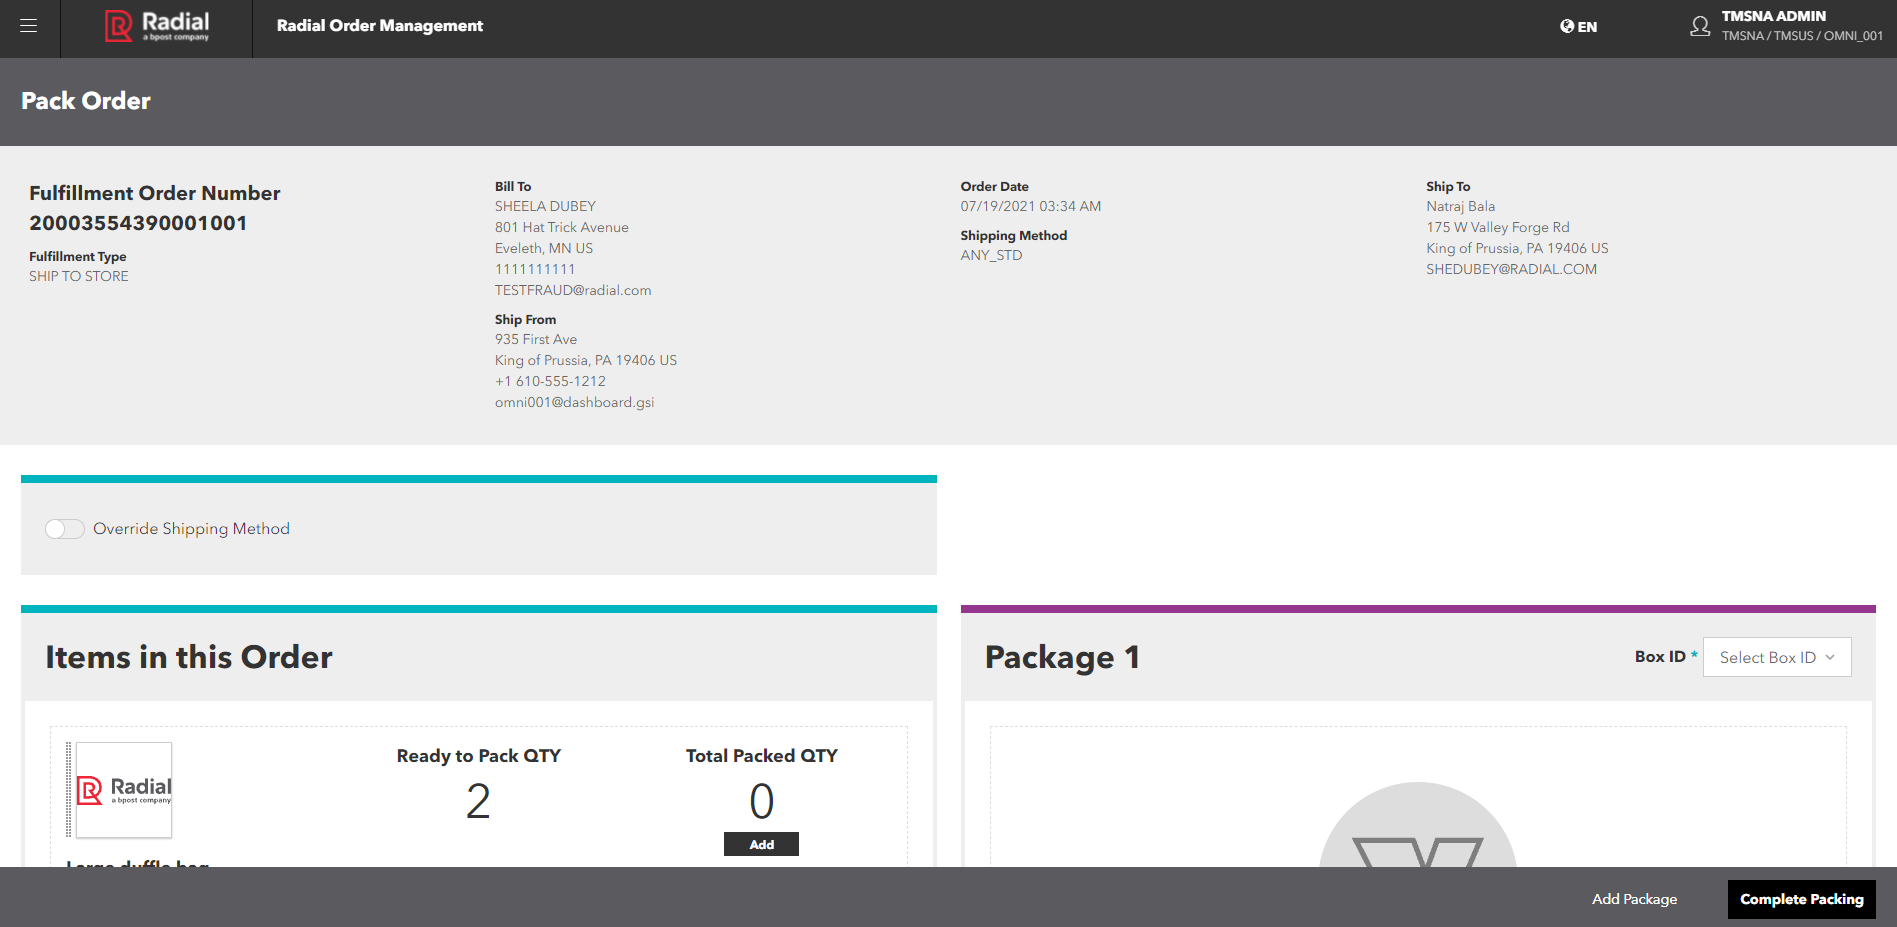
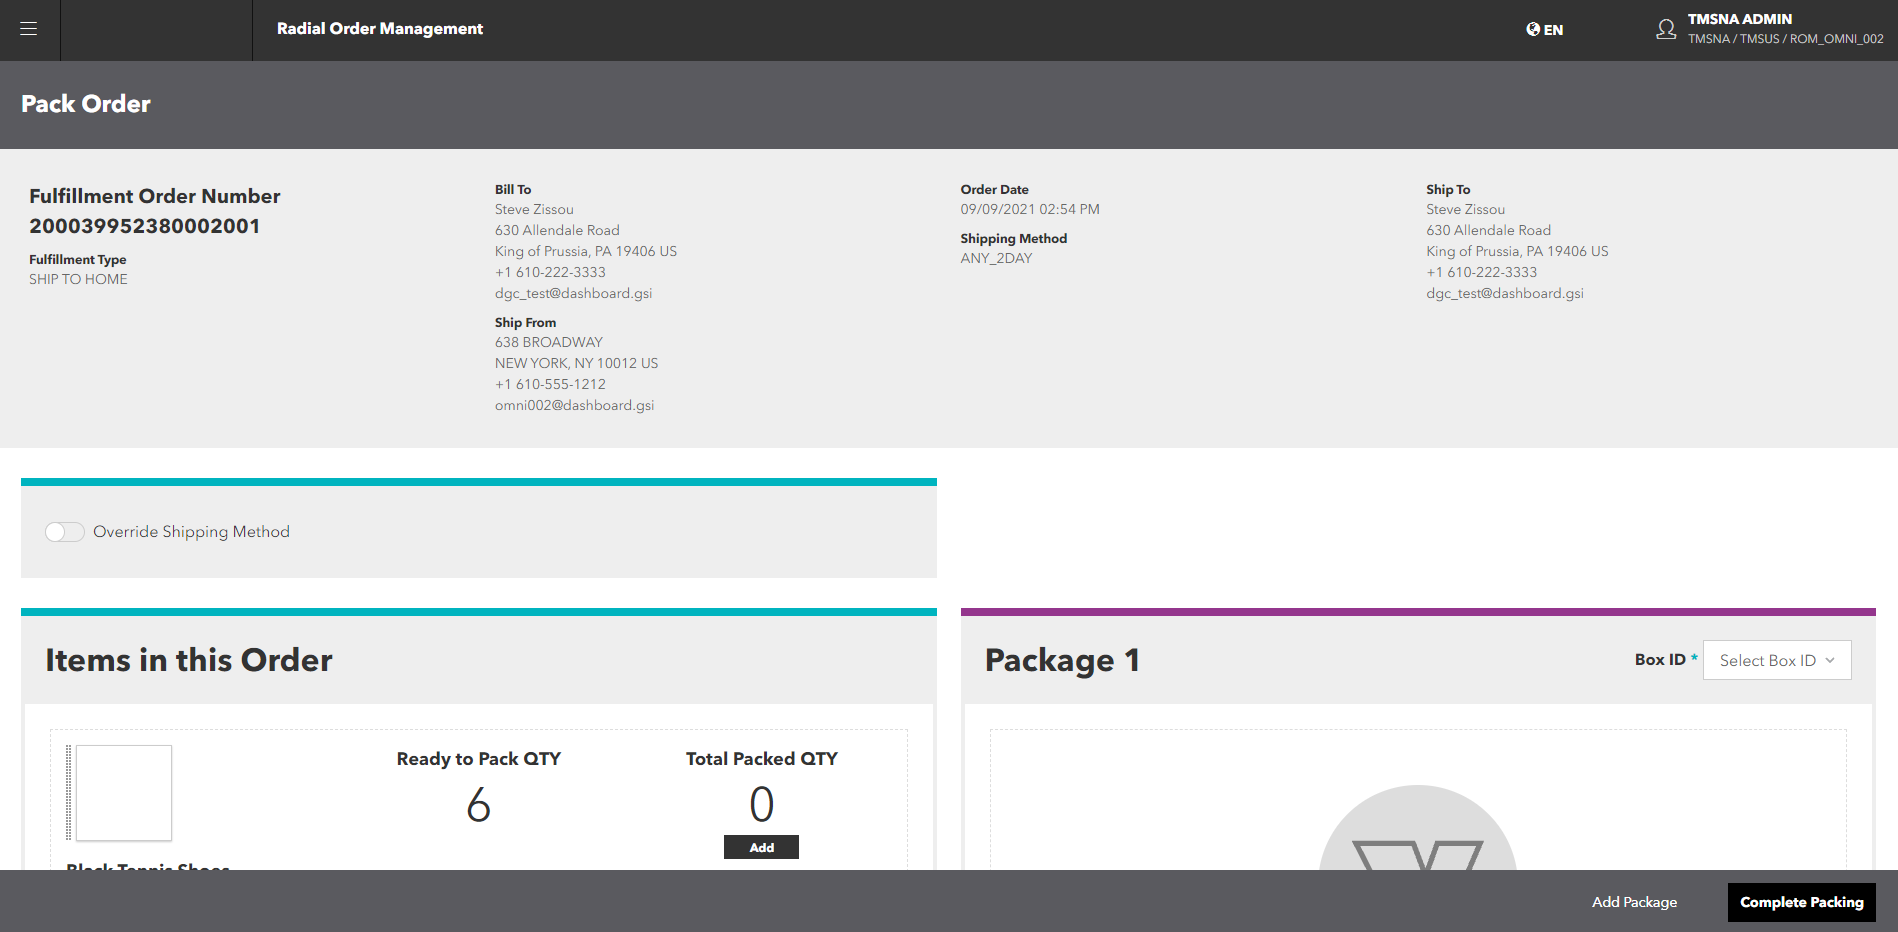
- Click or tap the Pack button in the Action bar at the bottom of the Ready to Pack screen. The Pack Order screen appears.

- If an item or items require gift wrapping, a pop-up appears. Click or tap the Continue button to return to the Pack Order screen.
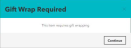
Click or tap the Continue button to return to the Pack Order screen. The Pack Order screen indicates the items that require gift wrapping. Gift wrap the item or items that require it.
- As you physically pack the items in boxes, add the items in the order to the package online. You can do this in several ways:
- Drag item images from the Items in this Order pane to the Package pane. The Ready to Pack QTY, Total Packed QTY, and Packed QTY update as you drag items into the package. Drag an image back to remove it.
- Click or tap the Add button to include items in a package; click or tap the Remove button to put them back. The Ready to Pack QTY, Total Packed QTY, and Packed QTY update as you add or remove items.
- Scan the item UPC code. The Ready to Pack QTY, Total Packed QTY, and Packed QTY update as you scan items into the package. To scan the items, you can use one of the supported scanners or a supported mobile device.
- Once you add an item to the package, you can edit the Packed QTY field. To do this, click or tap the quantity in the field. The field becomes editable and the Update button appears. You can now increase or decrease the quantity as necessary. Note: The Packed Qty cannot exceed the Ready to Pack QTY for the line item.
If you need to use more than one box to accommodate all of the items, click or tap the Add Package button, then continue to pack the items.
- If you do not add of the items to a package, the system considers those items to be declined. You must select a Reason for the decline from the Reason dropdown.
- In the Package pane, select the Box ID for each package in the order.
If the item can be packed in a polybag, you can select Polybag from the list. Keep in mind that it may be more cost effective to pack the item in a box with other items in the order rather than packing it separately in a polybag.
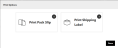
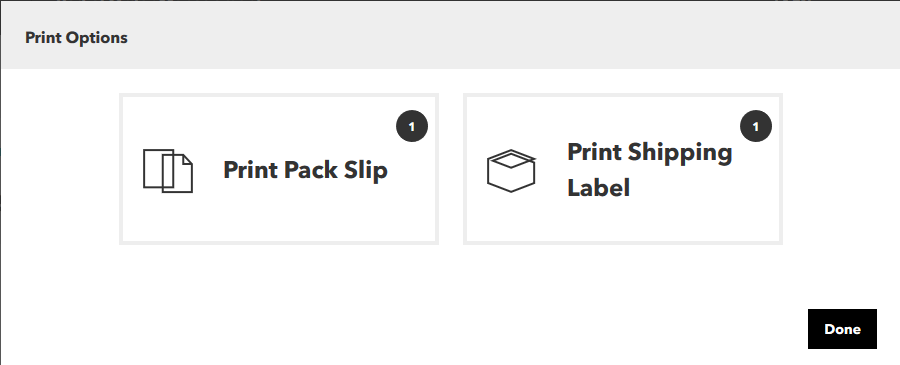
- Click or tap the Complete Packing button. A Print dialog appears, enabling you to print the Pack Slip, the Shipping Label, and/or a Return Shipping Label for Hassle-Free Returns.
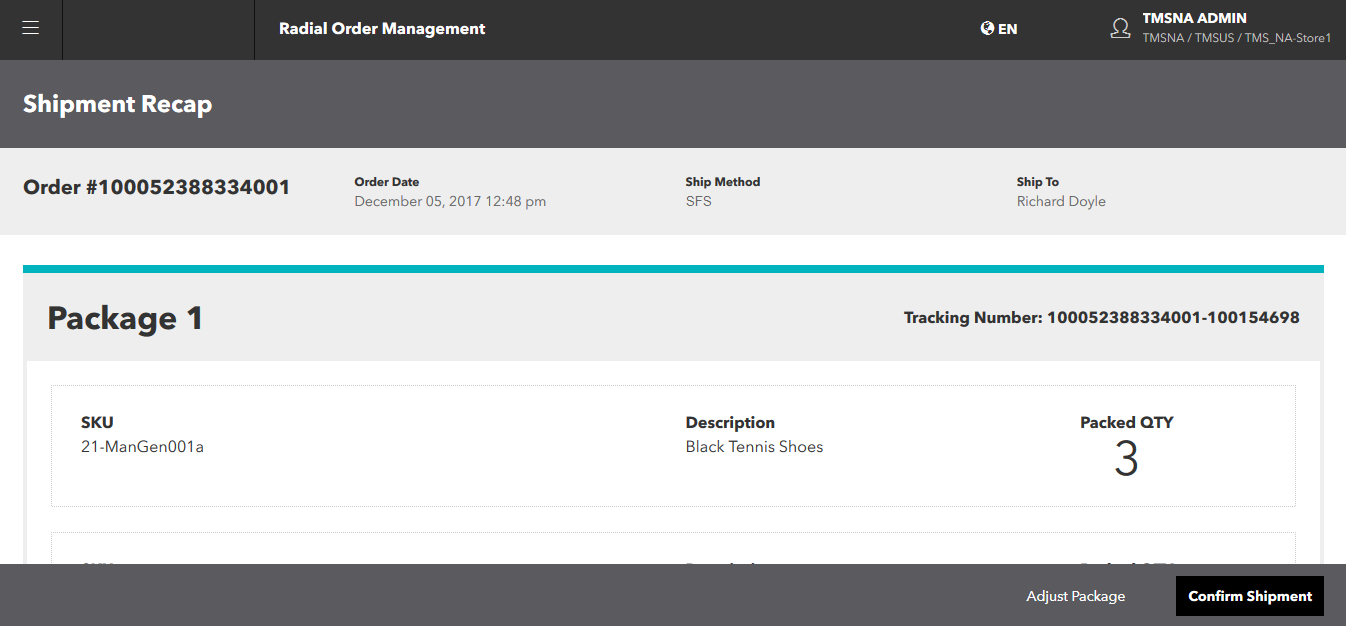
- If everything is fine, print the pack slip and/or shipping label, then click or tap the Done button. The Shipment Recap screen appears.
If the order contains gift-wrapped items, the pack slip does not display the pricing. If the shopper included a gift message and the print templates support it, the message is printed on the document.
- Click or tap the Confirm Shipment button. If you need to make changes to the shipment, click or tap the Adjust Package button to return to the Pack Order screen. You must now manually pack the shipment and confirm it. The successfully packed and confirmed shipments no longer appear on the Ready to Pack screen.
Note: You won't be able to make changes to the package once you confirm it.

Pack a Specific Order in the Queue
- Click or tap the icon in the Actions column. The Pack Order screen appears.
- If an item or items require gift wrapping, a pop-up appears. Click or tap the Continue button to return to the Pack Order scree.
Click or tap the Continue button to return to the Pack Order screen. The Pack Order screen indicates the items that require gift wrapping. Gift wrap the item or items that require it.
- As you physically pack the items in boxes, add the items in the order to the package online. You can do this in several ways:
- Drag item images from the Items in this Order pane to the Package pane. The Ready to Pack QTY, Total Packed QTY, and Packed QTY update as you drag items into the package. Drag an image back to remove it.
- Click or tap the Add button to include items in a package; click or tap the Remove button to put them back. The Ready to Pack QTY, Total Packed QTY, and Packed QTY update as you add or remove items.
- Scan the item UPC code. The Ready to Pack QTY, Total Packed QTY, and Packed QTY update as you scan items into the package. To scan the items, you can use one of the supported scanners or a supported mobile device.
If you need to use more than one box to accommodate all of this items, click or tap the Add Package button, then continue to pack the items.
- If you do not add of the items to a package, the system considers the unpacked items to be declined. You must select a Reason for the decline from the Reason dropdown.
- In the Package pane, select the Box ID for each package in the order.
If the item can be packed in a polybag, you can select Polybag from the list. Keep in mind that it may be more cost effective to pack the item in a box with other items in the order rather than packing it separately in a polybag.
-
Click or tap the Complete Packing button. A Print dialog appears, enabling you to print the Pack Slip, the Shipping Label, and/or a Return Shipping Label for Hassle-Free Returns.
- If everything is fine, print the pack slip, shipping label, and/or return shipping label, then click or tap the Done button. The Shipment Recap screen appears.
If the order contains gift-wrapped items, the pack slip does not display the pricing. If the shopper included a gift message and the print templates support it, the message is printed on the document.
- Click or tap the Confirm Shipment button. If you need to make changes to the shipment, click or tap the Adjust Package button to return to the Pack Order screen. You must now manually pack the shipment and confirm it. The successfully packed and confirmed shipments no longer appear on the Ready to Pack screen.
Note: You won't be able to make changes to the package once you confirm it.
Automatically Pack a Selection of Orders
- To select the orders that you want to pack, click or tap the checkboxes to the left of the order numbers.

- Click or tap the Auto Pack button in the Action bar at the bottom of the screen. A print dialog appears for the first shipment, enabling you to print the Pack Slip, the Shipping Label, and/or a Return Shipping Label for Hassle-Free Returns.
- If everything is fine, print the pack slip, the shipping label, and/or the return shipping label, then click or tap the Done button. The Shipment Recap screen appears.
- Click or tap the Confirm Shipment button. The next shipment appears. Continue to Confirm shipments until you're done.
If you need to make changes to a shipment, click or tap the Adjust Package button to return to the Pack Order screen. You must now manually pack the shipment and confirm it.
You must repack any remaining selected shipments that are not confirmed. Those shipments remain on the Ready to Pack screen.
- Physically pack the orders for shipment.
For an item that is eligible to be packed in a polybag, keep in mind that it may be more cost effective to pack the item in a box with other items in the order rather than packing it separately in a polybag.
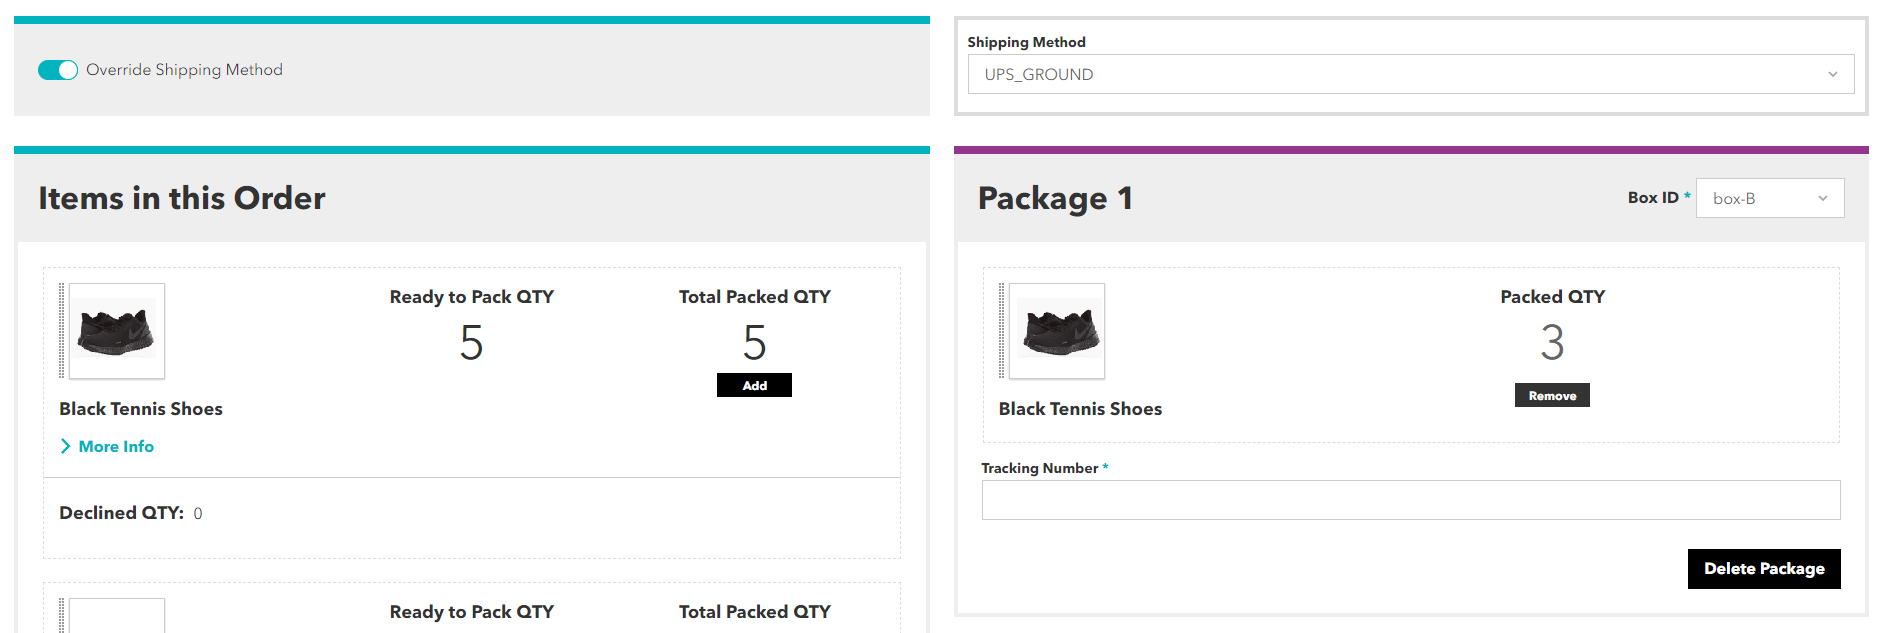
Override the Shipping Method for an Order
When packing orders, authorized users can manually override shipping information, giving you the flexibility to use manual shipping methods in special cases, such as orders for hazmat items or for orders requiring international shipping.
You must have the appropriate permissions to use this feature. Typically, Store Managers or experienced Store Associates may have these permissions.
When you override the shipping method for a package, ROM does not generate the shipping label and tracking number. You must generate the shipping label using an external application and manually enter the tracking number.
To override a shipping method:
-
From the Ready to Pack queue, select the order that you want to pack. The Pack Order screen appears.

-
Enable the Override Shipping Method toggle. The Shipping Method field and the Tracking Number fields appear.
-
Select the new shipping method from the dropdown.
-
Enter the tracking number for the new carrier.
-
Continue to pack the order as you usually do.