Configure Seller Service Groups
The specific settings for your Seller are set up in Service Groups. These groups correspond to the order pipeline and orchestration settings initially created before launch, so the Service Groups that you see on these pages may vary according to your unique setup and the Radial products that your company purchased. Access to this screen is controlled by permissions; normally, only certain Administrator roles are granted these permissions. This topic explains how to configure the default Seller Service Groups.
Important: If you are using an older version of ROM, you will not see this screen. Rather, you will configure your Seller settings here.
To configure Seller Service Groups:
- Click or tap the
 icon in the upper-left corner. The Main Menu appears.
 - Click or tap Omni Administration. The Omni Administration submenu appears.
- Click or tap Seller Configurations. The Seller Configurations submenu appears.
- Click or tap Service Group Configurations. The Edit Seller Service Group Configurations appears and displays the Basic Seller Configurations section.

The Edit Seller Service Groups screen has several sections. You may not see all of the following sections because what you see is based on the Radial products that your company owns.
- Basic Seller Configurations
- Invoice Shipment Service Group
- Order Consolidation Service
- Reship Service Group
- Return Service Group
- Sales Order Create Service Group
- Schedule Service Group
- Shipment Service Group
These groups define the way an order moves through the life cycle, how the order is fulfilled, and how order returns are handled.
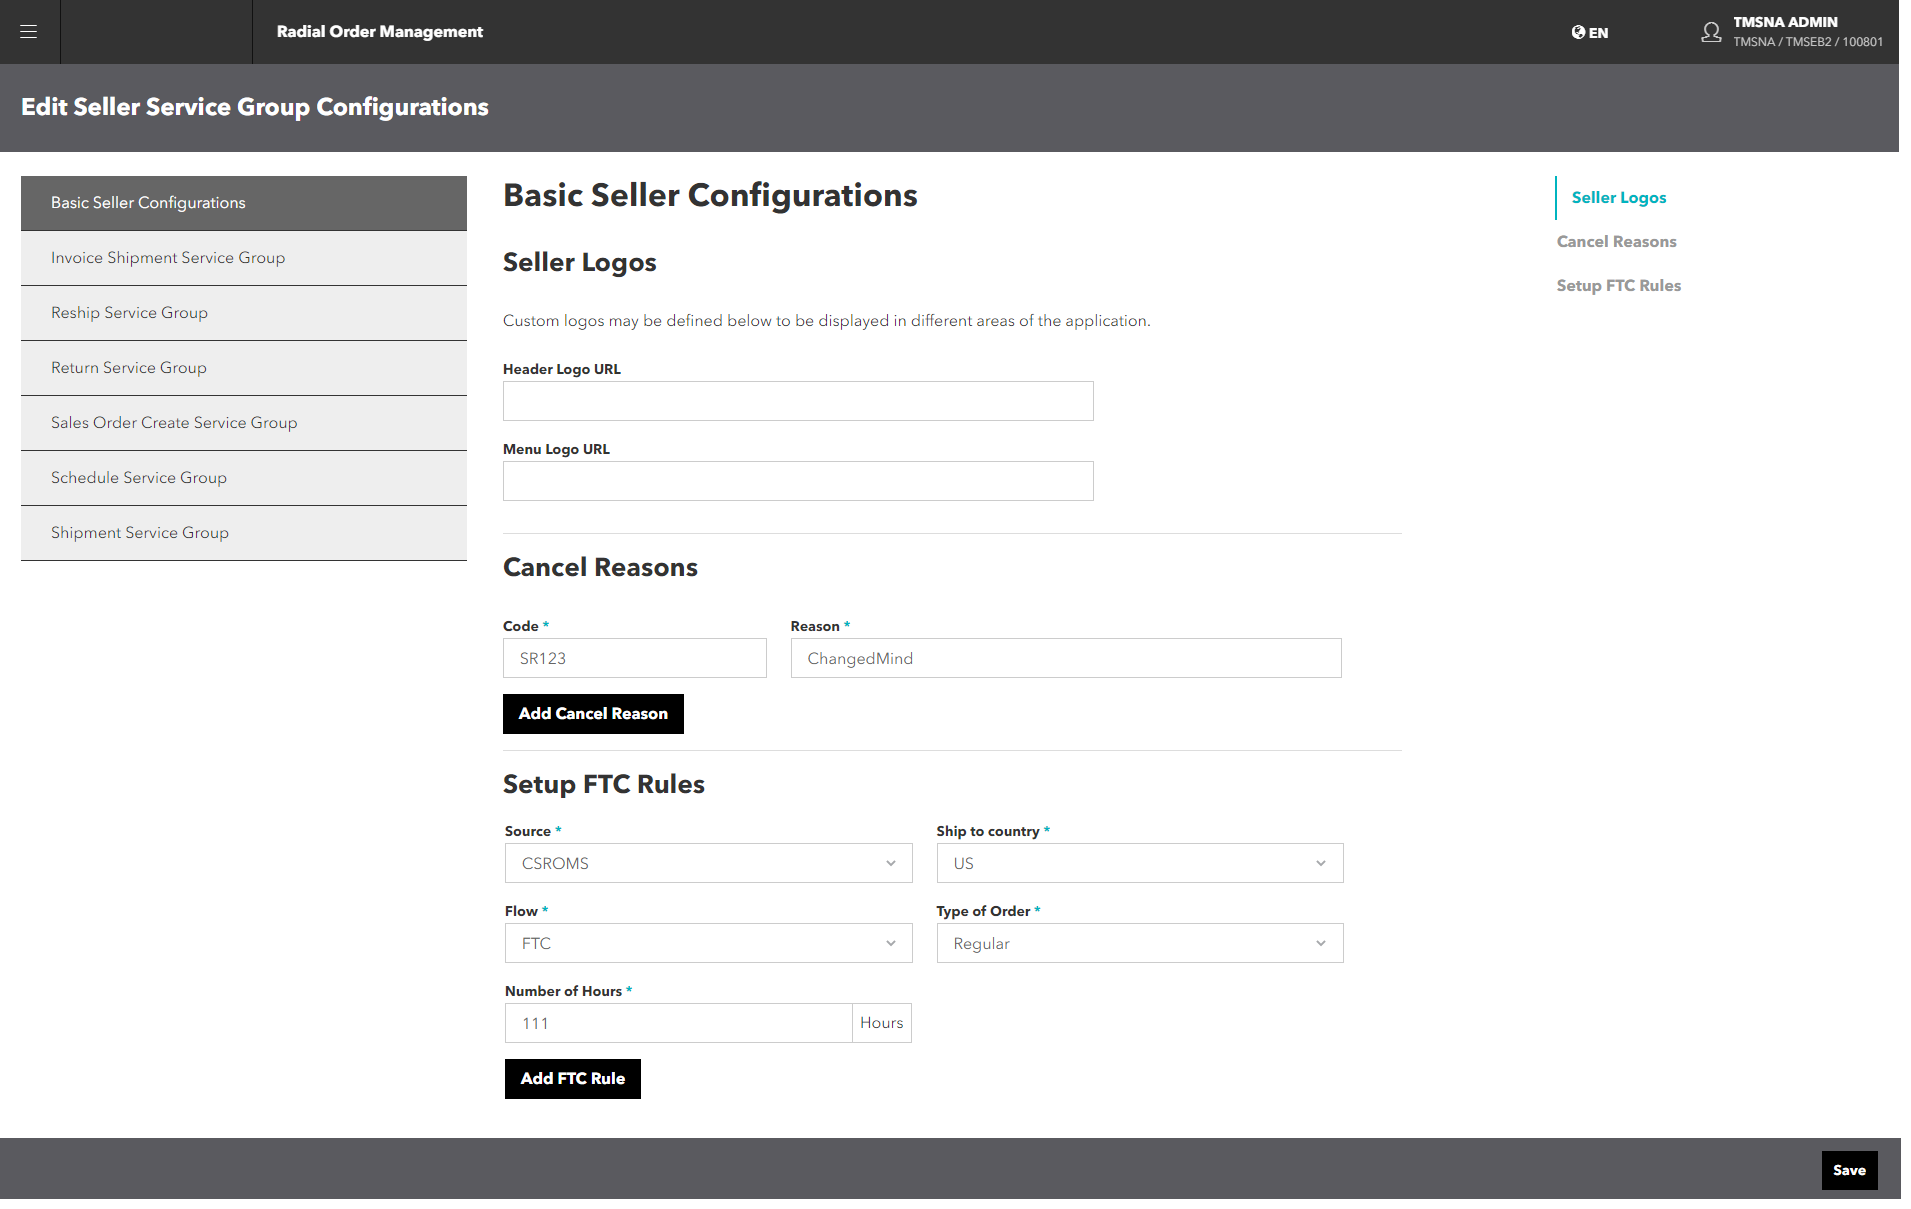
Basic Seller Configurations
Overview
The Basic Seller Configurations section has the following parts:
- Seller Logos: Header and Menu logos to display on the ROM user interface and print documents.
- Cancel Reasons: Codes that identify the reason that an order was canceled; for example, CR could indicate Credit Card Rejected.
- Pre-Release Cancelable Statuses: Identifies the order status codes that enable orders and order lines to be cancelled.
- Setup FTC Rules: If an order has not been shipped to a customer as promised, FTC rules determine when to send the first delay notification, second delay notification, or cancel notification of order lines or portion of the order line. An FTC rule configuration is based on:
- Order Entry Type (for example, WEB)
- Ship to Country
- Flow:
- FTC - Used to process the first delay
- Cancel - Used to process a second delay / cancel order lines
- Type of Order -Regular or Rush
Clients should configure separate FTC rules for FTC Flow and Type of Order, and Cancel flow and Type of Order.
If you are using the latest version of ROM, the Basic Configurations are available to all of the Sellers that you set up under an Inventory Organization.
Procedure
To set up the Basic Seller Configurations:
- Set up the Seller Logos.
- Enter the URL for the Header Logo.
- Enter the URL for the Menu Logo.
- Set up the Cancel Reasons.
- Enter the first Cancel Code. This code identifies the reason that an order was canceled; for example, CR for Credit Card Rejected. The codes are set up prior to launch.
- Enter the Reason that corresponds to the Code.
- To add another reason, click or tap the Add Cancel Reason button. New Code and Reason fields appear.
If you need to delete a Cancel Reason, click or tap the
 icon. The Code and Reason are deleted.
Select the Pre-Release Cancelable Statuses.
Select an order status from the dropdown. (The available order statuses are configured during your ROM implementation.)
- To add another status, click or tap the Add Cancelable Status button. A new dropdown appears.
- To delete a status, click or tap the icon. The status is deleted.
- Set up the FTC Rules.
- Select the Source from the dropdown. The Source specifies how the order came into ROM; for example, through a Customer Service agent, a webstore, or the Radial legacy system. The default Entry Types include:
- CSROMS: Customer Service
- EB2C: Radial webstore
- LEGACY: Radial JDA-based system
- WEB: Client webstore
- XWEB
- ZCREXCHANGE: Zero-cost reship exchange
- Select the Ship to Country from the dropdown. These values depend on which countries the Seller ships to; they are set up prior to launch.
- Select the Flow:
- FTC - Follow FTC rules for delay notifications.
- Cancel - Cancel the order.
- Type of Order:
- Regular
- Rush
- Number of Hours: Specifies the delay, in hours, before notifications are sent or orders are canceled.
- To add another rule, click or tap the Add FTC Rule button. A new set of fields appears.
- If you need to delete an FTC Rule, click or tap the icon.
- Select the Source from the dropdown. The Source specifies how the order came into ROM; for example, through a Customer Service agent, a webstore, or the Radial legacy system. The default Entry Types include:
- When you are finished, click or tap the Save button.
Invoice Shipment Service Group
Overview
The Invoice Shipment Service Group Configurations section has two parts:
- Publish Invoice Milestones: Determines when to publish the POS message.
- Non-Sellable Return Reason Codes: Determines if a return is non-sellable; for example, DM could stand for Damaged.
Procedure
To set up Invoice Shipment Service Group Configurations:
- From the Edit Seller Service Group screen, click or tap the Invoice Shipment Service Group button. The Invoice Shipment Service Group Configurations screen appears.

- Set up the Publish Invoice Milestones.
- Select a Value for the first Publish Invoice Milestone from the dropdown:
- Invoice Create: The POS message is published when the invoice is created.
- Invoice Settlement: The POS message is published when the payment for the invoice is settled.
- None: The POS message is not published.
- Enter a Description for the Milestone Value.
- To add another reason, click or tap the Add Milestone button. New Value and Description fields appear.
- Select a Value for the first Publish Invoice Milestone from the dropdown:
- Set up the Non-Sellable Return Reason Codes.
- Enter the first Code. This code identifies the reason that a returned order is not sellable; for example, DM for Damaged. The codes are set up prior to launch.
- Enter the Reason that corresponds to the Code.
- To add another reason, click or tap the Add Cancel Reason button. New Code and Reason fields appear.
- When you are finished adding Milestones and Non-Sellable Return Reason Codes, click or tap the Save button.

If you need to delete a Milestone, click or tap the icon.
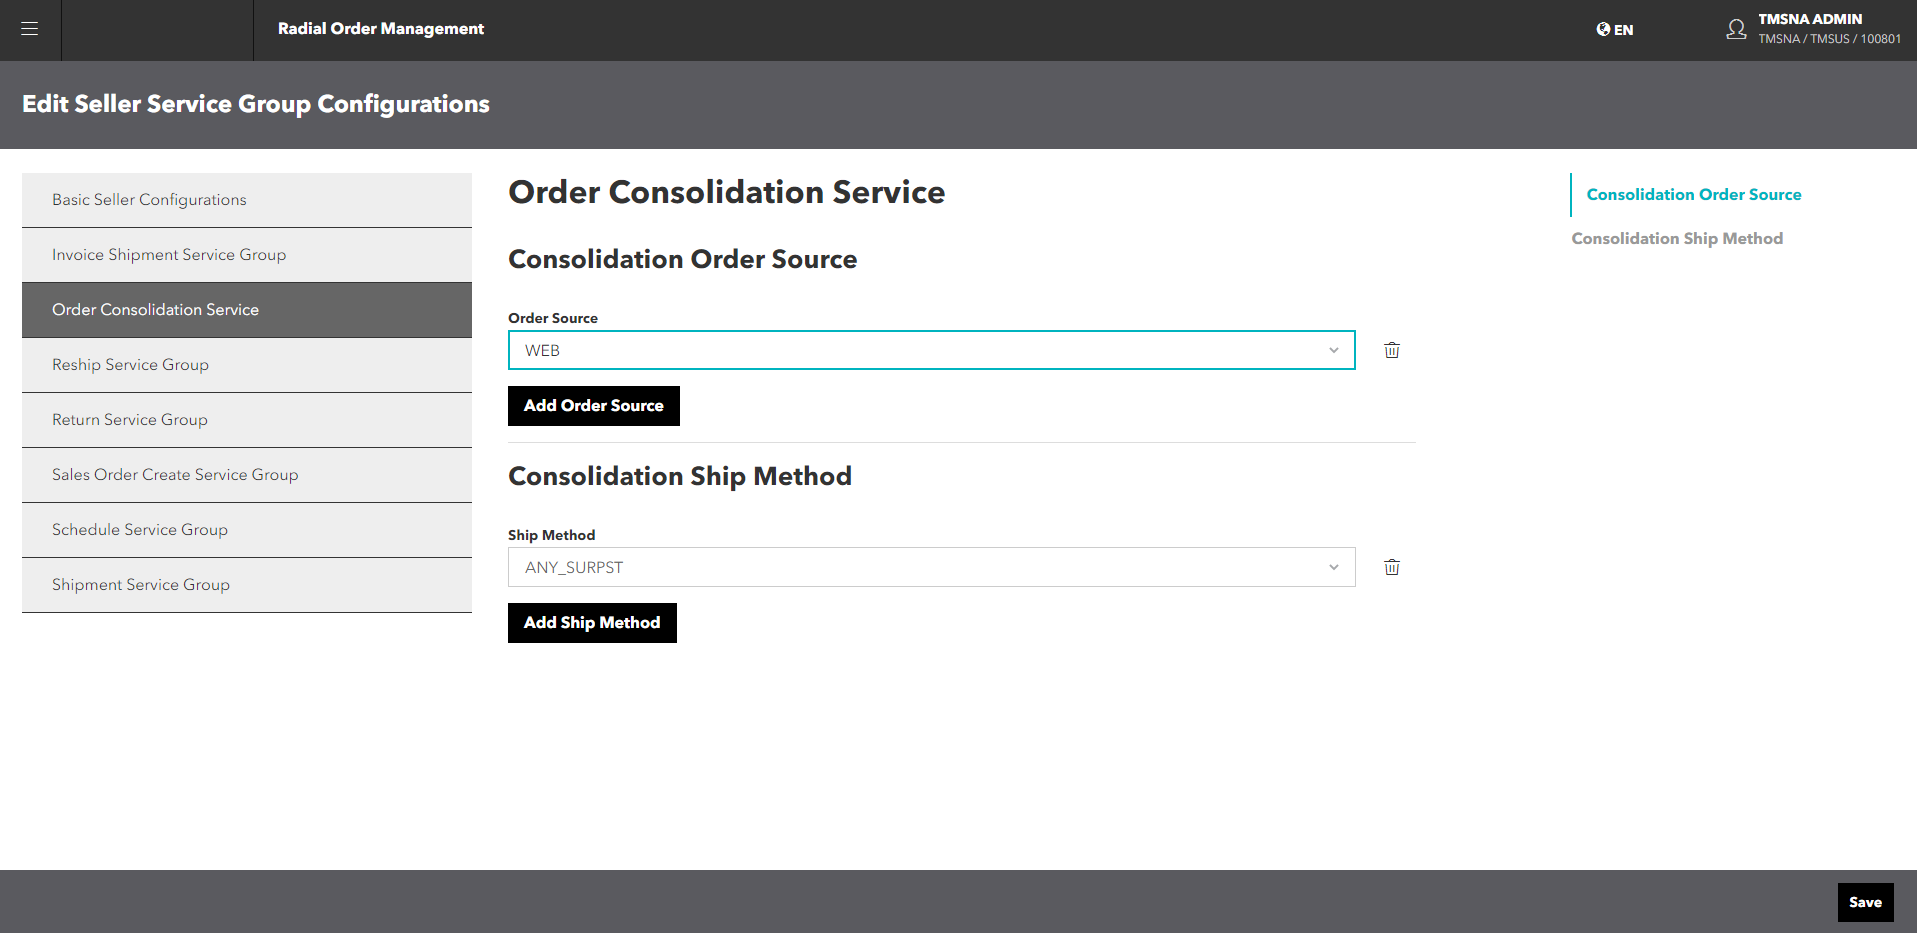
Order Consolidation Service
Overview
Order Consolidation is the ability to bring together merchandise from separate orders into one shippable package, saving on packaging and delivery costs. When a shopper places one order, then places another order soon after the first, followed by a third order after that, you can ship each order separately or combine the three orders into one single package using the Order Consolidation Service.
How It Works
When a shopper places an order that is eligible for Order Consolidation, the order is held for a specified period of time. If another eligible order is submitted by the same shopper using the same ship-to address, that order is combined with the first. If any other eligible orders come in during the hold time, those orders are also combined with the first. At the end of the hold period, the orders are released. They are picked, packed, and shipped together as if they were one order.
ROM uses the following criteria to determine if an order is eligible to be consolidated with previously dropped orders:
The orders are for the same customer; that is, the customer email addresses match.
The orders have the same eligible Order Source.
The orders have the same Ship-To Name and Address.
The orders have the same eligible Shipping Method. If the orders had different Shipping Methods, the consolidated order would need to ship by the method with the soonest arrival time, which could increase shipping costs rather than decrease them.
The order is allocated to the same fulfillment node.
The following exclusions apply:
Orders with ISPU or Associate Delivery fulfillment types
Customizations
Kits
COD orders
Orders that include gift wrap, gift messages, or pack slip messages
Procedure
To enable the Order Consolidation feature, you must first specify the Order Source and Shipping Methods in the Order Consolidation Seller Service Group:
From the Edit Seller Service Group Configurations screen, click or tap the Order Consolidation Service button. The Order Consolidation Service screen appears.

This screen has two sections: Consolidation Order Source and Consolidation Ship Method.
The Consolidation Order Source specifies the source of the orders to be consolidated. Although you can specify multiple order sources, orders must have the same order source to be consolidated.
The Consolidation Ship Method specifies the eligible shipping methods. Although you can specify multiple shipping methods, orders must have the same shipping method to be consolidated.
In the Consolidation Order Source section, select the order source from the dropdown.
To add an Order Source:
Click or tap the Add Order Source button. A new Order Source field appears.
Select the new Order Source from the dropdown.
In the Consolidation Ship Method section, select a shipping method from the dropdown.
To add a shipping method:
Click or tap the Add Ship Method button. A new Ship Method field appears.
Select the new Ship Method from the dropdown.
To delete an Order Source or Ship Method, click or tap the
icon to the right of the field.Click or tap the Save button.
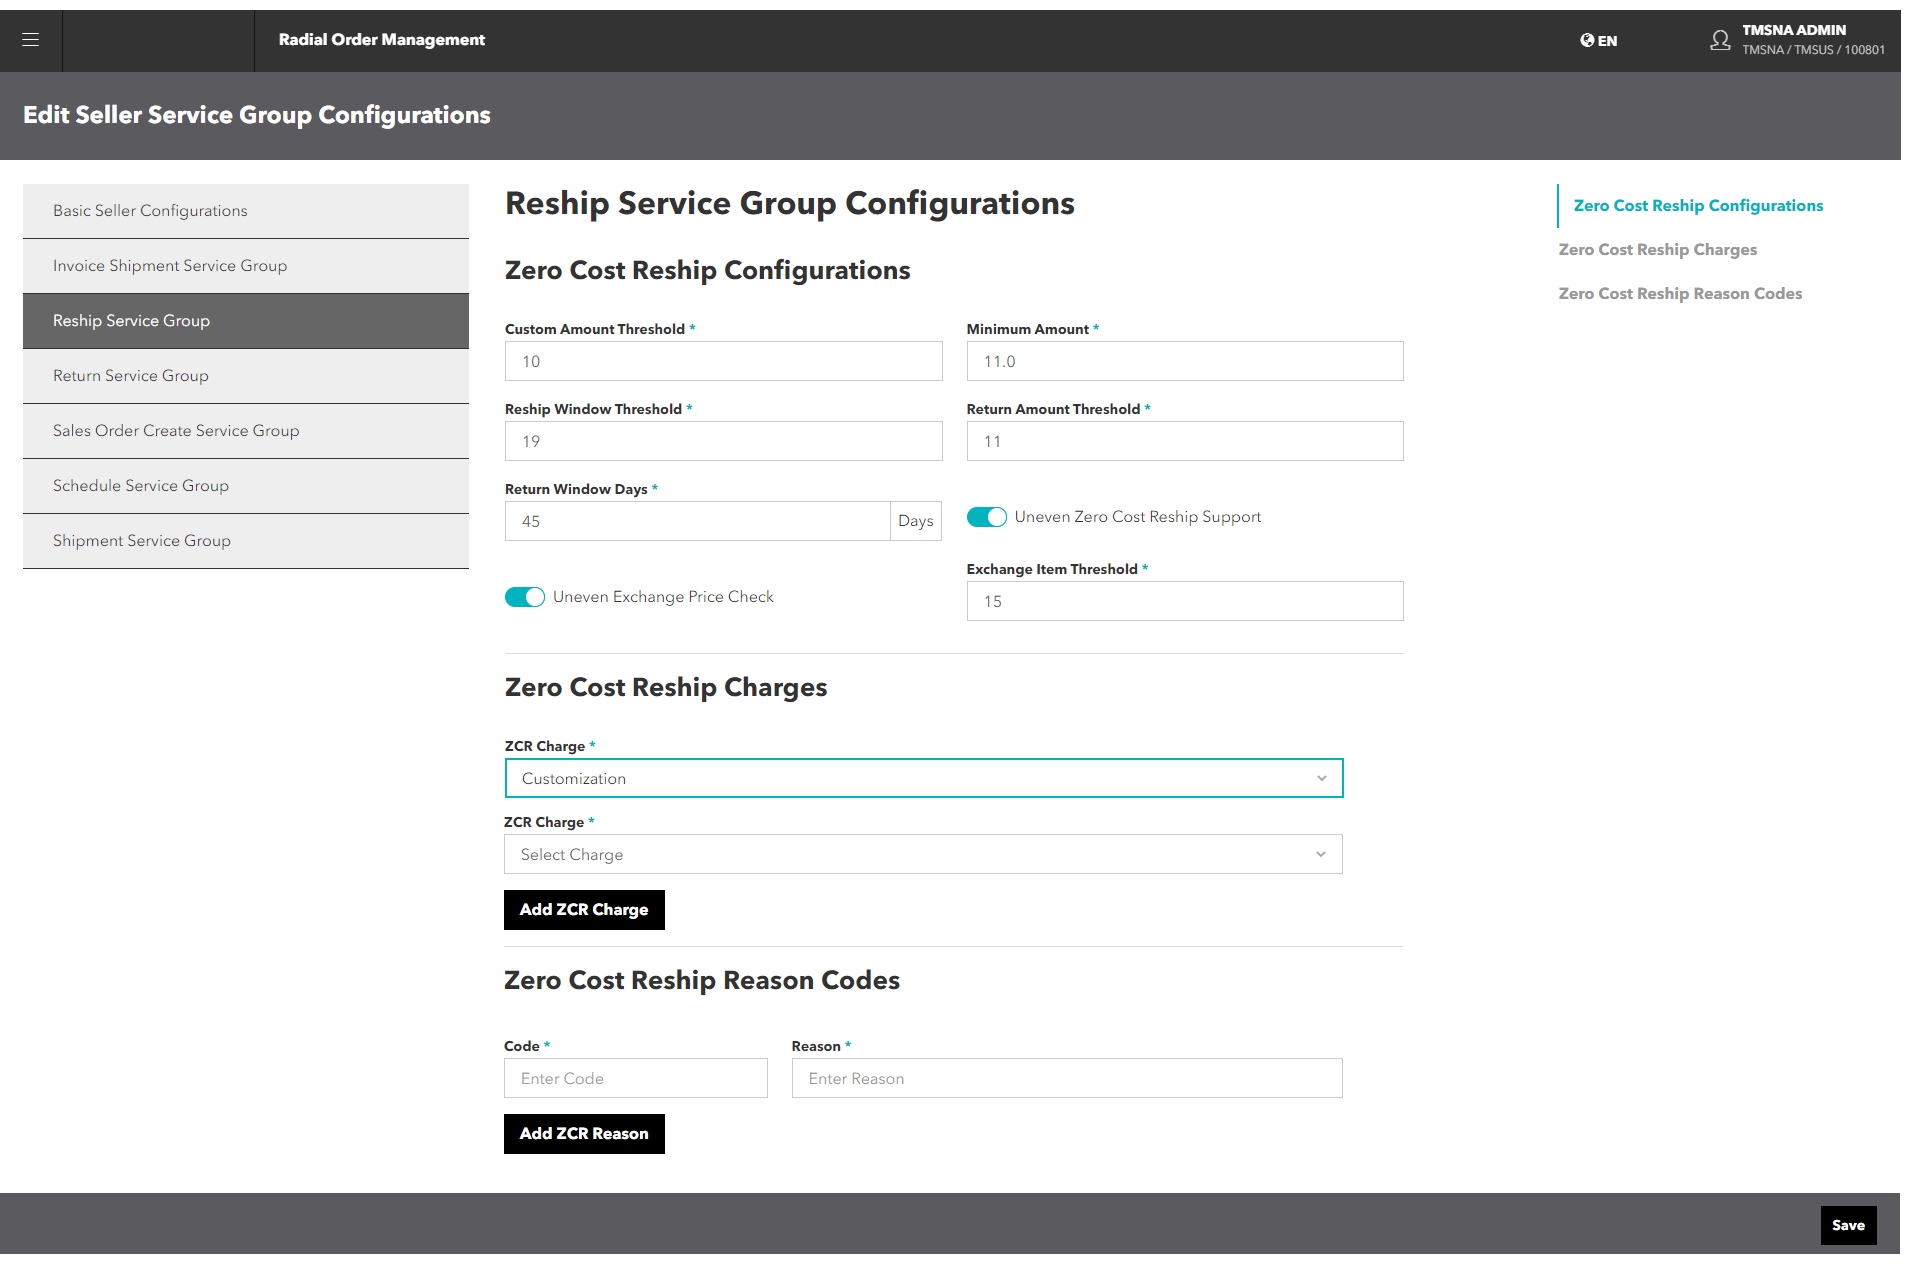
Reship Service Group
Overview
The Reship Service Group configurations enable you to set up rules for handling zero-cost reship (ZCR) orders. The ZCR functions enables you to use your own customer service tools to reship an order at no cost to the shopper. This section has three parts:
- Zero Cost Reship Configurations: Sets the basic rules for ZCR orders, including return thresholds and reship windows.
- Zero Cost Reship Charges: The charges to apply when "Return Required" items are not returned.
- Zero Cost Reship Reason Codes: A set of codes that describe the reasons for the ZCR; for example, the code RW might indicate Reship - Wrong item.
Procedure
To set up Reship Service Group Configurations:
- From the Edit Seller Service Group screen, click or tap the Reship Service Group button. The Reship Service Group Configurations screen appears.

- Enter the Zero Cost Reship Configurations.
- Custom Amount Threshold: If a customized item cost does not exceed this threshold, no return is required. For example, a shopper buys a tote bag and has it monogrammed; however, the monogram is wrong. The total cost is $20.00. If you set this threshold at $25.00, the shopper does not have to return the tote bag.
- Minimum Amount: The minimum amount for ZCR. If the shopper spends at least this amount, the order is eligible for ZCR.
- Reship Window Threshold: The number of days after the original shipment that an item is eligible for ZCR.
- Return Amount Threshold: If a non-customized item cost does not exceed this threshold, the shopper does not have to return it in order to qualify for ZCR.
- Return Window Days: The number of days the shopper has to return a "Return Required" item before being charged for not returning it.
- Uneven Zero Cost Reship Support: Determines whether or not to support uneven exchanges with ZCR; for example, the shopper wants to exchange the item for a more expensive version of the item. Activate the toggle to support this type of exchange.
- Uneven Exchange Price Check: Enables ROM to check the price of an item to determine if the price has changed since the purchase.
- Exchange Item Threshold: Sets the threshold for a ZCR to be accepted. For example, assume the threshold is 15%. If the price difference between the items is less than 15%, then the exchange is eligible for a ZCR.
- Enter the Zero Cost Reship Charges.
- Select the charge from the ZCR Charge dropdown.
- Price
- Customization
- To enter another ZCR Charge, click or tap the Add ZCR Charge. A new set of fields appear.
- Select the charge from the ZCR Charge dropdown.
- Enter the Zero Cost Reship Reason Codes.
- Enter the first Code. This code identifies the reason that an item is eligible for ZCR. The codes are set up prior to launch.
- Enter the Reason that corresponds to the Code.
- To add another reason, click or tap the Add ZCR Reason button. New Code and Reason fields appear.
- When you finish setting up the Reship Service Configurations, click or tap the Save button.
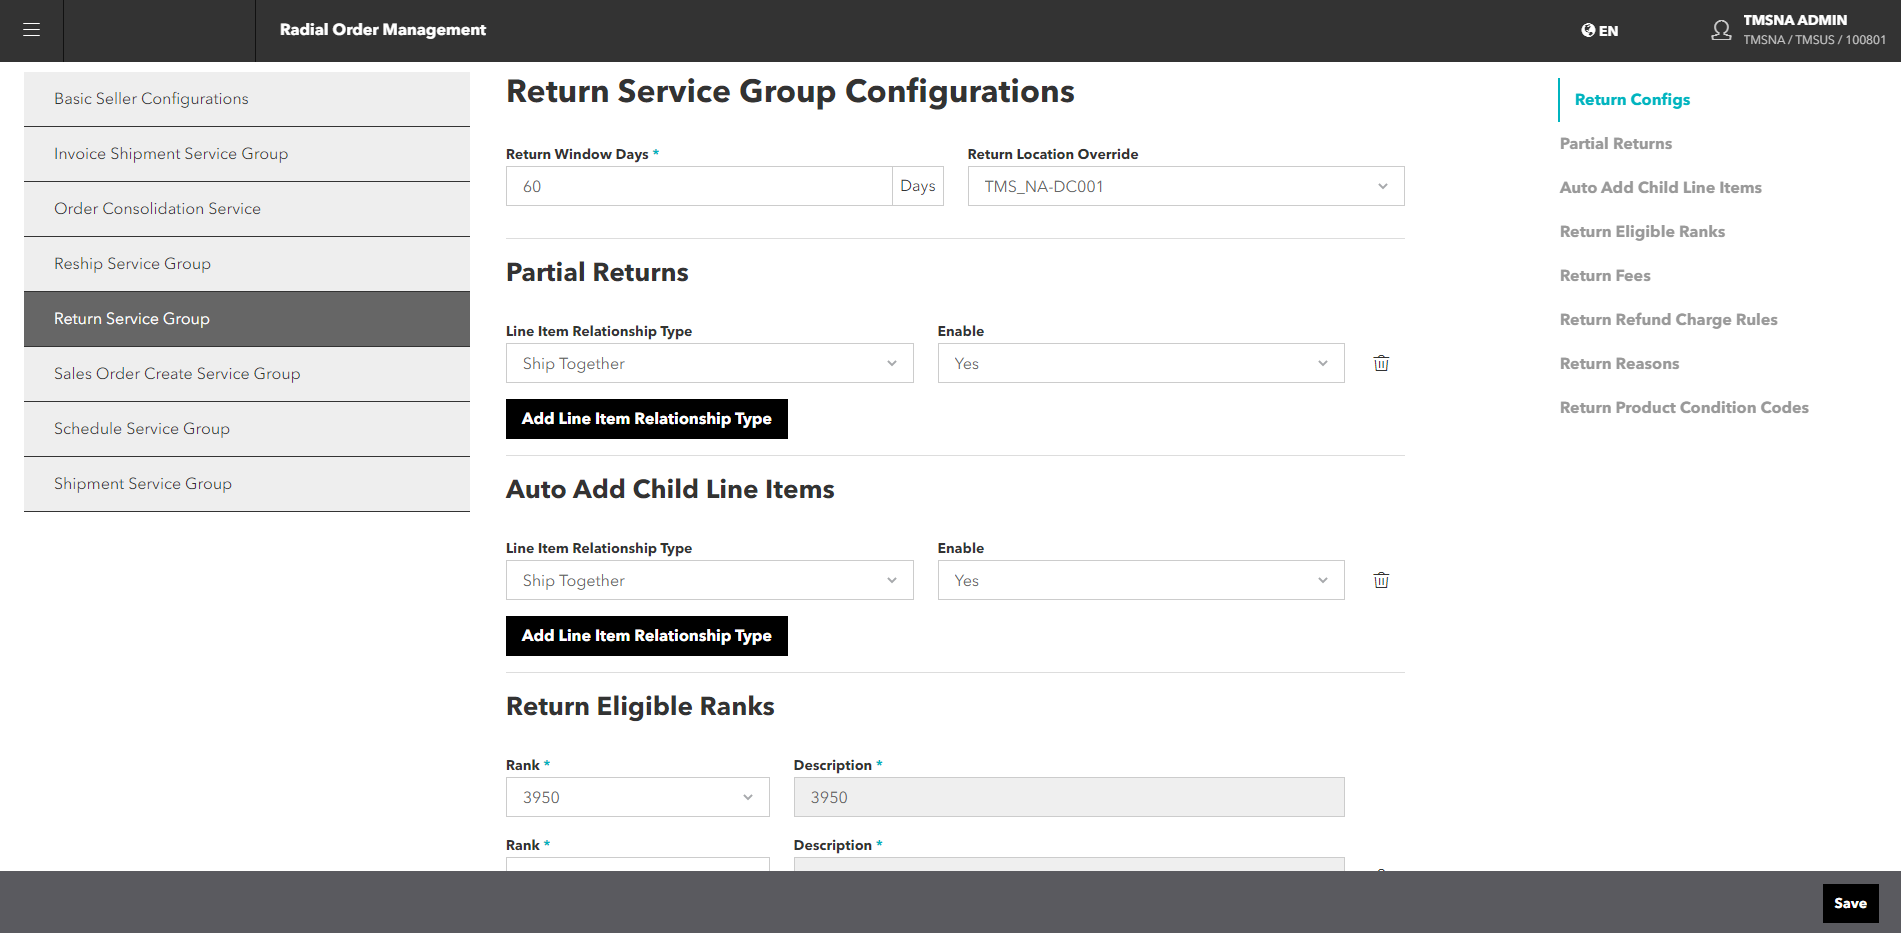
Return Service Group
Overview
The Return Service Group Configurations enable you to set up rules on handling order returns. This section has four parts:
- Return Configurations: Sets the basic return rules for the return window, eligible rank of sublines, and location override.
- Return Fees: Specifies any fees that may be charged if your organization does not participate in hassle-free returns (HFR).
- Return Refund Charge Rules: Specify the rules for refund charges.
- Return Reasons: A set of codes that the warehouse uses to specify the reasons for returns.
- Return Product Condition Codes: A set of codes that warehouse associates use to specify the condition of returned products.
Procedure
To configure the Return Service Group:
- From the Edit Seller Service Group Configurations screen, click or tap the Return Service Group button. The Return Service Group Configurations screen appears.

- Enter the Return Service Configurations.
- Return Window Days: Enter the number of days that make up the Return Window. This is the amount of time that a shopper has to return items in an order.
- Return Location Override: Select the node to be used as the default return location.
In the Partial Returns section, specify the Line Item Relationship Type and whether to enable a partial return for that type.
In the Line Item Relationship Type field, select Ship Together or Customization.
In the Enable field, select Yes to enable returns of line items in the bundle.
To add and enable another Line Item Relationship Type, click or tap the Add Line Item Relationship Type button. A new set of fields appears.
To delete a Line Item Relationship Type, click or tap the
icon next to the item that you want to delete.In the Auto Add Child Line Items, if a return is entered for the virtual bundle parent item or customization parent item (for example, a t-shirt with a player number and name), the bundle components are automatically included in the return order.
In the Line Item Relationship Type field, select Ship Together or Customization.
In the Enable field, select Yes to enable returns of line items in the bundle.
To delete a Line Item Relationship Type, click or tap the
icon next to the item that you want to delete.To add and enable another Line Item Relationship Type, click or tap the Add Line Item Relationship Type button. A new set of fields appears.
- Enter the Return Eligible Ranks: Specifies the subline status ranks eligible for return. To add a Return Eligible Rank:
- Click or tap the Add Return Eligible Rank. The Rank and Description fields appear.
- Select a rank from the dropdown. Once you select a rank, the Description field activates.
- To add an additional Return Eligible Rank, click or tap the Add Return Eligible Rank button. A new set of fields appears.
- To delete a Return Eligible Rank, click or tap the icon.
- Enter any applicable Return Fees.
Return fees enable you to determine the return fee structure, making it easily available for managing returns based on business needs.
- In the Return Fee field, enter the return fee.
- To add another return fee, click or tap the Add Return Fee button. A new Return Fee field appears.
- To delete a return fee, click or tap the icon next to the fee that you want to delete.
- Click or tap the Save button.
- Enter the Return Refund Charge Rules. These rules define a list of charges to be included in the refund amount. When a customer return is processed, the system uses this configuration to determine which charges need to be refunded to a consumer.
- Select a rule from the dropdown. These rules are defined during launch; they may include rules like:
Customization
Duty
Fees
Gift Wrap
Price
Shipping
- To add another rule, click or tap the Add Refund Charge Rule button. A new set of fields appears.
- To delete a Refund Charge Rule, click or tap the icon.
- Select a rule from the dropdown. These rules are defined during launch; they may include rules like:
- Enter the Return Reasons.
- Enter the first Code. This code identifies the reason that an order or product is returned; for example, WS for Wrong Size.
- Enter the Reason that corresponds to the Code.
- To add another reason, click or tap the Add Cancel Reason button. New Code and Reason fields appear.
- To delete a Return Reason, click or tap the icon.
- Enter the Return Product Condition Codes.
- Enter the first Code. This code identifies the reason that an order or product is returned; for example, UW for Unworn.
- Enter the Reason that corresponds to the Code.
- To add another reason, click or tap the Add Cancel Reason button. New Code and Reason fields appear.
- To delete a Return Product Condition Code, click or tap the icon.
- When you are finished adding the Return Service rules, click or tap the Save button.
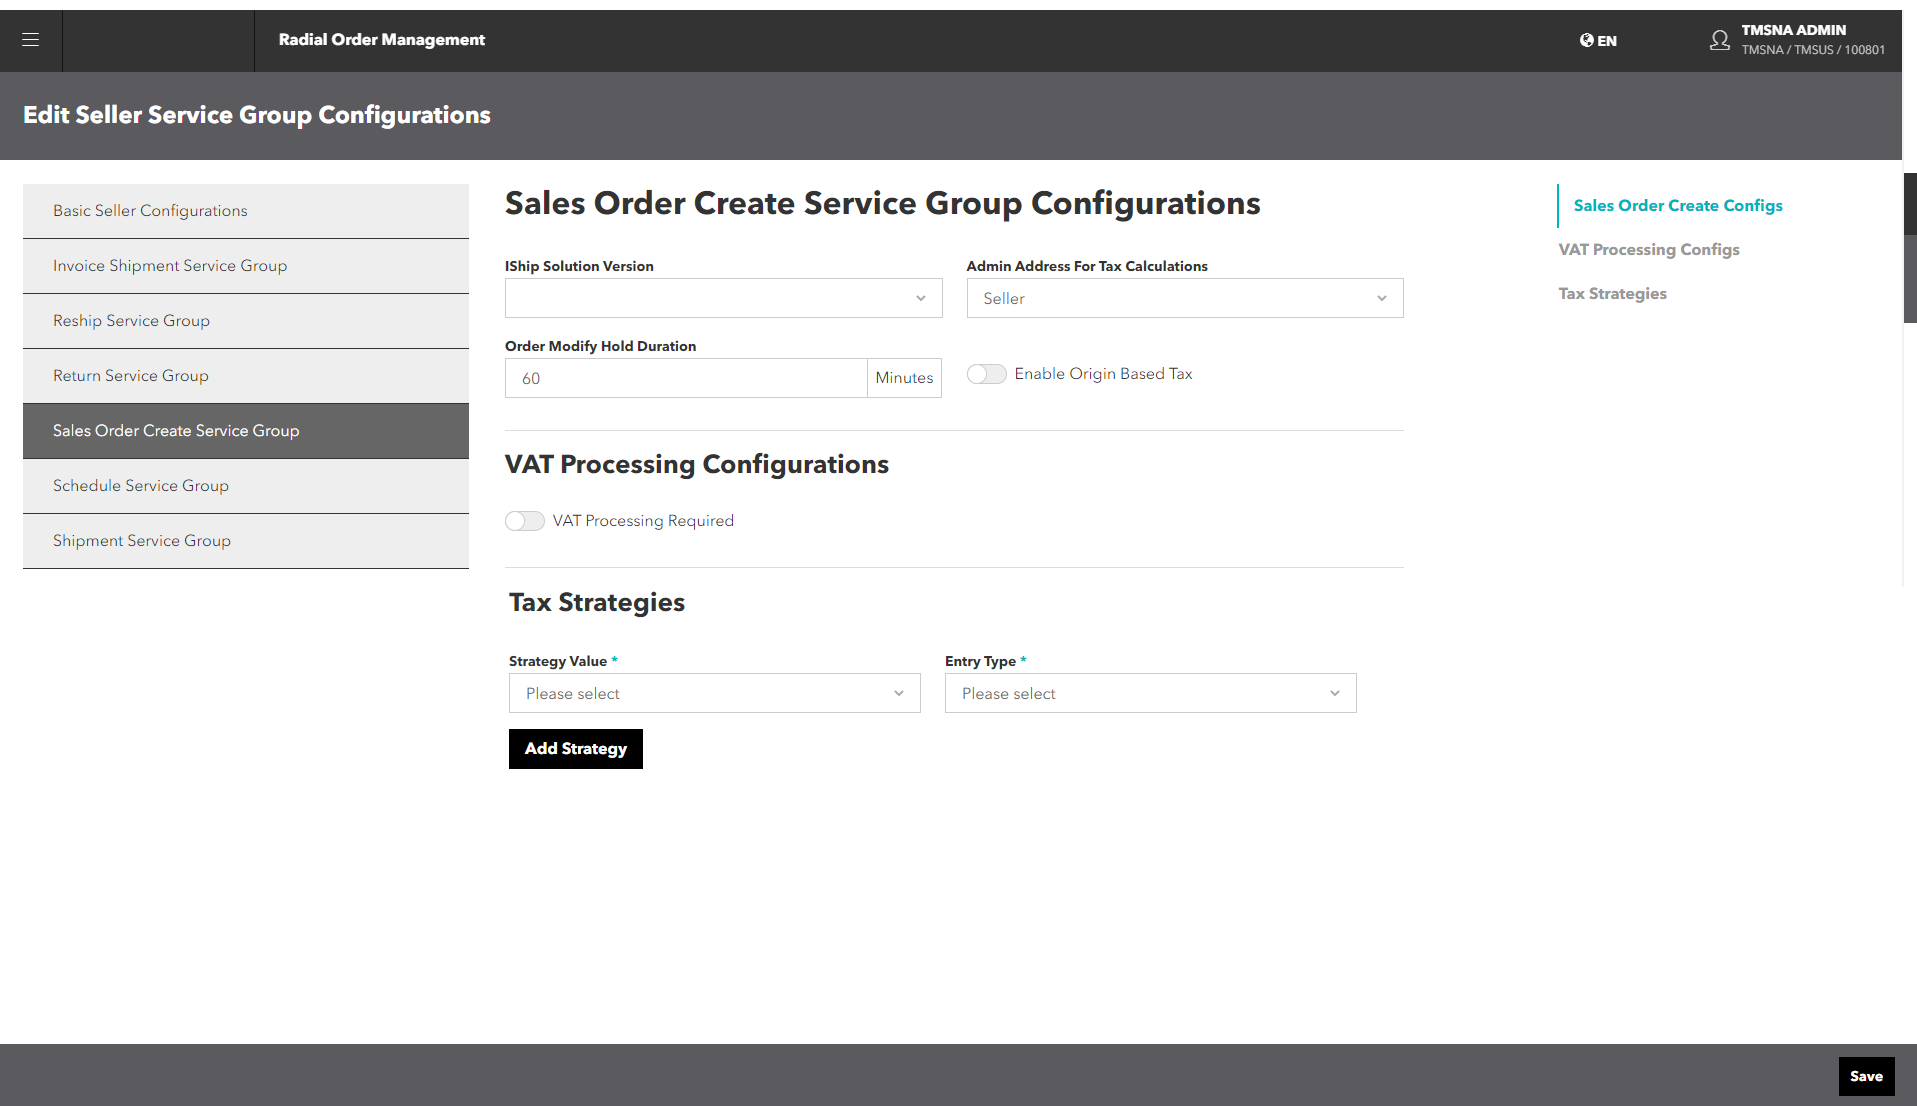
Sales Order Create Service Group
Overview
The Sales Order Create Service Group Configurations enable you to specify how ROM handles taxes on orders. You first specify details common to all orders, then you can set up multiple tax strategies based on a Strategy Value and order Entry Type. You can also specify how to handle Value Added Taxes (VAT).
The tax strategy determines whether to use the Radial Taxes, Duties, and Fees (TDF) Service to calculate taxes or to prorate the taxes across the order lines/line item quantity. Tax strategy is defined based on the entry type. For example, Marketplace orders are prepaid, so ROM bypasses a tax call for these orders. Therefore, for a Marketplace Entry Type, Tax Strategy would be PRORATION, but for EB2C Entry type, it could be TDF.
Procedure
To configure the Sales Order Create Service Group:
- From the Edit Seller Service Group Configurations screen, click or tap the Sales Order Create Service Group button. The Sales Order Service Group Configurations screen appears.

- Select the iShip Solution Version. This selection determines which version of iShip you are using.
- V1 - You are using Version 1, the legacy version of iShip.
- V2 - You are using Version 2 of iShip.
- Select the Admin Address for Tax Calculations. This selection determines whether a seller address or fulfillment node address is used for the tax calculation when Tax Strategy is TDF. The default value is Seller.
- Fulfillment Node - The system uses a fulfillment node address based on the fulfillment type. For example, for ISPU orders, the address would be the pickup location; for SFS and STS orders, the address would be the Ship-from location.
- Seller - The system uses the Seller's address.
- Enter the Order Modify Hold Duration in minutes. This value specifies the number of minutes to hold the order before releasing it, which enables you to modify the order before it's scheduled and shipped.
- If applicable, enable Origin Based Tax. When enabled, taxes are computed with actual shipFrom address and charged to a customer at the time of invoice. The default is not enabled.
- If you need to specify VAT Processing Configurations, enable the VAT Processing Required toggle. Once you do, you can enable the VAT Event Required and/or VAT Pack Slip Required options.
- Add tax strategies.
- Select the Source.
- CSROMS
- EB2C
- LEGACY
- WEB
- XWEB
- ZCREXCHANGE
- Select a Strategy Value.
- Proration - The taxes are prorated across the order line/line item quantity. Generally used when the Entry Type is Marketplace.
- TDF - The TDF Service is used to calculate the taxes.
- To add another Tax Strategy, click or tap the Add Strategy button. A new set of fields appears.
- If you need to delete a Tax Strategy, click or tap the icon.
- Select the Source.
- When you are finished configuring the Sales Order Create Service Group, click or tap the Save button.
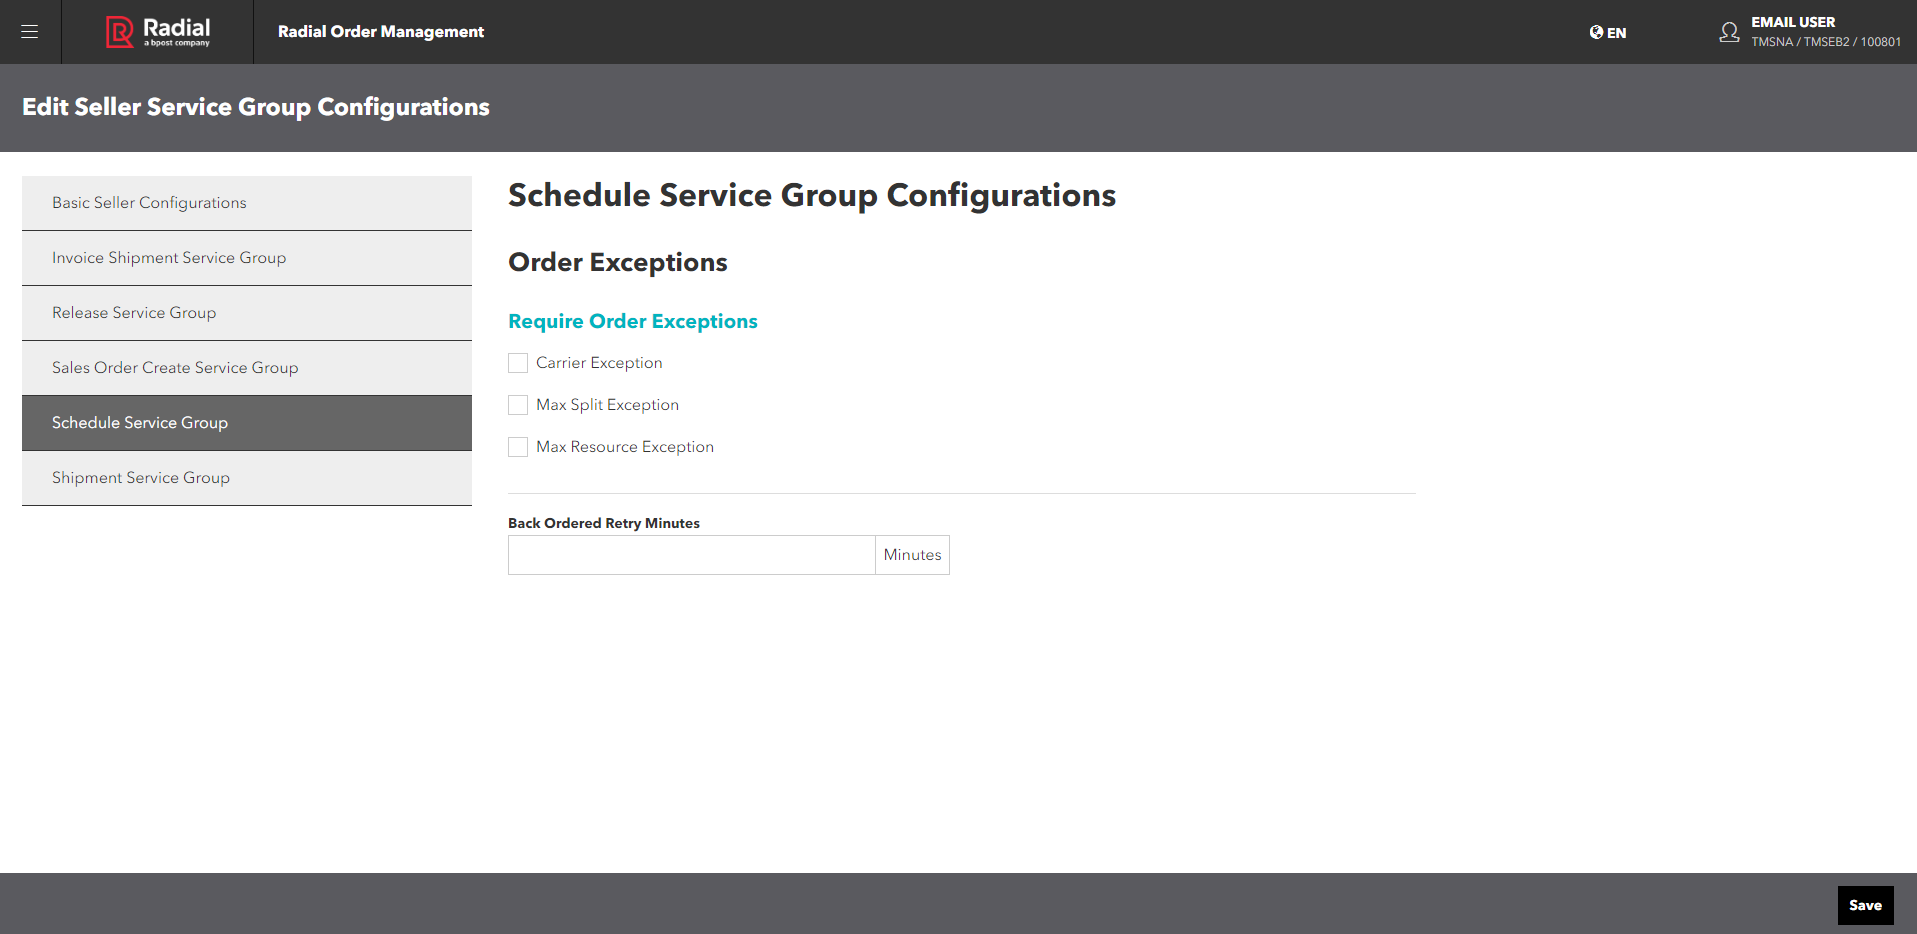
Schedule Service Group
Overview
The Schedule Service Group Configurations enable you to specify whether ROM captures exceptions for Administrators to resolve. If not enabled, ROM automatically cancels orders that:
- Exceed the maximum sourcing attempts.
- Exceed the maximum order splits.
- Have an incorrect shipping address.
For details on how to resolve these exceptions, see Handle Exceptions.
Procedure
To set up Schedule Service Group Configurations:
- From the Edit Seller Service Group Configurations screen, click or tap the Schedule Service Group button. The Schedule Service Group Configurations screen appears.

- Select the Order Exceptions that you want to capture.
- Carrier Exception - A Carrier Exception occurs when a carrier rejects the label request for a shipment because of an issue with the Shipping Address. When Carrier Exception is enabled, the shipment moves to the exception queue, where an Administrator or Store Manager can then review and resolve the issue. If the address is corrected, the shipment is reprocessed and shipped to the customer.
- Max Split Exception - A Max Split Exception occurs when the order sourcing process exceeds the maximum specified number of splits. When Max Split Exception is enabled, the order/line moves to the exception queue, where an Administrator or Store Manager can then review the issue, manually source it, auto re-source it and ignore the max splits rule, or cancel the unsourced quantity.
- Max Resource Exception - A Max Resource Exception occurs when the order sourcing process exceeds the maximum specified sourcing attempts. When Max Resource Exception is enabled, the order/line moves to the exception queue, when an Administrator or Store Management can then review the issue, manually source it, or cancel it.
- Enter a value for the Back Ordered Retry Minutes. This value is the number of minutes that the system waits before attempting to reschedule an order line item. Radial recommends that you set the Retry interval to 45 - 60 minutes to allow time for a new inventory update, if provided.
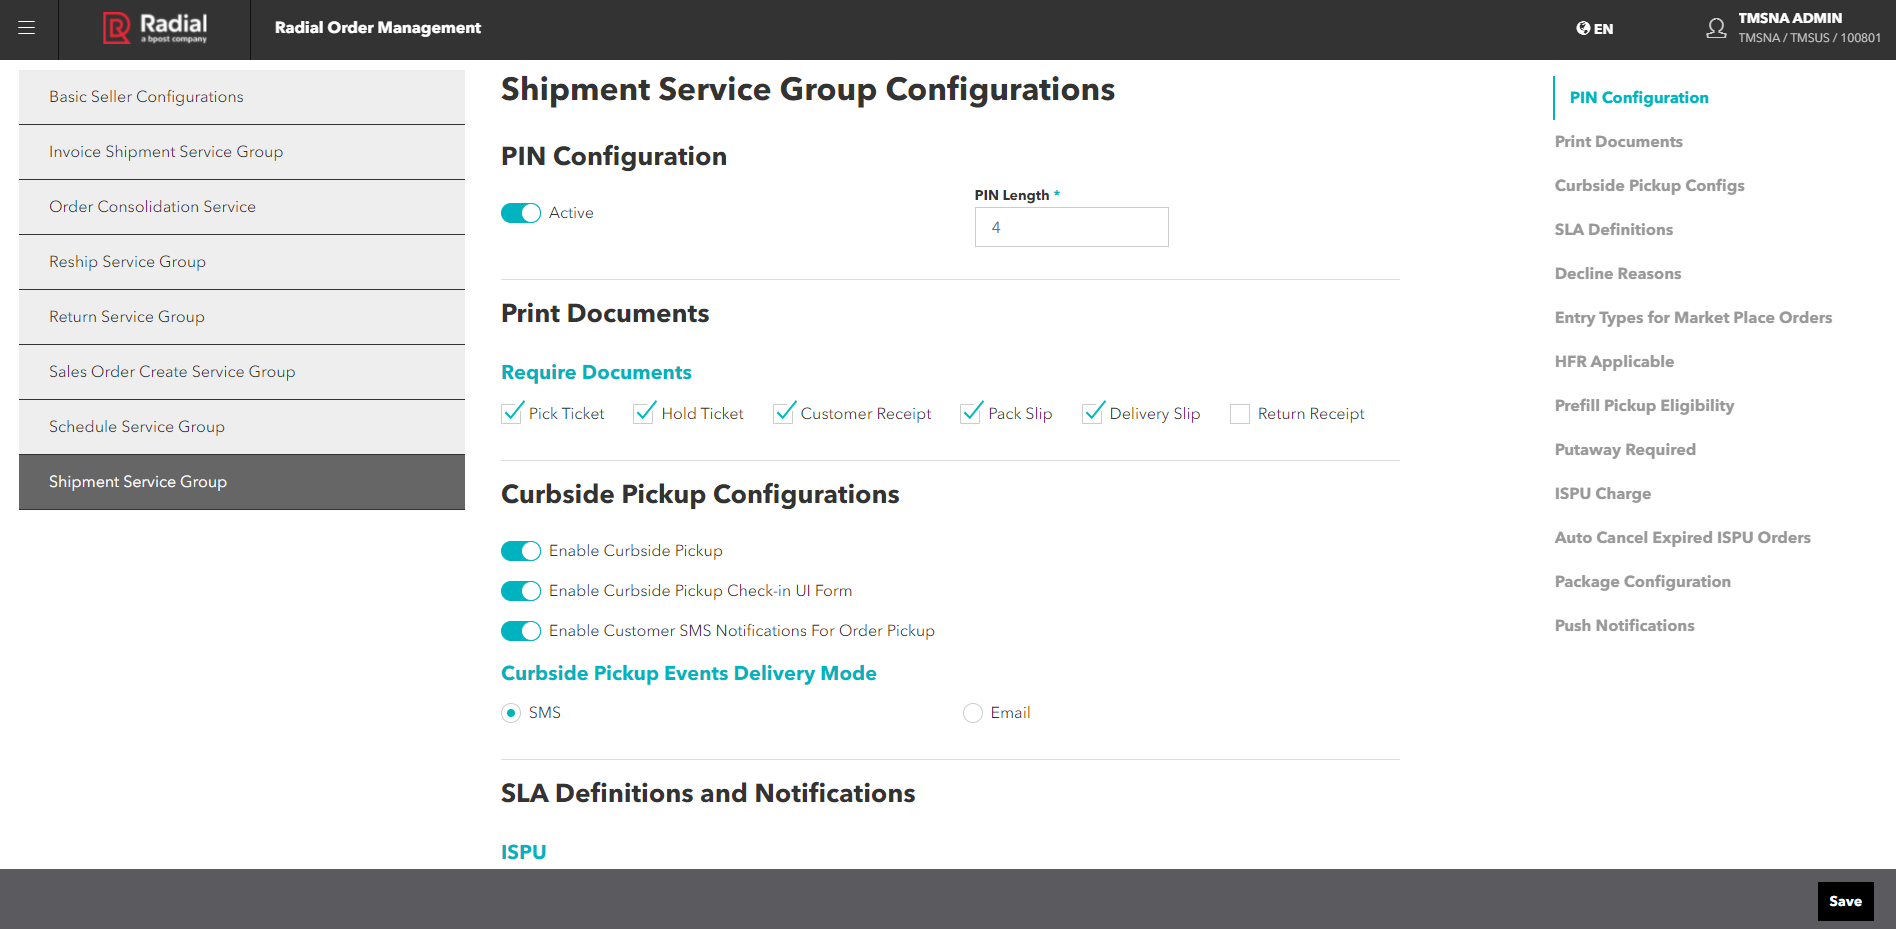
Shipment Service Group
Overview
The Shipment Service Group Configurations enable you to specify how ROM handles orders. It has 14 parts:
- PIN Configuration: Applies to STS and ISPU orders. A PIN enables Store Associates to perform an additional verification for security purposes. When you activate a PIN, the PIN is provided to shoppers in the Ready for Pickup email, printed on a hold ticket, and displayed on the Order Pickup Details screen. The shopper must provide the PIN before they pick up an order.
- Print Documents: These are the various documents that get printed as an order moves through its lifecycle. These documents help Store Managers and Associates ensure that orders are correct and complete, and proof that orders were picked up, delivered, or returned.
- Curbside Pickup Configurations: Activate this set of toggles to enable:
- Curbside Pickup
- The Curbside Pickup tile on the Dashboard and Ready for Pickup form
- SMS notifications for Curbside Pickup
- SLA Definitions: In this part, you configure the Service Level Agreement (SLA) values in minutes for your fulfillment types. For SFS and STS, you can also activate the auto re-sourcing feature.
- ISPU - These fields define the Service Level Agreement for how long the Seller has to complete the defined processes for the In-Store Pickup fulfillment type. All SLAs for ISPU are based on the fulfillment order create time, with the exception of Customer Pickup Approaching and Curbside Pickup Approaching SLAs, which is based on the date/time when an order status is updated as Ready for Pickup.
- STS - These fields define the Service Level Agreement for how long the Seller has to complete the defined processes for the Ship-to Store fulfillment type. All SLAs for STS are based on the fulfillment order create time, with the exception of Customer Pickup Approaching SLA, which is based on the date/time when an order status is updated as Ready for Pickup. The Auto Resource toggle activates or deactivates automatic re-sourcing. When Auto Resource is activated, the Pick Expired Cancel SLA field appears. When the Pick Expired Cancel SLA time is reached, the order is pulled from the Pick queue and re-sourced to another node.
- SFS - These fields define the Service Level Agreement for how long the Seller has to complete the defined processes for the Ship-from Store fulfillment type. All SLAs for SFS are based on a fulfillment order create date/time.The Auto Resource toggle activates or deactivates automatic re-sourcing. When Auto Resource is activated, the Pick Expired Cancel SLA field appears. When the Pick Expired Cancel SLA time is reached, the order is pulled from the Pick queue and re-sourced to another node.
- Associate Delivery - These fields define the Service Level Agreement for how long the Seller has to complete the defined processes for the Associate Delivery fulfillment type.All SLAs for Associate Delivery are based on a fulfillment order create date/ time.
- Decline Reasons: In this part, you define decline codes and definitions for the following actions.
- Pick Decline
- Customer Pickup Decline
- Pack Decline
- Check In Decline
- Warehouse Schedule Codes: These codes control whether to reallocate or cancel an order line that was declined at the warehouse. Note: If you configure these codes, you must also update your pipeline(s) to connect the dc_declined exit point from the Shipment service back to the Scheduling service. If you do not, the order is not re-allocated.
- Entry Types for Market Place Orders: In this part, you enter a list of Entry Types, which are considered as marketplace orders. Marketplace orders can be excluded from some of the steps and processes of the orchestration flow. For example, marketplace orders are usually excluded from Buyer's Remorse Hold, Fraud Check, Ship Method Optimization, and so on.
- HFR Applicable: In this part, you choose whether hassle-free returns (HFR) are available from this Seller.
- Prefill Pickup Eligibility: In this part, you can activate the toggle to have ROM prefill line item quantities on the ISPU Order Details Pickup screen. When this toggle is activated, Store Associates can confirm pickup with one tap or click, rather than having to confirm each line item separately.
- Putaway Required: In this part, you choose whether Putaway Processing is required. For ISPU and STS fulfillment types, orders that are not picked up must be put away. If the Seller supports ISPU and STS, you should activate this toggle to ensure that items are returned to their proper location when they are not picked up.
- ISPU Charge: In this part, you specify when you want to charge an ISPU order. You can charge the order when picking is complete or you can wait until the customer picks up the order.
- Auto Cancel Expired ISPU Orders: When you activate this toggle, ISPU orders with expired Customer Pickup or Curbside Pickup SLAs are automatically canceled.
- Exclude Custom Line from OTF/RFIL: When you activate this toggle, order line items that have CUSTOM item types (such as a warranty) are excluded from the Orders to Fulfill (OTF) feed.
- Pick-up Expired Cancel Minutes: In this part, you specify the number of minutes that must elapse after the Customer Pickup SLA expires and the order is canceled.
- Package Configuration: In this part, you specify the different types of package configurations available for packing orders. The Package IDs that you assign to these configurations appear in the Pack workflow, where Store Associates can select the best package for the order.
- Push Notifications: In this part, you can select SMS or email delivery methods for push notifications, and enable or disable specific notifications in the toggle-based list for each fulfillment type.
Procedure
To set up Shipment Service Group Configurations:
- From the Edit Seller Service Group Configurations screen, click or tap the Shipment Service Group button. The Shipment Service Group Configurations screen appears.

- Set the PIN Configuration.
- To activate the PIN, set the toggle to Active. The PIN Length field appears.
- Enter a one- to four-digit number.
- Select the Print Documents that will be required when ROM processes orders. These documents include:
- Pick Ticket
- Hold Ticket
- Customer Receipt
- Pack Slip
- Delivery Slip
- Return Receipt
- Specify the SLA Definitions and Notifications.
- ISPU: Enter the number of minutes for each of the following SLAs.
- Start Pick Process Approaching
- Start Pick Process Expired
- Complete Picking Approaching
- Complete Picking Expired
- Complete Pickup Approaching
- Complete Pickup Expired
- SFS: Enter the number of minutes for each of the following SLAs, and enable or disable Auto Resource.
- Start Pick Process Approaching
- Start Pick Process Expired
- Complete Picking Approaching
- Complete Picking Expired
- Complete Packing Approaching
- Complete Packing Expired
- Toggle Auto Resource
- STS: Enter the number of minutes for each of the following SLAs, and enable or disable Auto Resource.
- Start Pick Process Approaching
- Start Pick Process Expired
- Complete Picking Approaching
- Complete Picking Expired
- Complete Packing Approaching
- Complete Packing Expired
- Customer Pickup Approaching
- Customer Pickup Expired
- Toggle Auto Resource
- Associate Delivery: Enter the number of minutes for each of the following SLAs, and enable or disable Auto Resource.
- Start Pick Process Approaching
- Start Pick Process Expired
- Complete Picking Approaching
- Complete Picking Expired
- Complete Packing Approaching
- Complete Packing Expired
- Customer Delivery Approaching
- Customer Delivery Expired
- ISPU: Enter the number of minutes for each of the following SLAs.
- Define Decline Reasons for Pick Decline, Customer Pickup Decline, Pack Decline, Check In Decline, and Warehouse Schedule Codes.
- For each type of Decline, enter a code, then enter the reason.
- To add another decline reason for each type, click or tap the Add Decline Reason button for the applicable Decline type. A new set of fields appears.
- To delete a Decline Reason, click or tap the icon.
- For Warehouse Schedule Codes, you must also enter the warehouse node ID. You can enter different decline reasons for different warehouse nodes.
- Specify Entry Types for Market Place Orders
- Enter the Entry Type.
- To add another Entry Type, click or tap he Add Entry Type button. A new set of fields appears.
- To delete an Entry Type, click or tap the icon.
- If the Seller accepts hassle-free returns, activate the HFR Applicable toggle.
- To enable Store Associates to confirm ISPU orders all at once, activate the Prefill Pickup Eligibility toggle.
- If the Seller requires Putaway Processing, activate the Putaway Required toggle.
- Specify the Pick-up Expired Cancel Minutes. When this amount of time elapses after the Customer Pickup SLA expires, the order is canceled.
- Define Package Configurations.
- Enter a Package ID. This ID appears in the Pack Workflow.
For polybag packaging, enter POLYBAG.
- Enter the Weight and select a unit of measure.
- Enter the Packing Material Weight and select a unit of measure.
- Enter the Height and select a unit of measure.
- Enter the Width and select a unit of measure.
- Enter the Length and select a unit of measure.
- If this is the default package, click or tap the Default Package radio button. You can only have one default package configuration.
- To add a new package, click or tap the Add a Package button. A new set of fields appears.
- To delete a Package Configuration, click or tap the icon.
- Enter a Package ID. This ID appears in the Pack Workflow.
-
Specify the form and types of Push Notifications.
- For the form of the push notifications, click or tap either the SMS or Email radio button.
- For In-Store Pickup, you can enable the following notifications:
- Backroom Pick Approaching
- Backroom Pick Expired
- Customer Pick Approaching
- Customer Pick Expired
- Pick Ticket Generate Approaching
- Pick Ticket Generate Expired
- New Order is Waiting to Pick
- For Ship-from Store, you can enable the following notifications:
- Backroom Pick Approaching
- Backroom Pick Expired
- Pack Shipment Approaching
- Pack Shipment Expired
- Pick Ticket Generate Approaching
- Pick Ticket Generate Expired
- New Order is Waiting to Pick
- For Ship-to Store, you can enable the following notifications:
- Backroom Pick Approaching
- Backroom Pick Expired
- Customer Pick Approaching
- Customer Pick Expired
- Pack Shipment Approaching
- Pack Shipment Expired
- Pick Ticket Generate Approaching
- Pick Ticket Generate Expired
- New Order is Waiting to Pick
- For Associate Delivery, you can enable the following notifications:
- Backroom Pick Approaching
- Backroom Pick Expired
- Pack Shipment Approaching
- Pack Shipment Expired
- Delivery Approaching
- Delivery Expired
- Pick Ticket Generate Approaching
- Pick Ticket Generate Expired
- New Order is Waiting to Pick
- When you are finished setting up the Shipment Service Group Configurations, click or tap the Save button.